efx-logo-w-bkg-325px.jpg


Basic EFXTM Terminology


  • Also referred to as the home screen or home menu.
  • The EFXTM Main Menu contains your Devices, Groups and Scenes.
  • EFX Main Menu

  • The EFXTM Control Panel is accessed by tapping on the icon in the top left corner of the EFXTM Main Menu
  • From your EFXTM Control Panel, you can access to your EFXTM Cloud Account, Device Manager Menu, FAQ, and other informational menus.
  • EFX Control Panel Menu

  • The Device Manager menu is accessed off the EFXTM Control Panel.
  • The Device Manager menu provides detailed technical information and the connection status with your EFXTM Device(s).
  • Through your Device Manager you can share EFXTM Device(s) with other users who have signed up with a EFXTM cloud account.
  • EFX Device Manager menu

  • At the time this document was created, an EFXTM Device is either an EFXTM Frame, Smart Socket or Smart Lightbulb. More EFXTM Devices are being developed now.
Picture of EFX Devices

  • The Device Menu provides access to your EFXTM Devices.
  • Picture of EFX Devices Menu

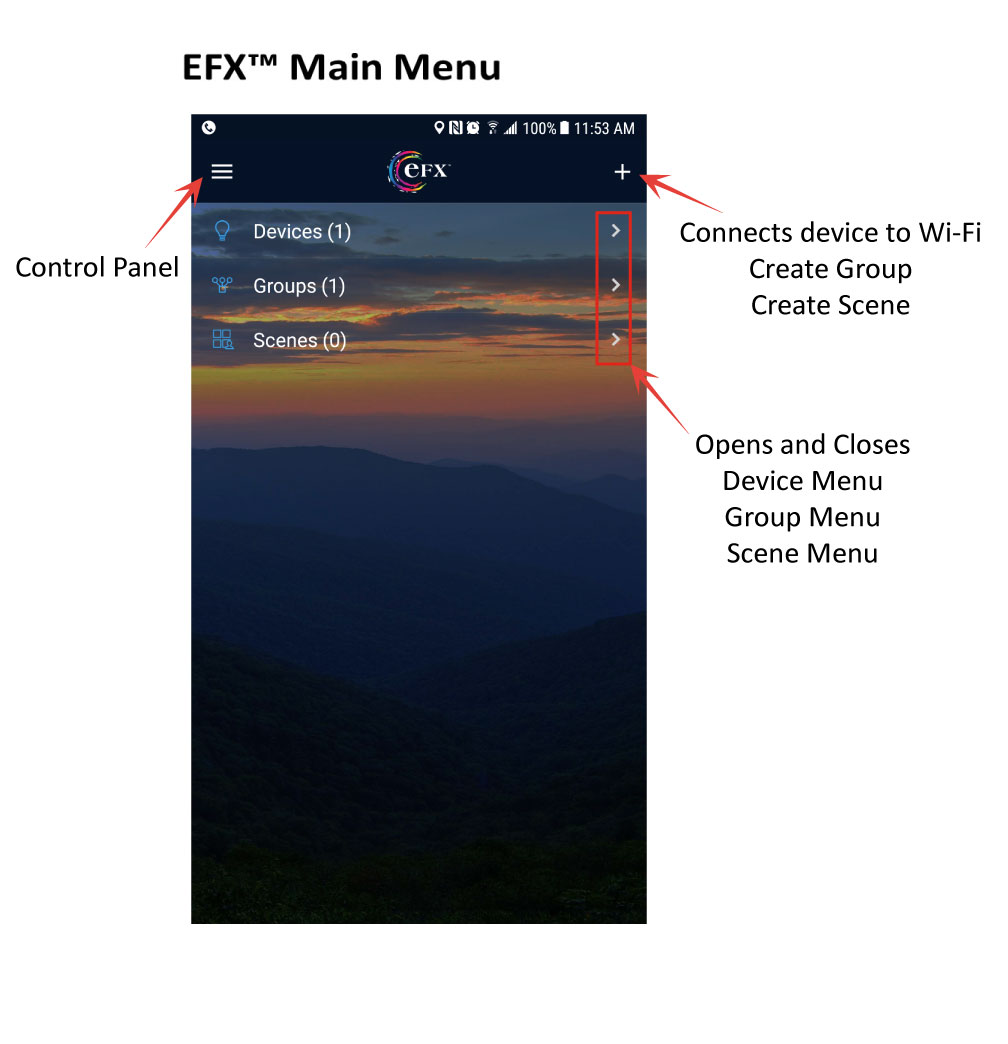
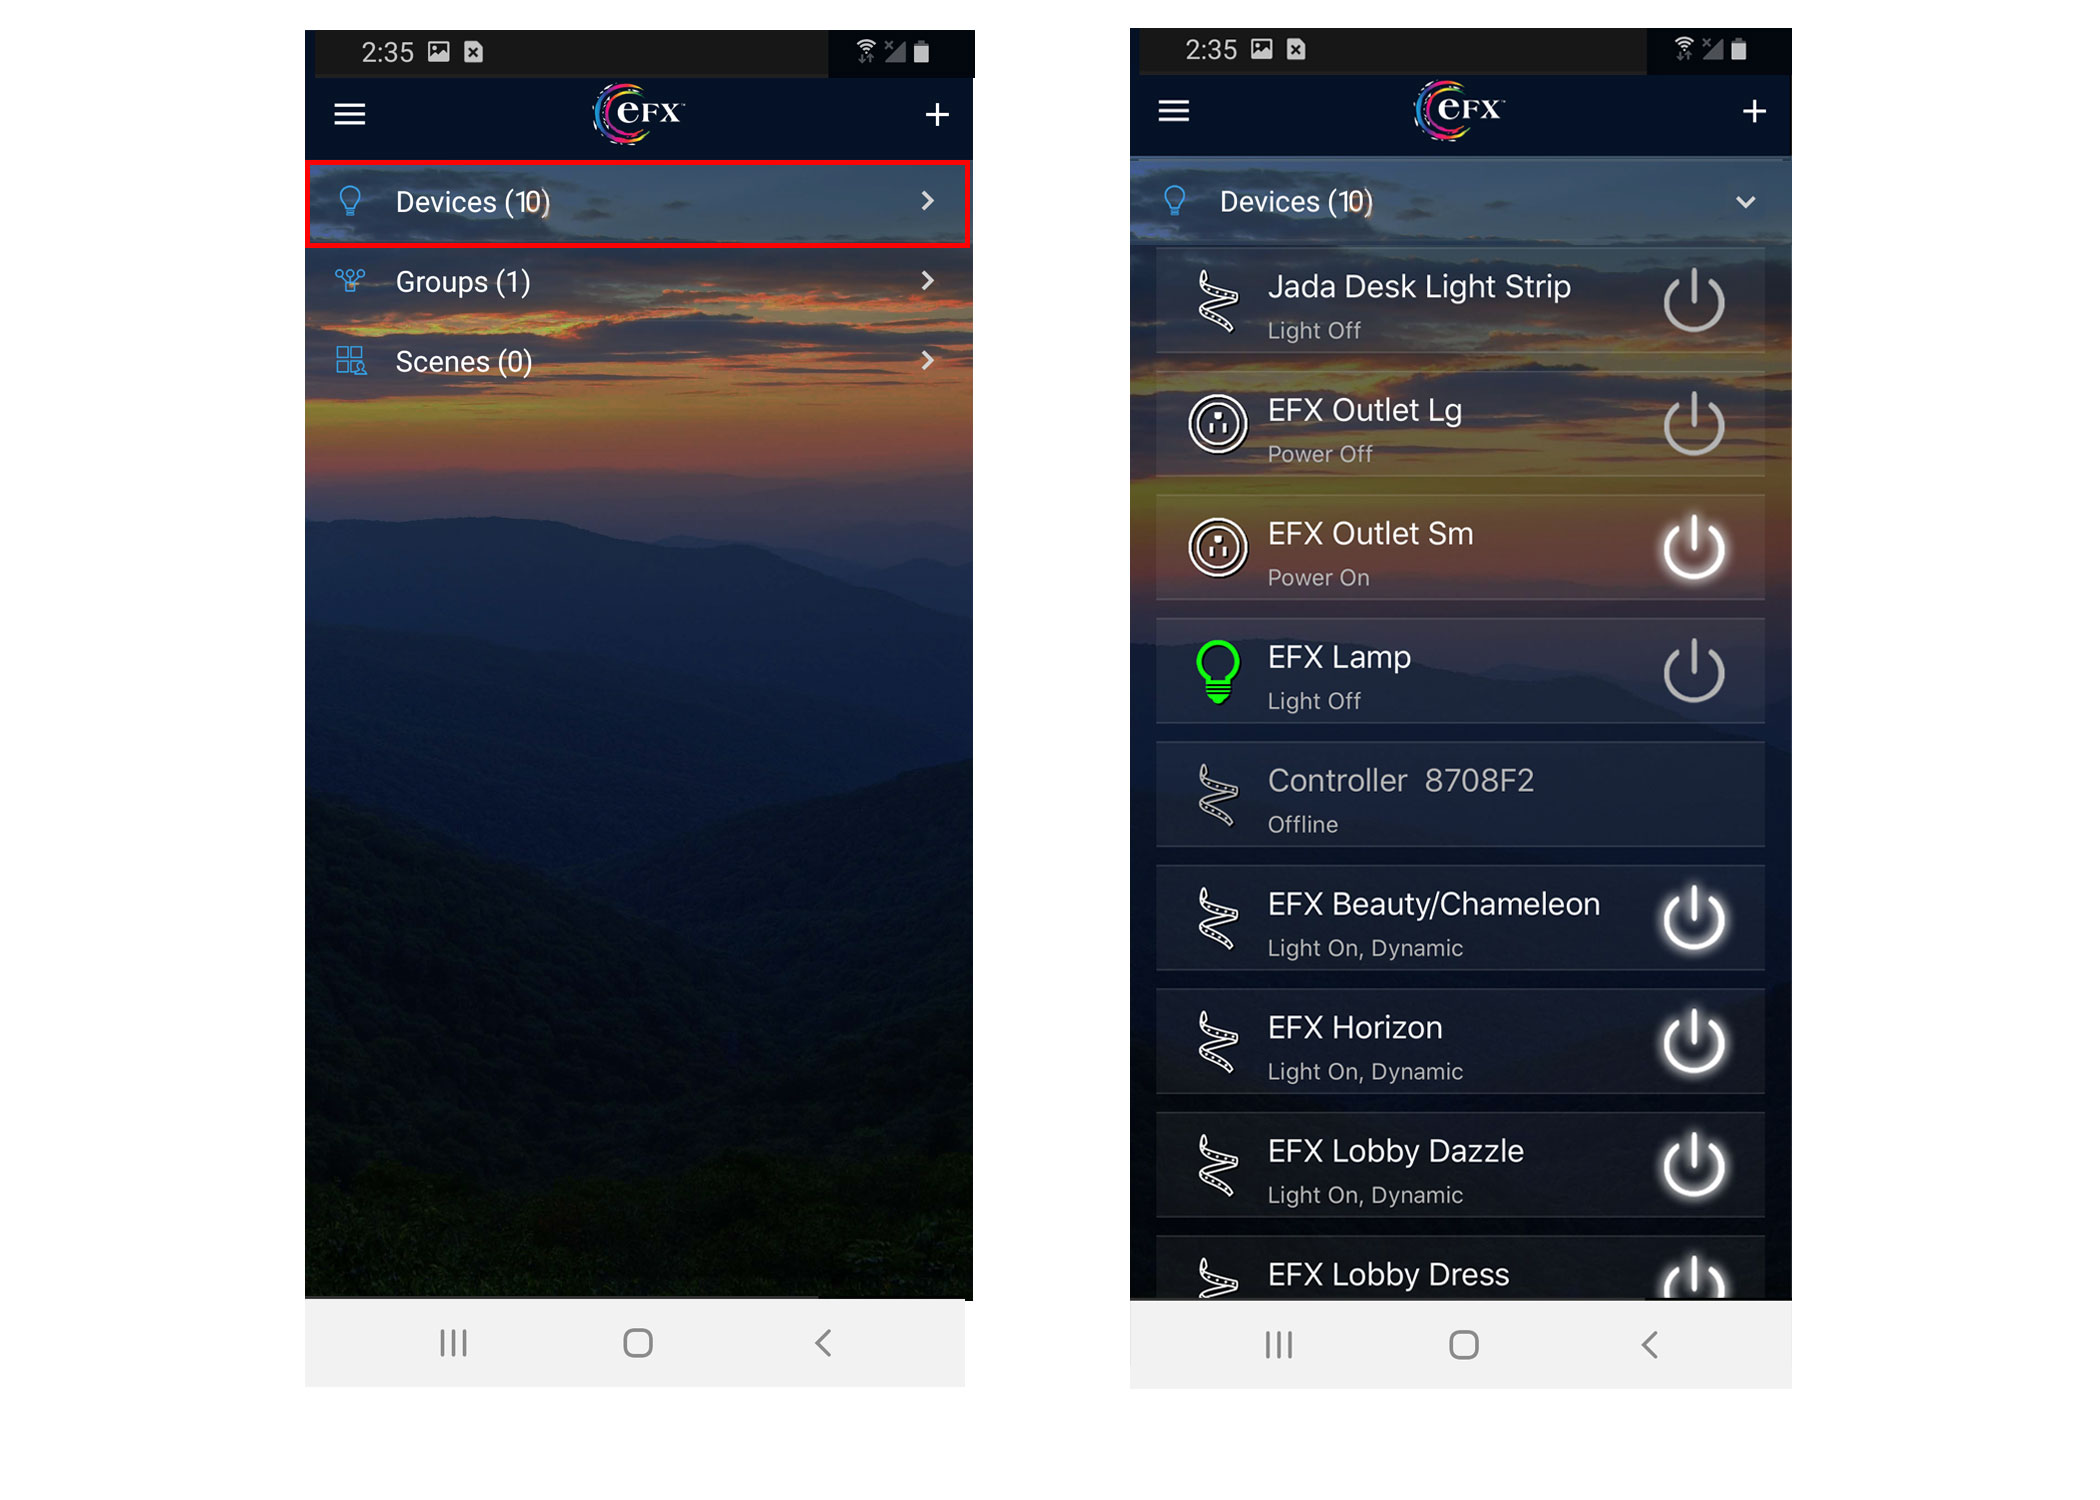
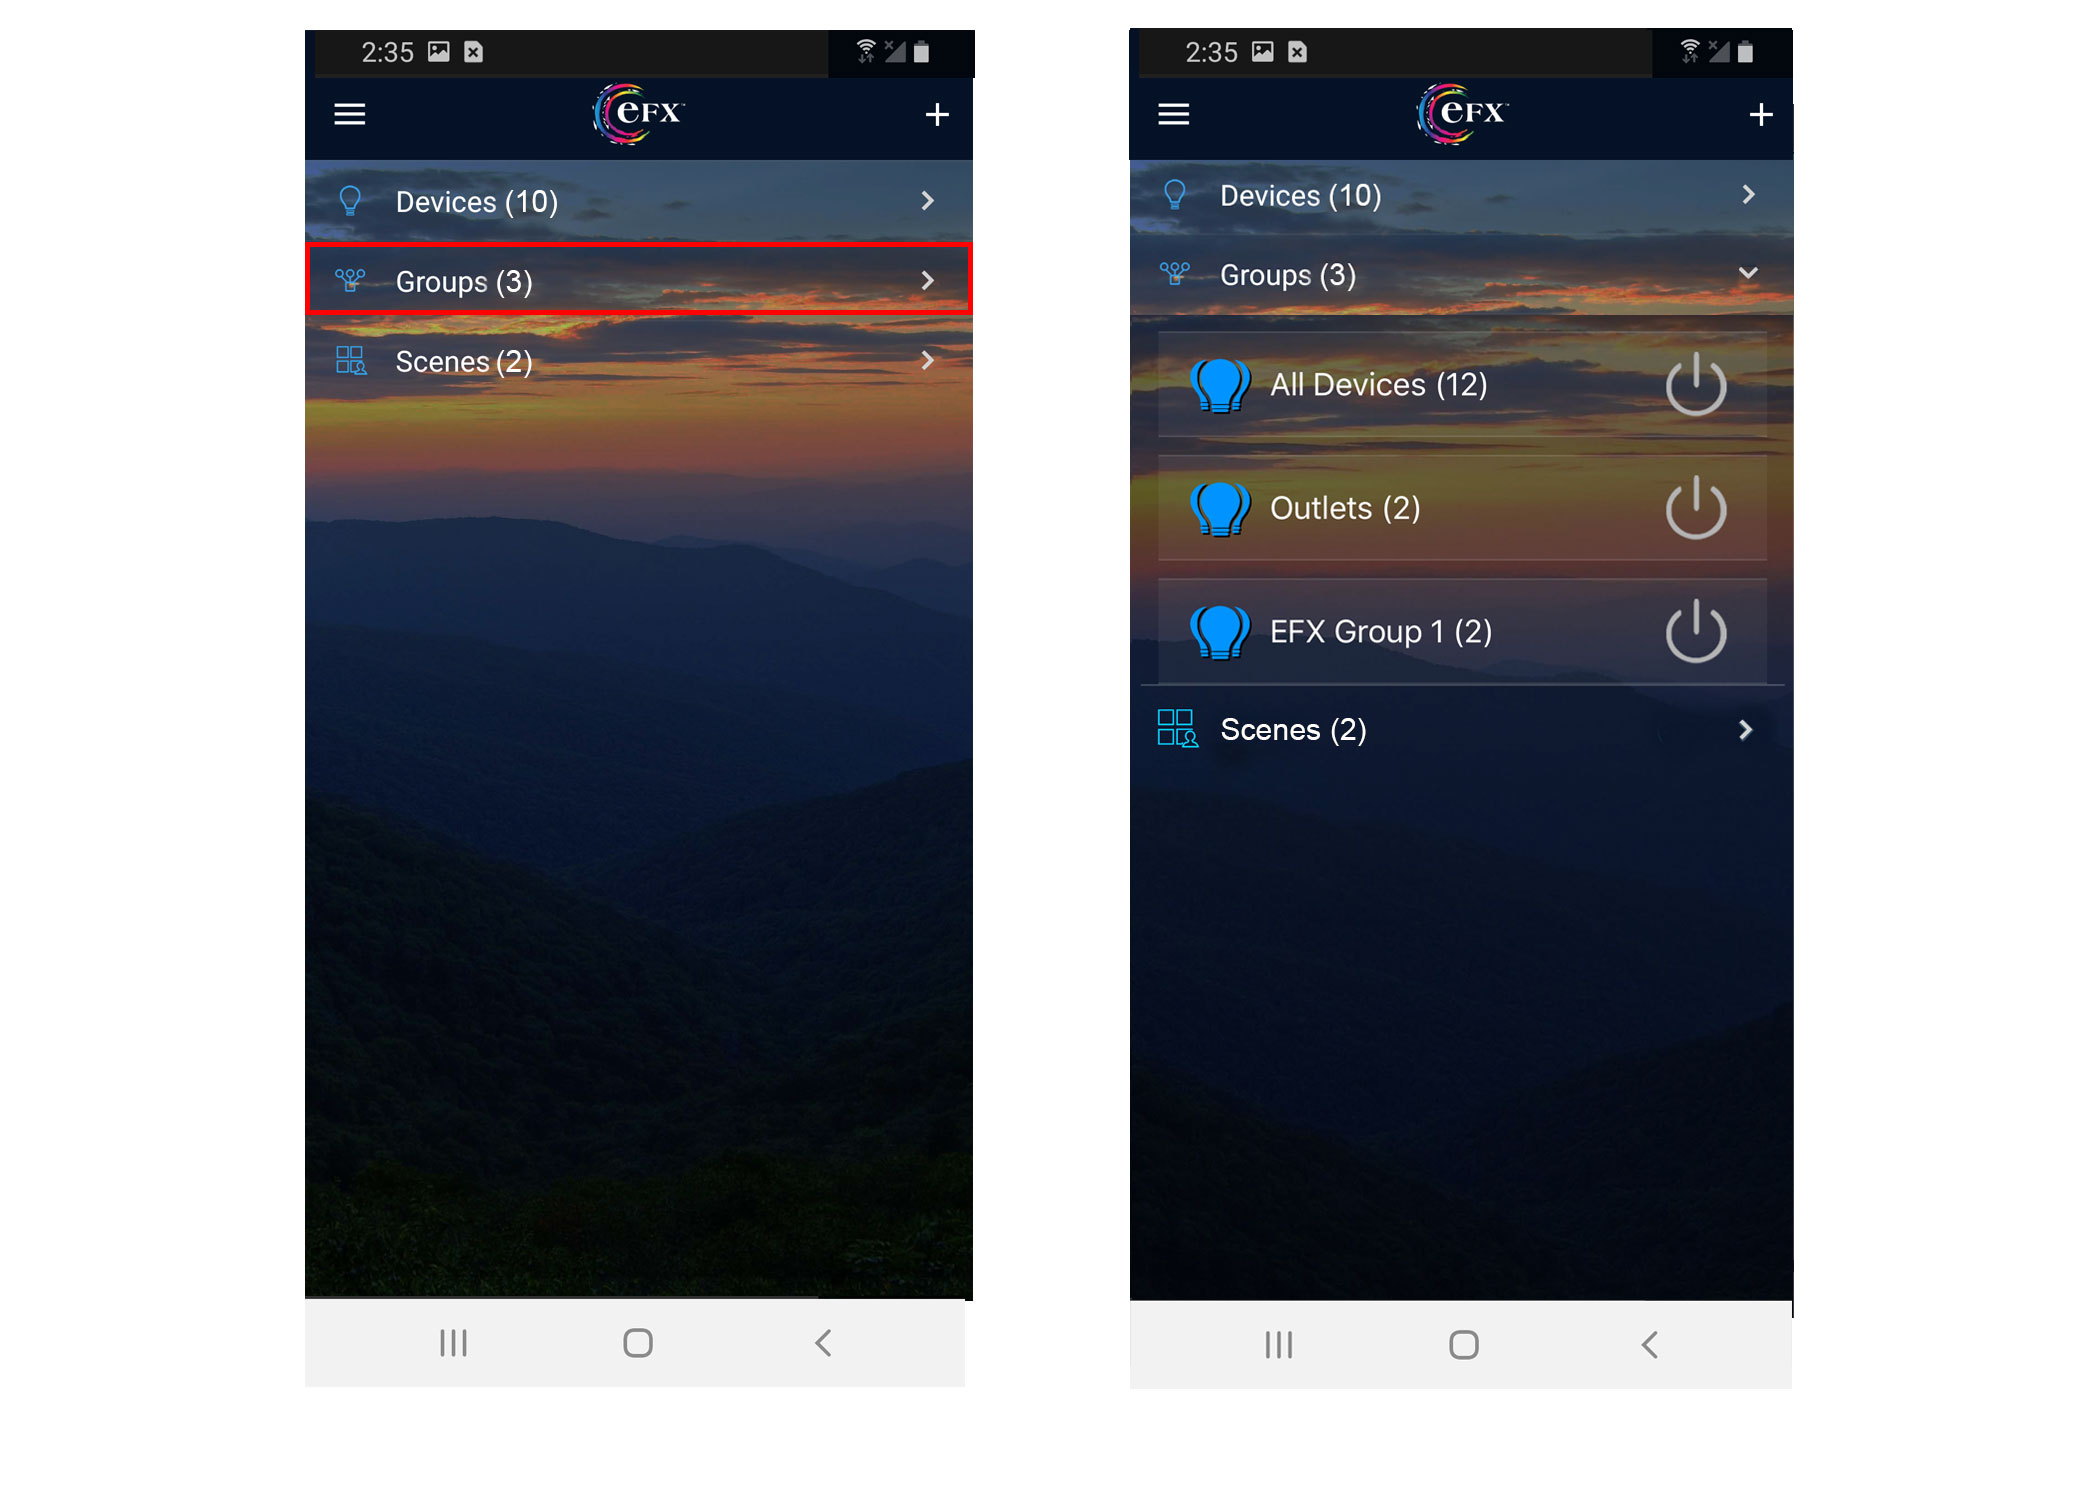
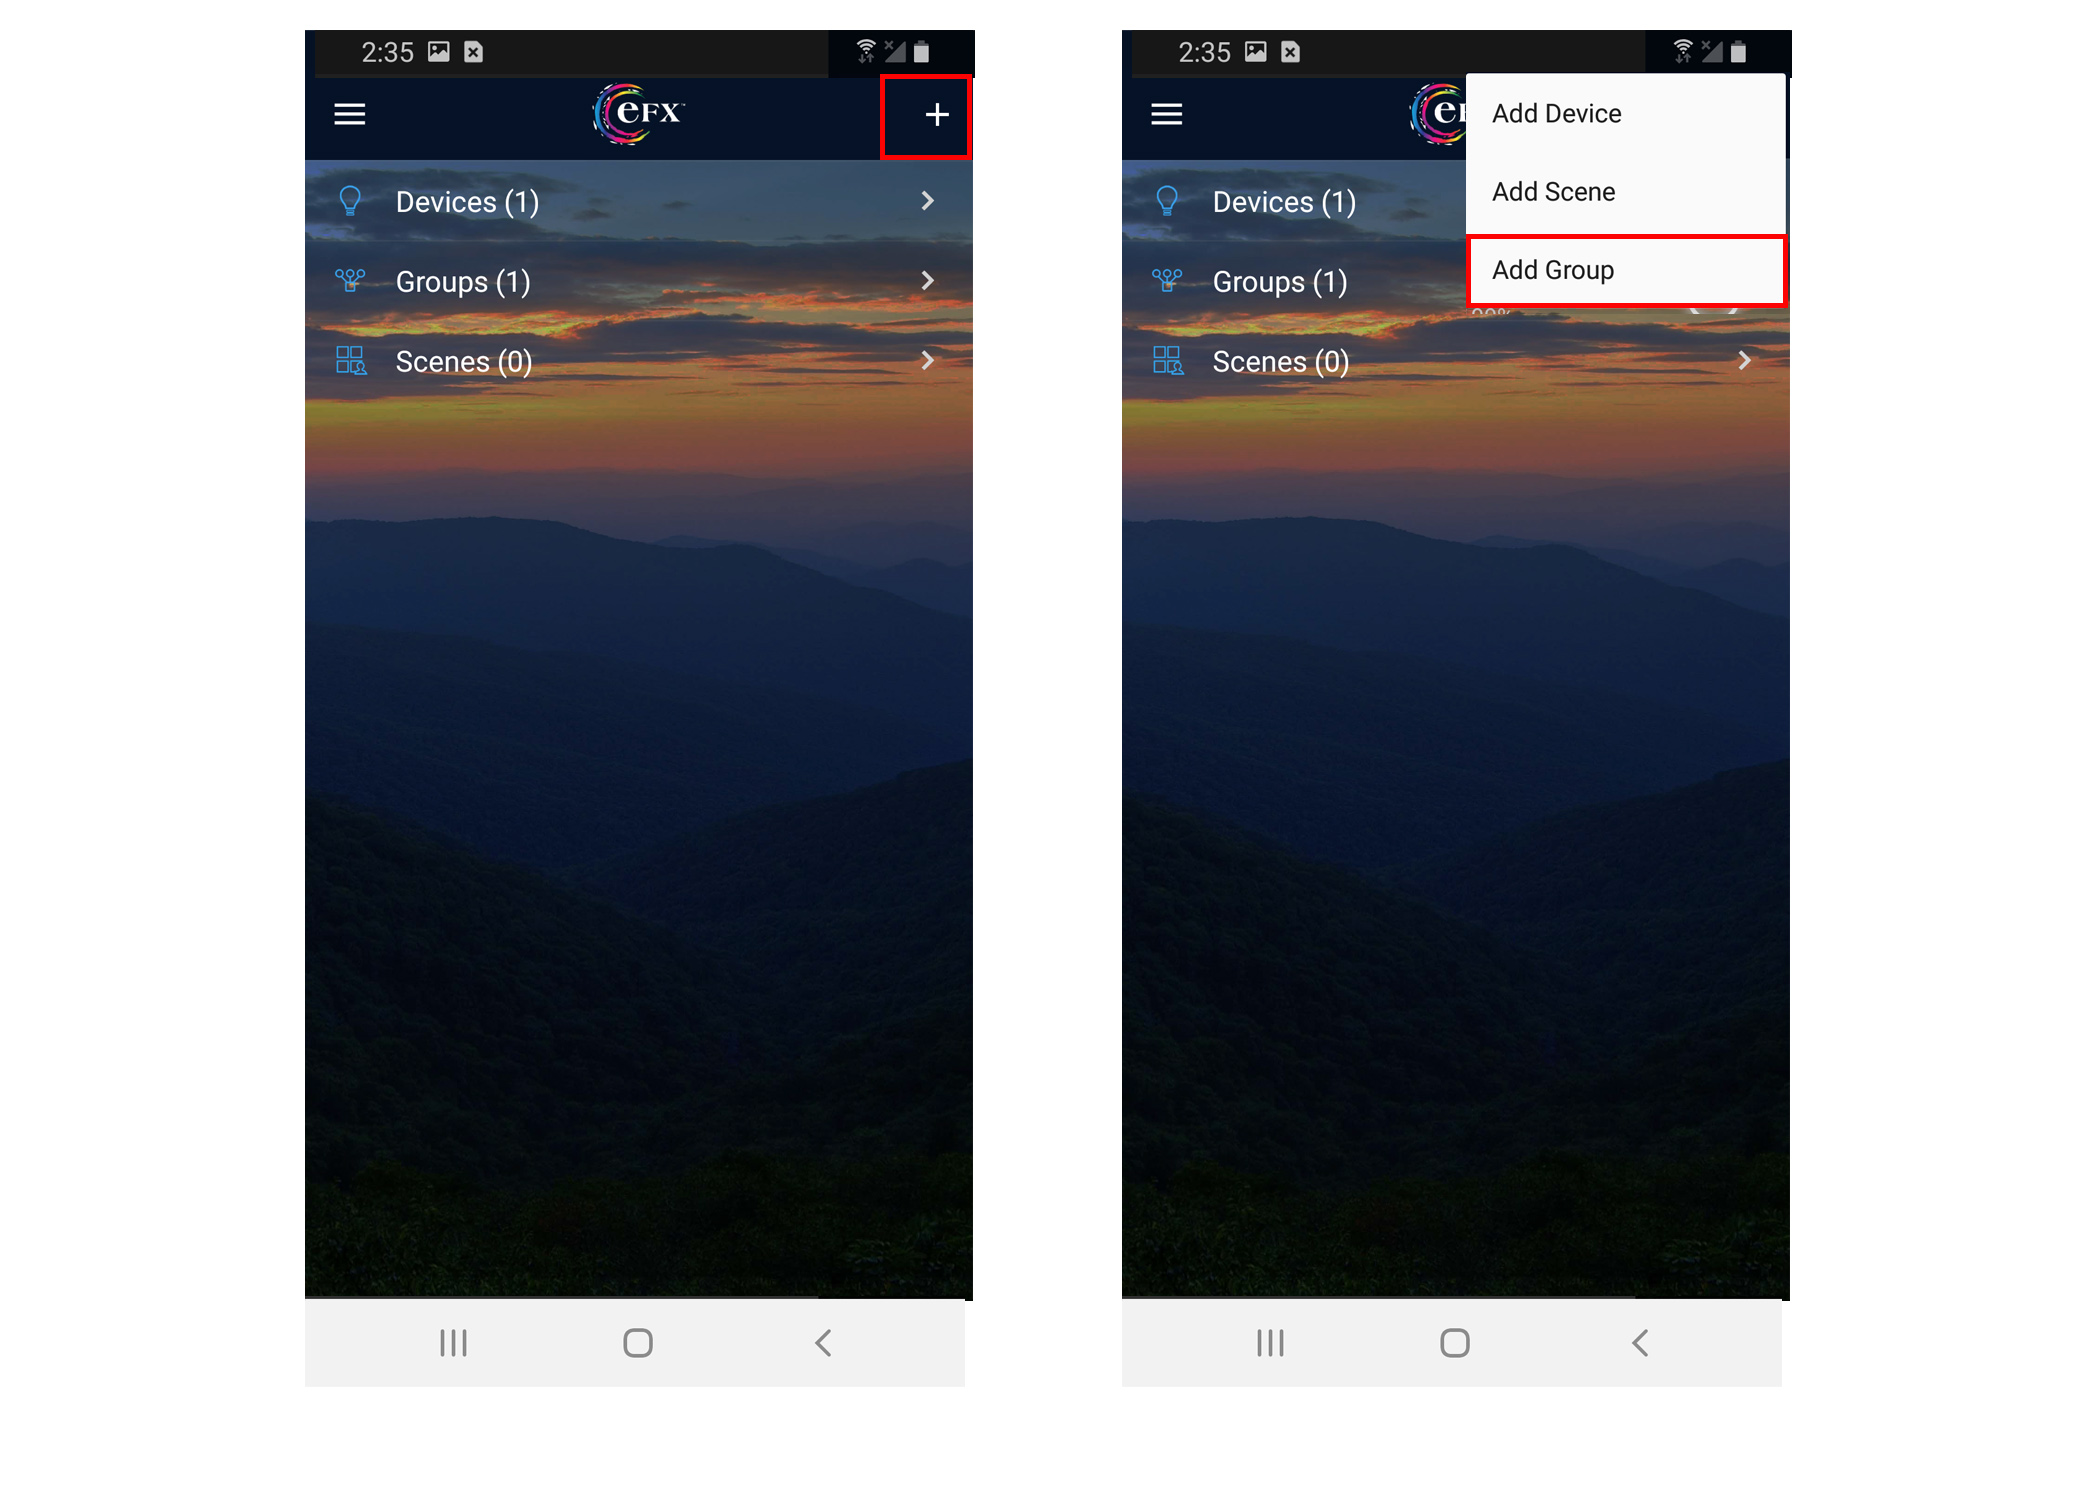
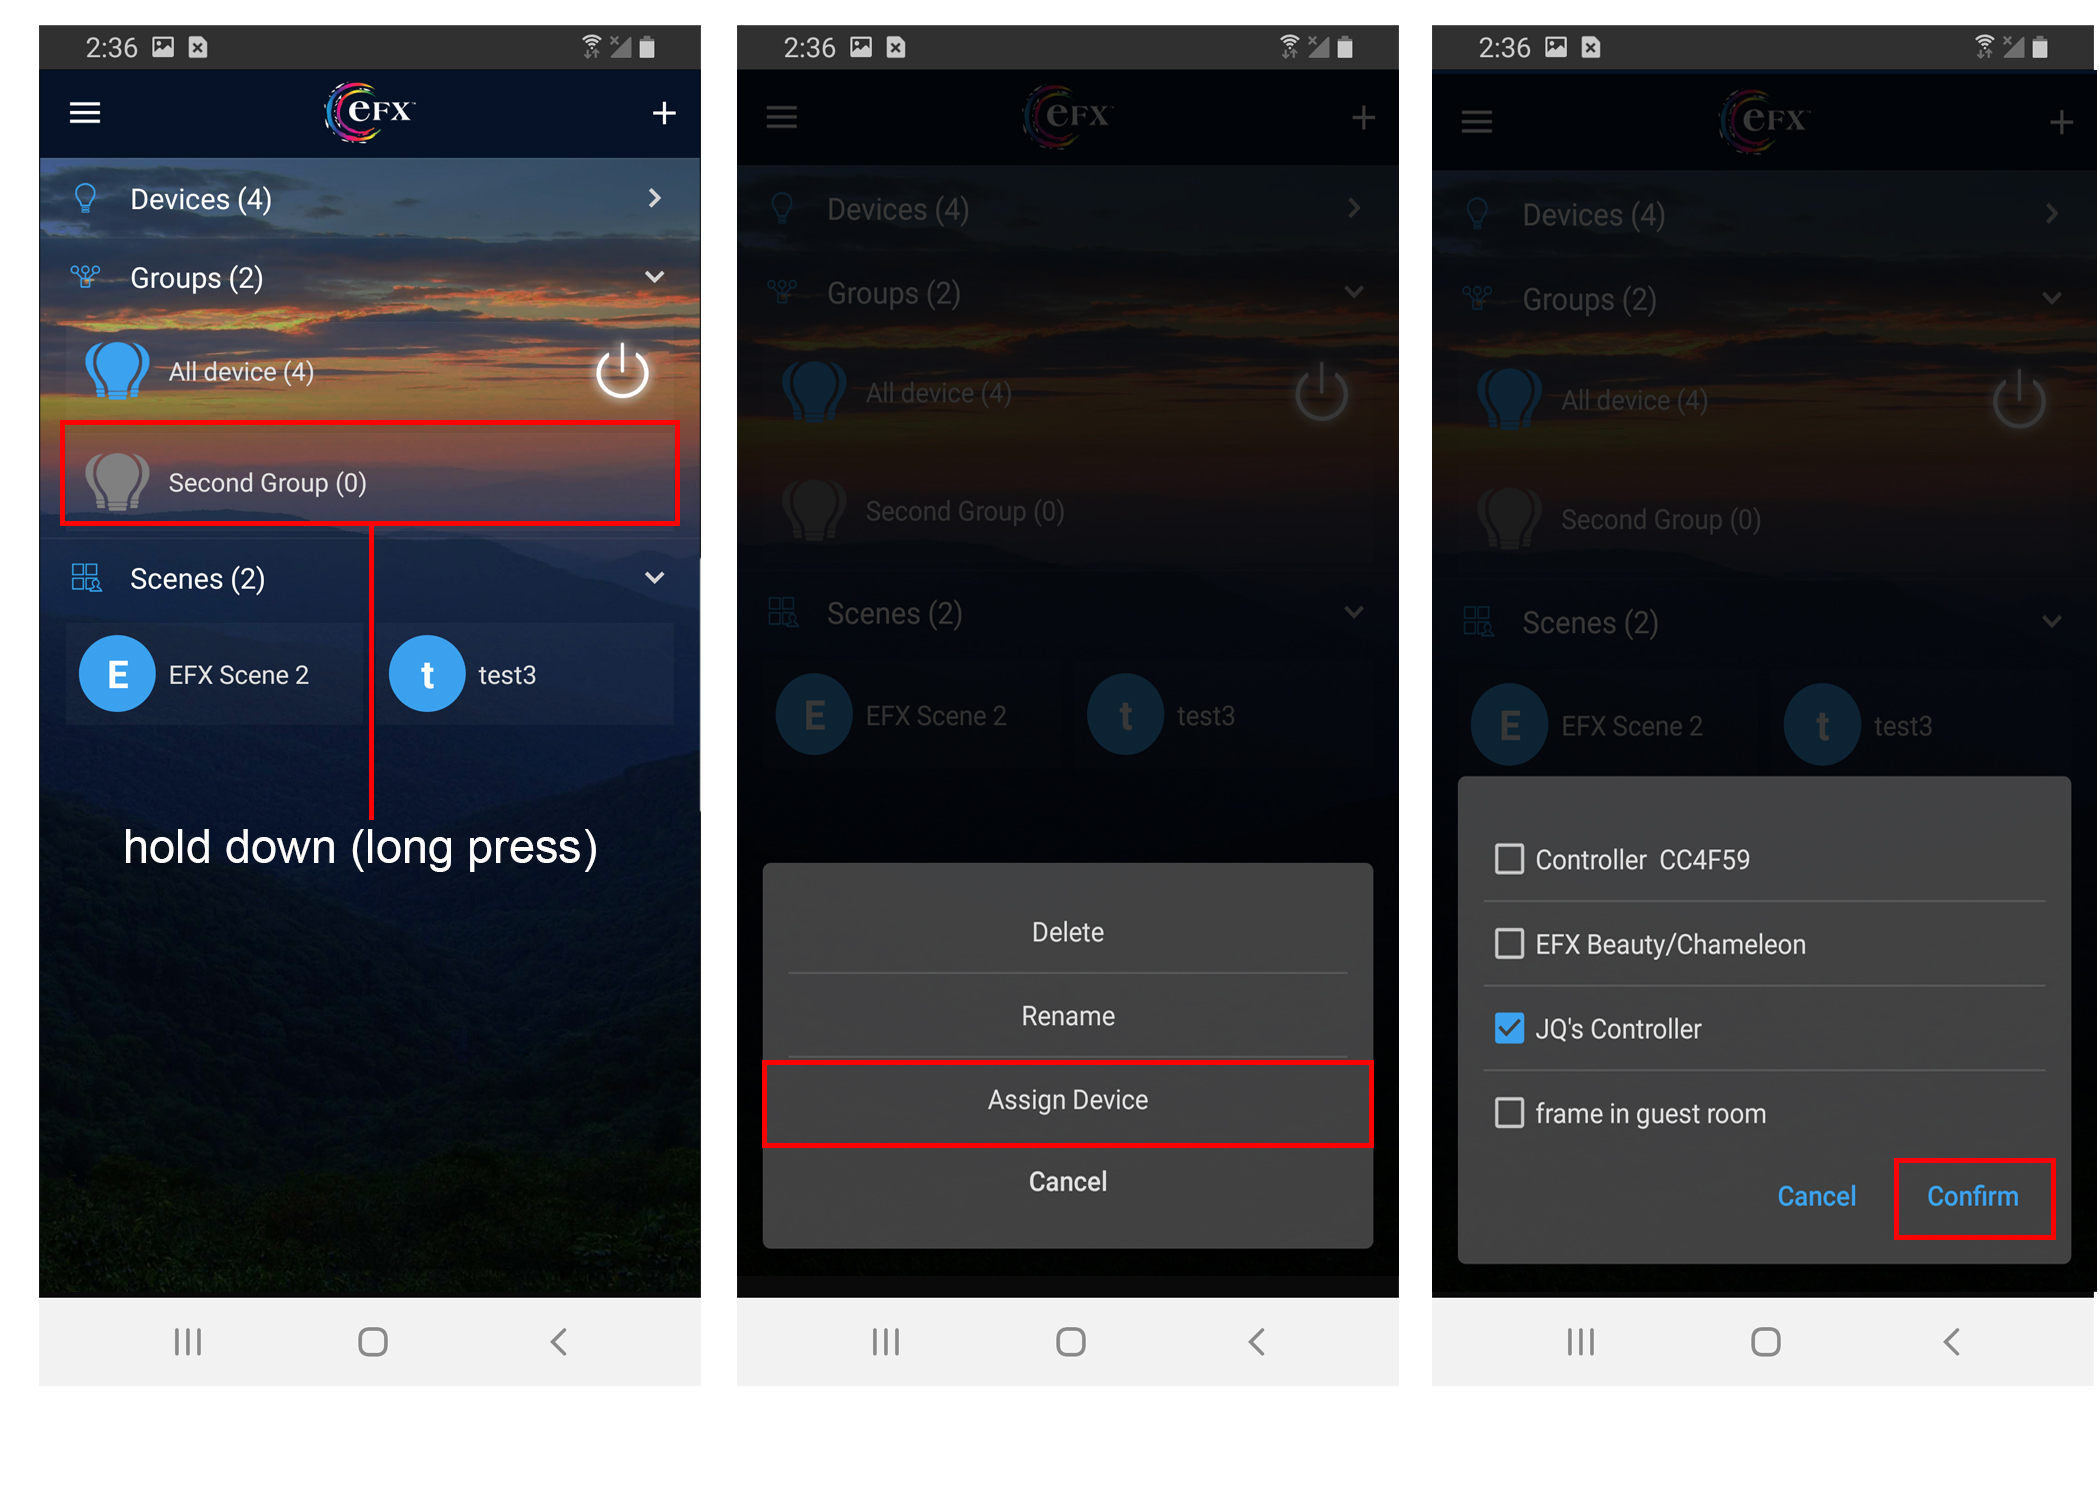
A Group is usually at least two EFXTM Devices that are assigned under a single name (i.e. group name).

For example:

  • A user could assign multiple EFXTM Devices in a room of a building, office, or house, and you could then control the group with a single action.
  • Picture of EFX Groups Menu

  • A Scene is usually at least two EFXTM Devices that are programmed to run synchronously with each other. For example, you can create a scene where one EFXTM Device turns red in color and another Device runs your custom color pattern you have designed, and a third Device could strobe a purple light. That would probably be a weird "scene", but I the scene function is designed to give you a lot of control with your devices.

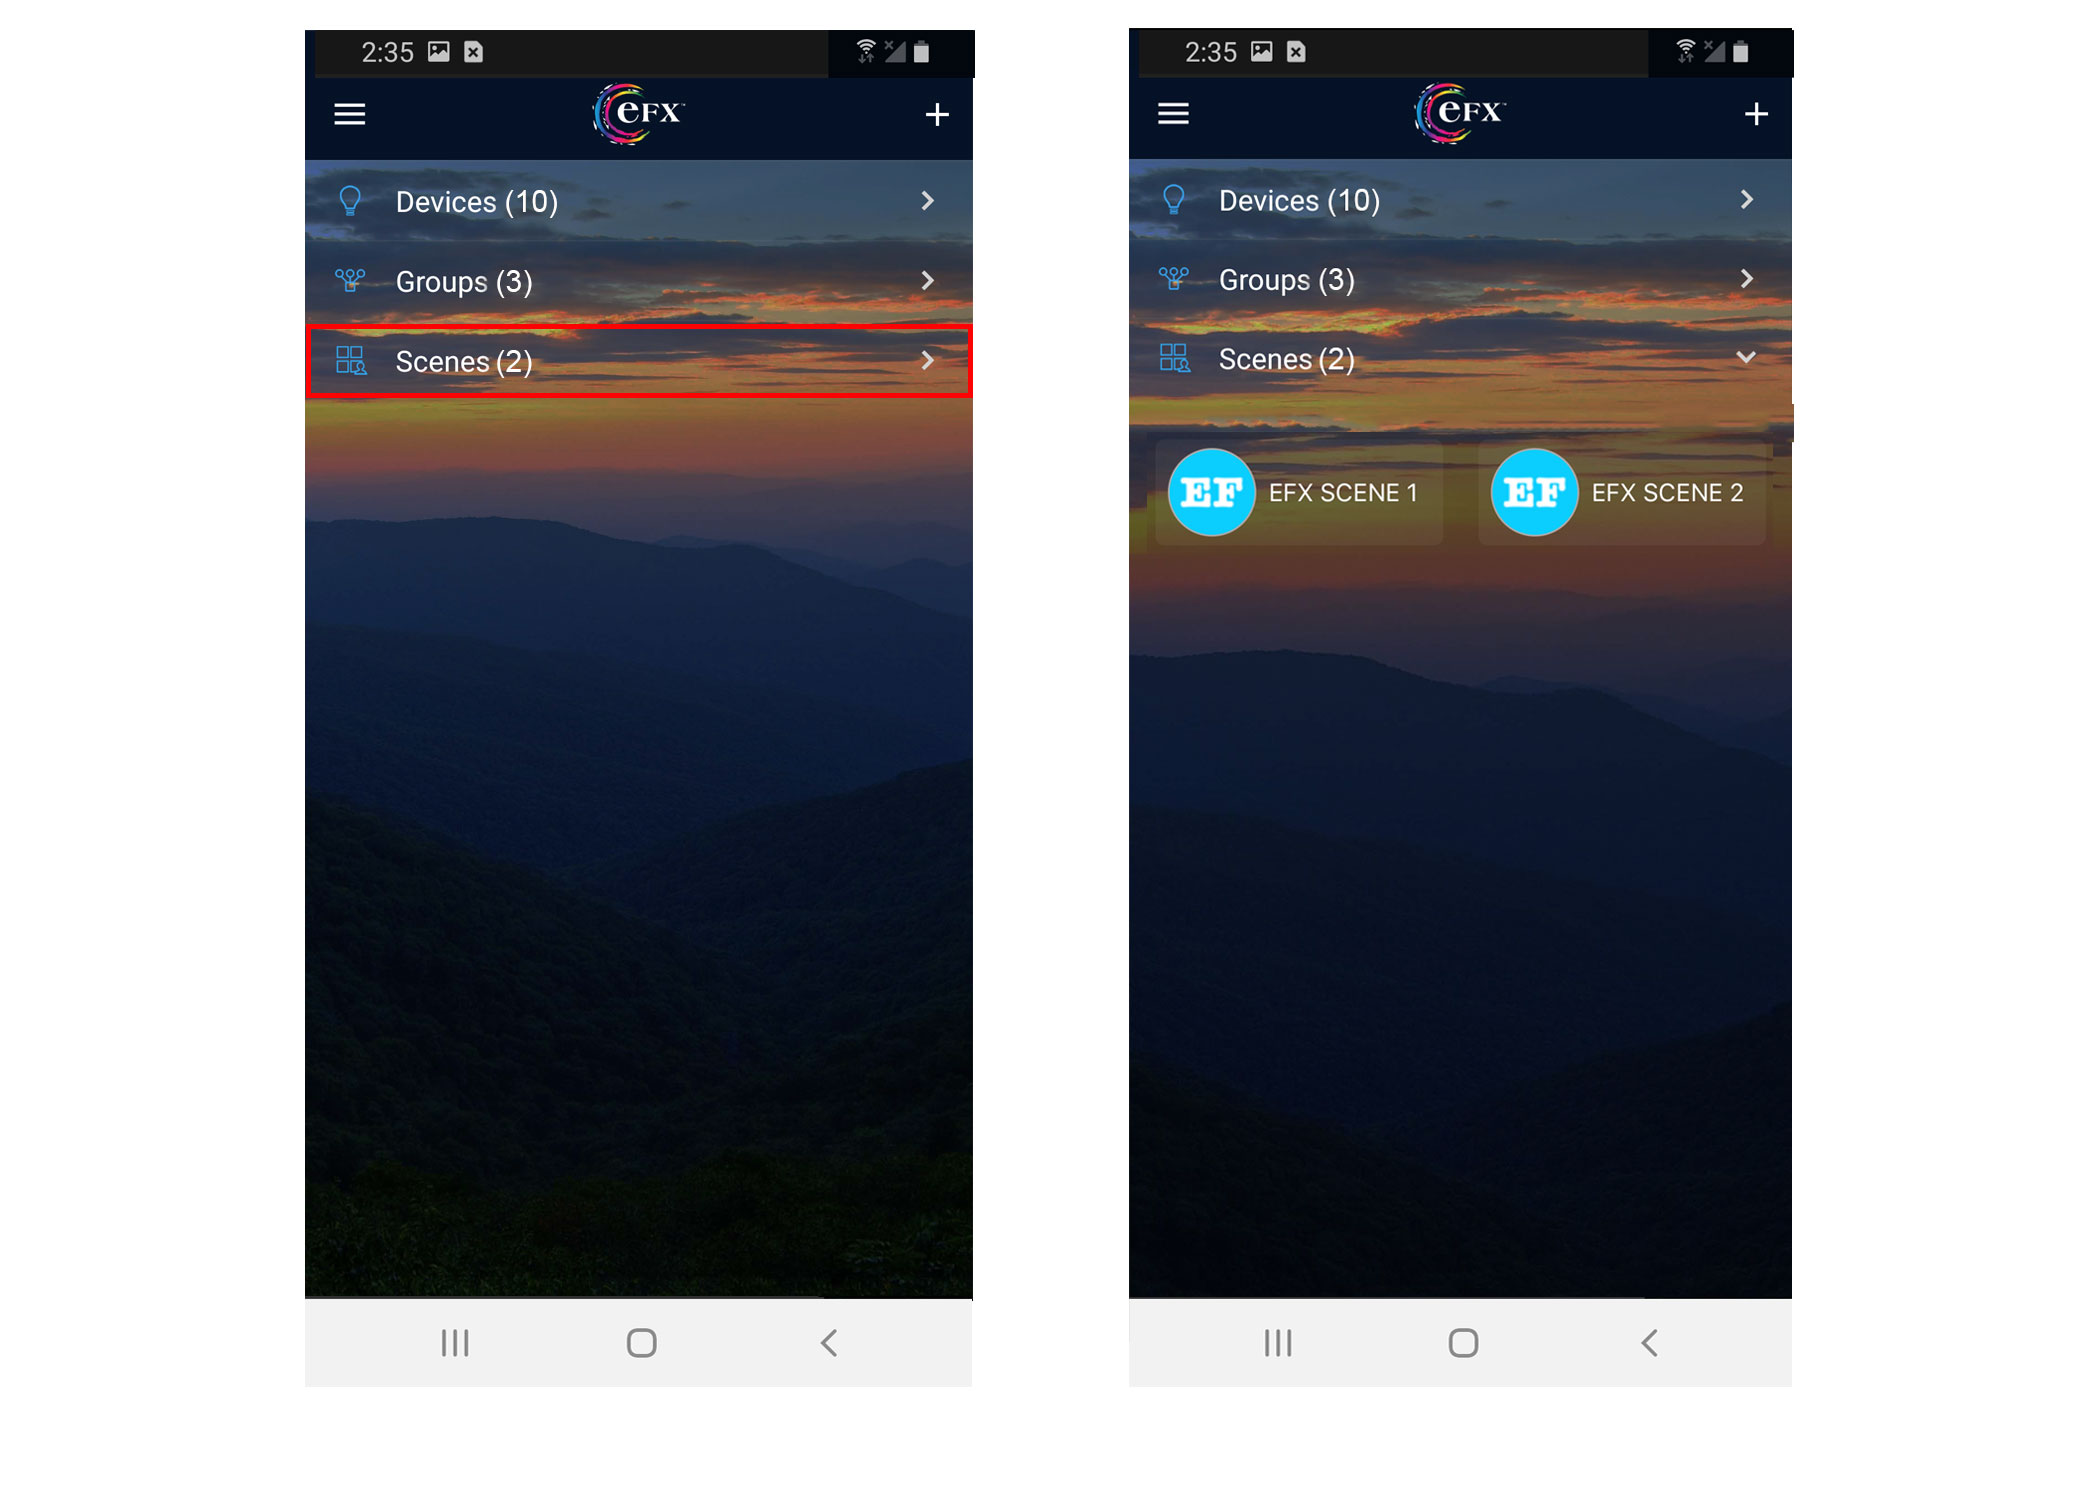
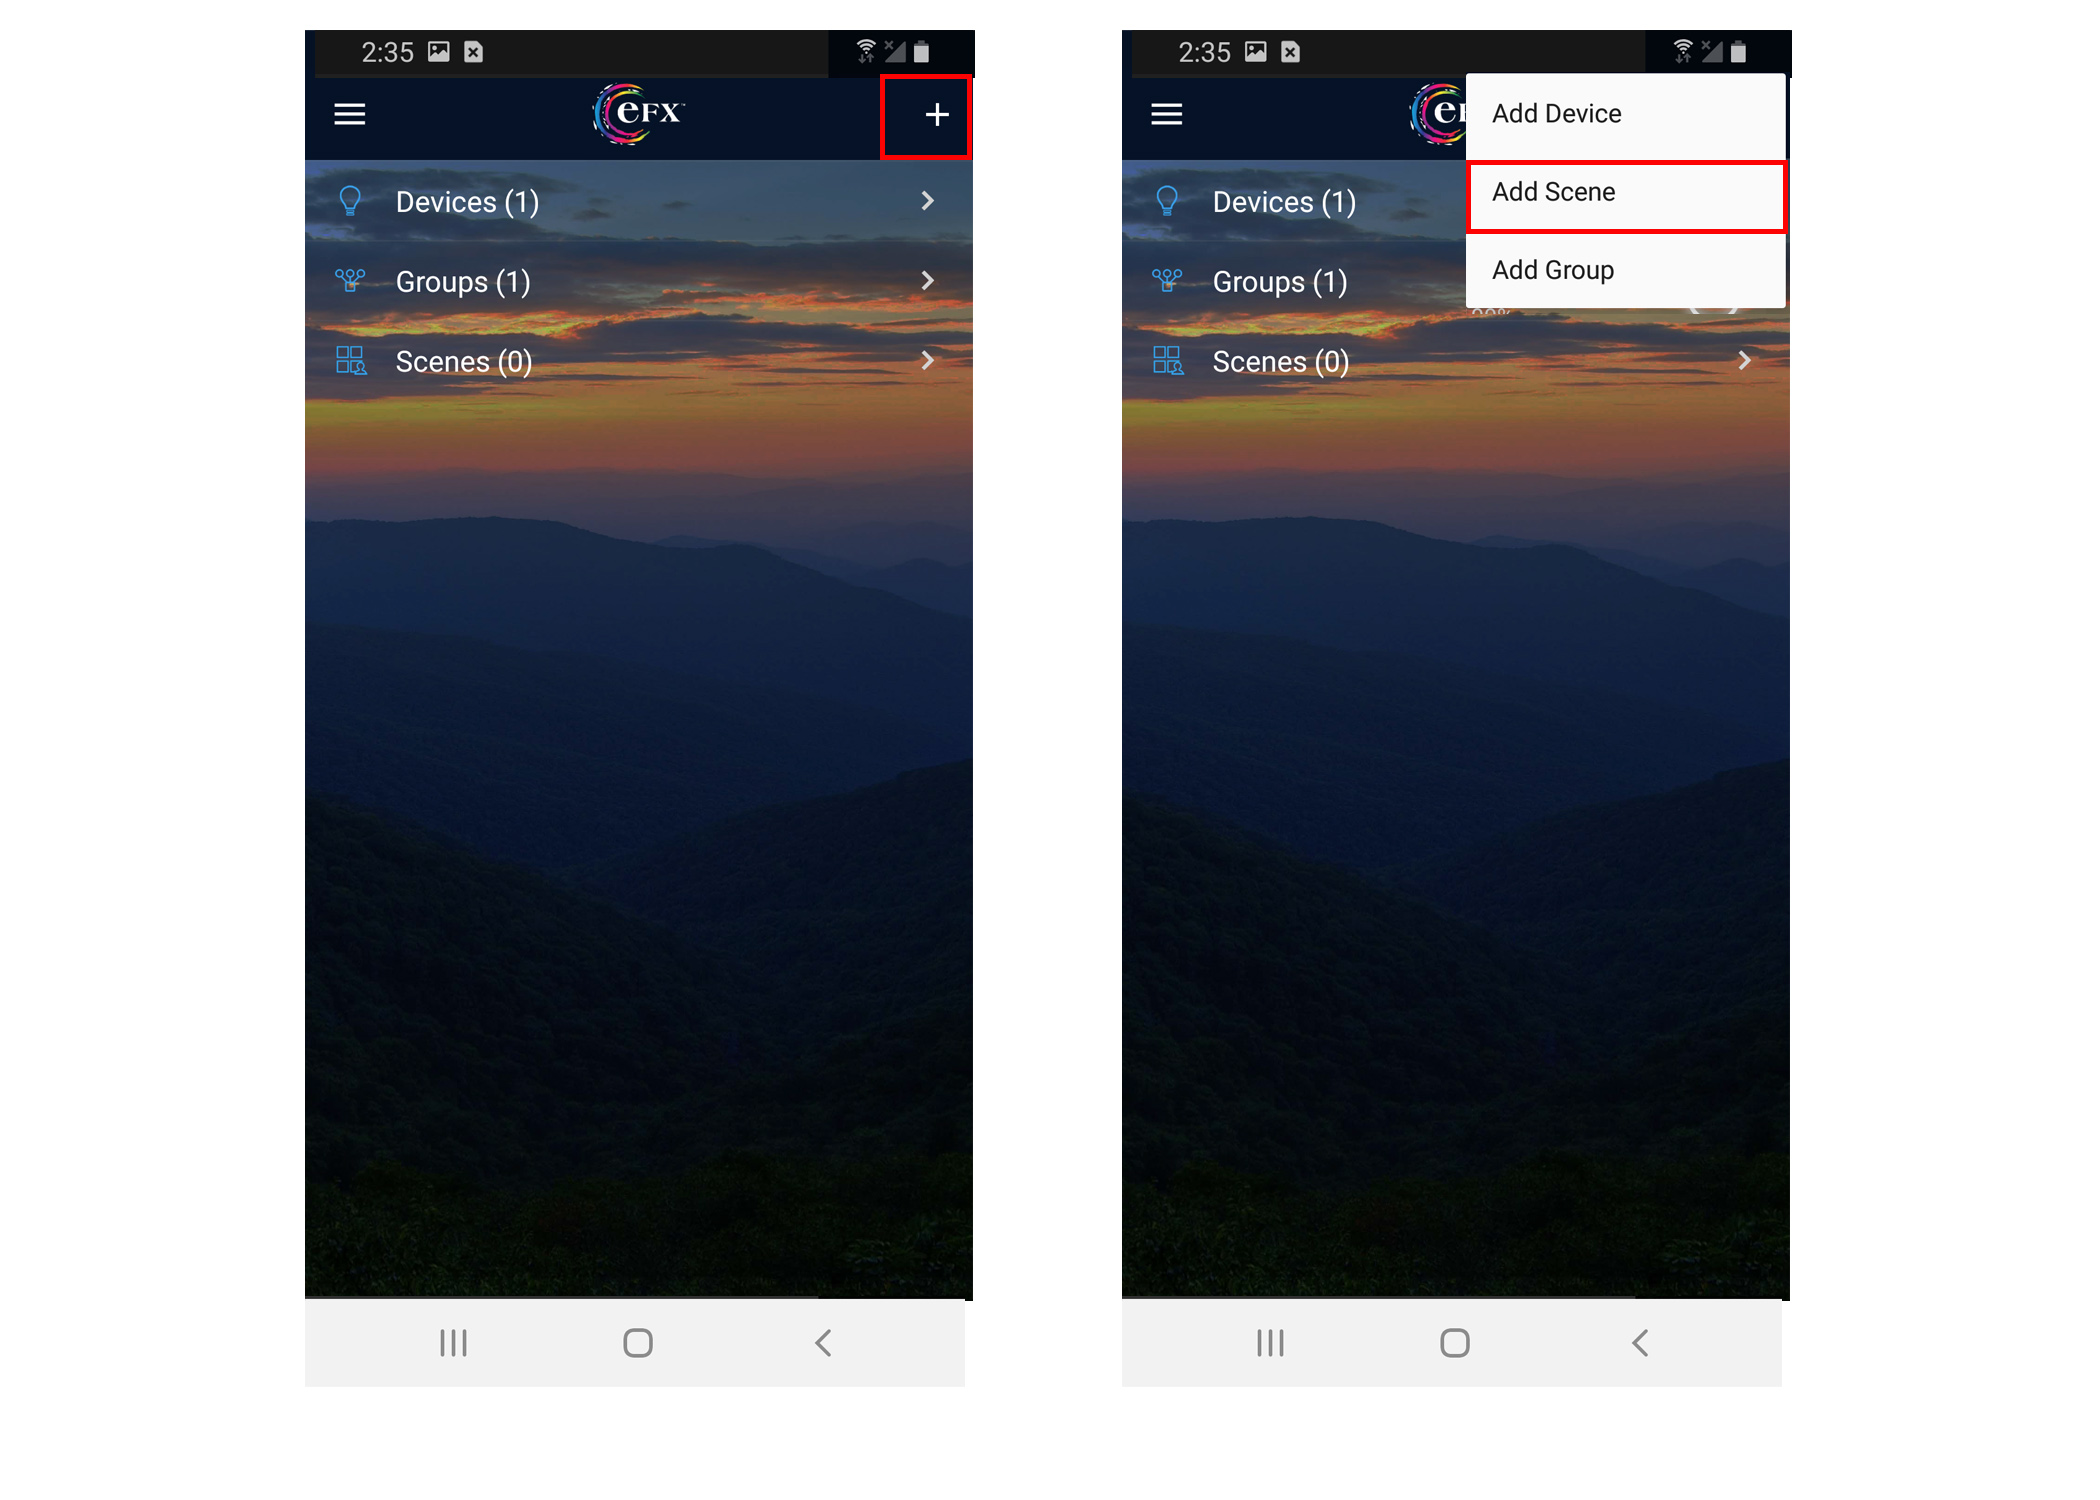
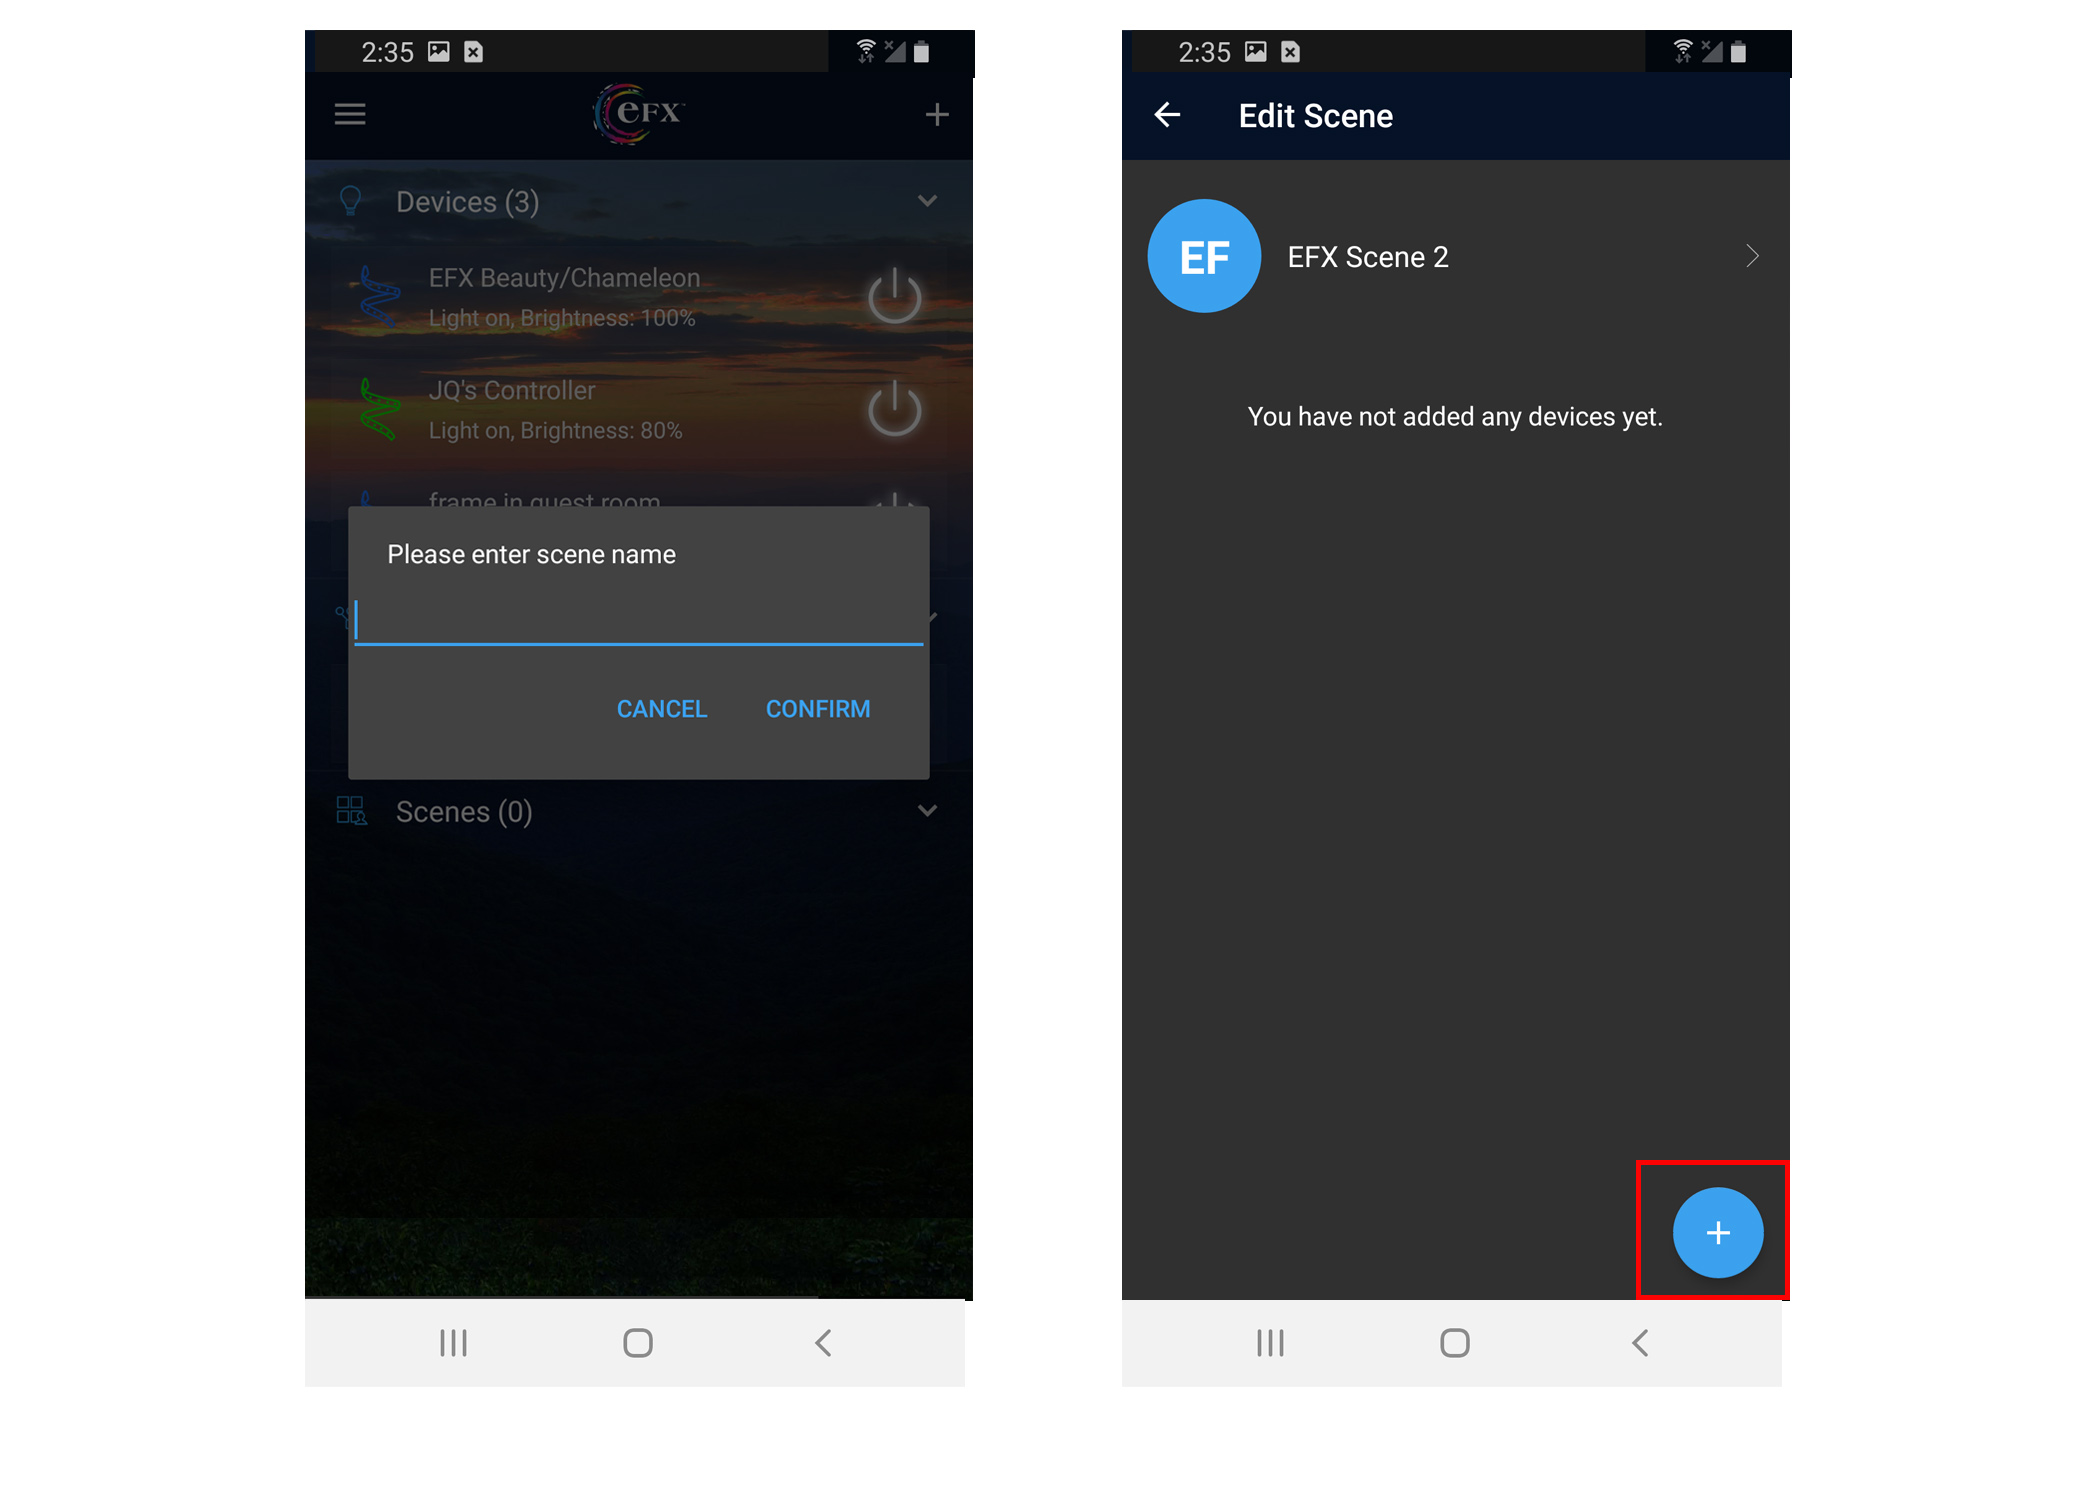
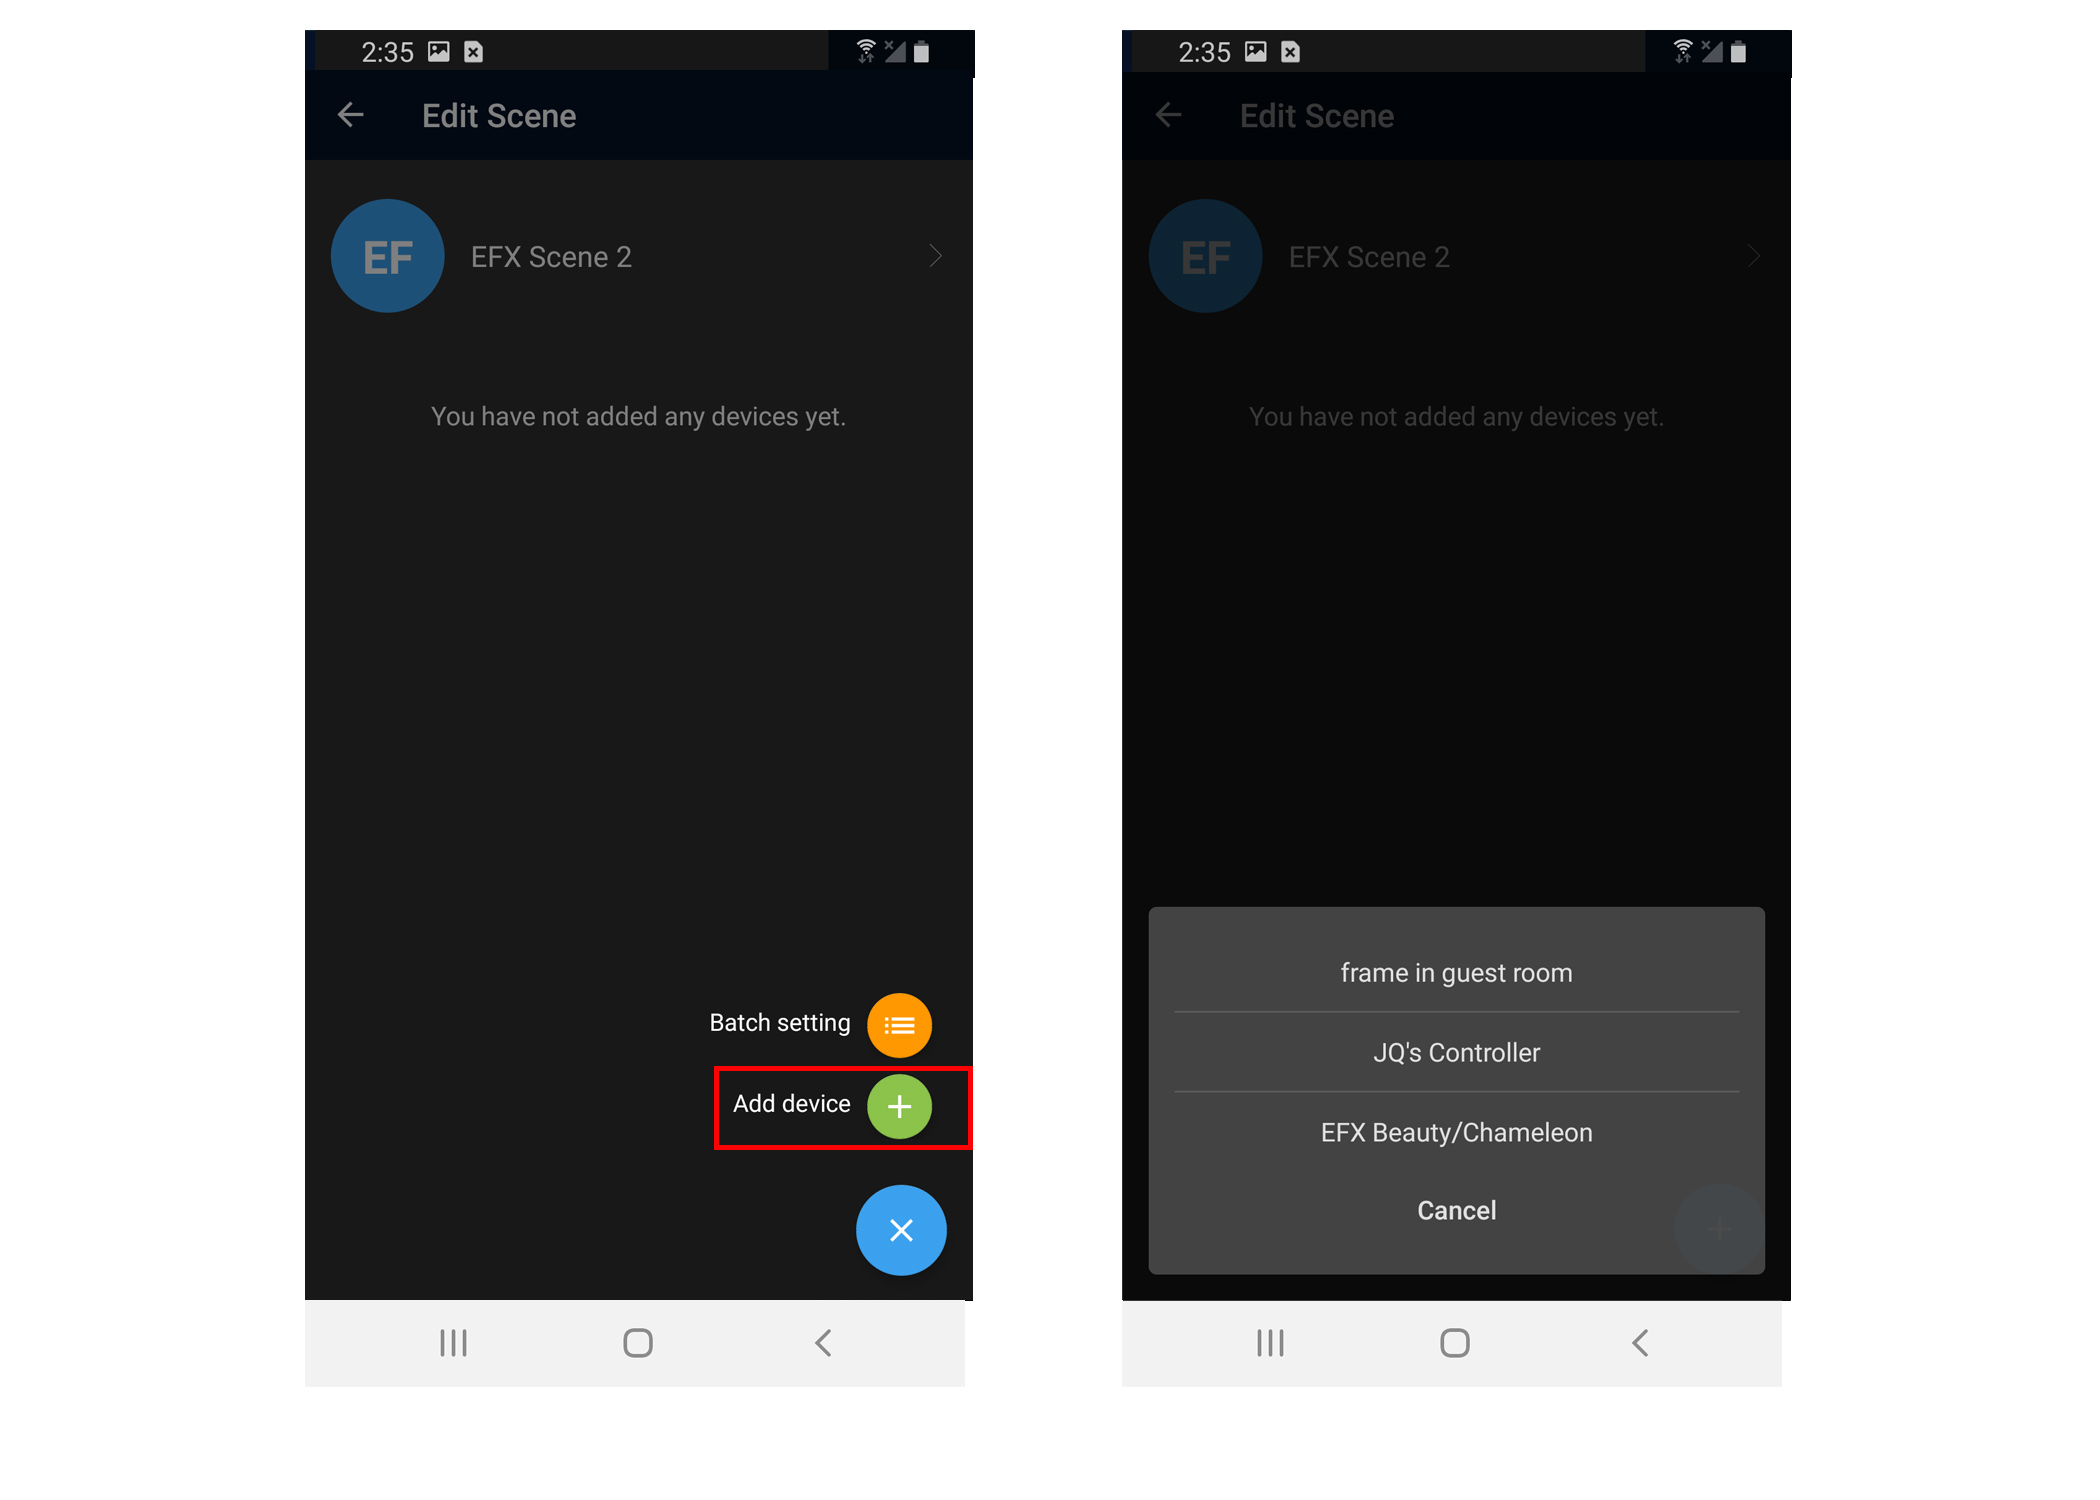
Scenes could be designed to link multiple EFXTM Devices together in order to run a set color pattern at the same time by touching that Scene icon or even by a voice command to your Amazon Alexa or Google Home Assistant.

Picture of EFX Scenes Menu


How To Use the EFXTM App Menus


Overview
  • Upon starting the EFXTM App, it will automatically attempt to connect to all your previously connected EFXTM Devices.
  • A listing of all the Devices the App was able to connect to will be listed on the Main Menu under the heading called “Devices”.
Picture of EFX Devices menu How to Use
  • From the main menu, a user can control the device by turning on or off the device.
  • After selecting the EFXTM Device, you will be able to access more advance features such as color control, custom color functions, music and microphone synchronization*, and camera color selection.
Picture of Devices EFX apps Menu

*Note Music and Mic functionality ONLY work if both your smartphone and the EFX™ Device are connected to the same Wi-Fi network (i.e. router)
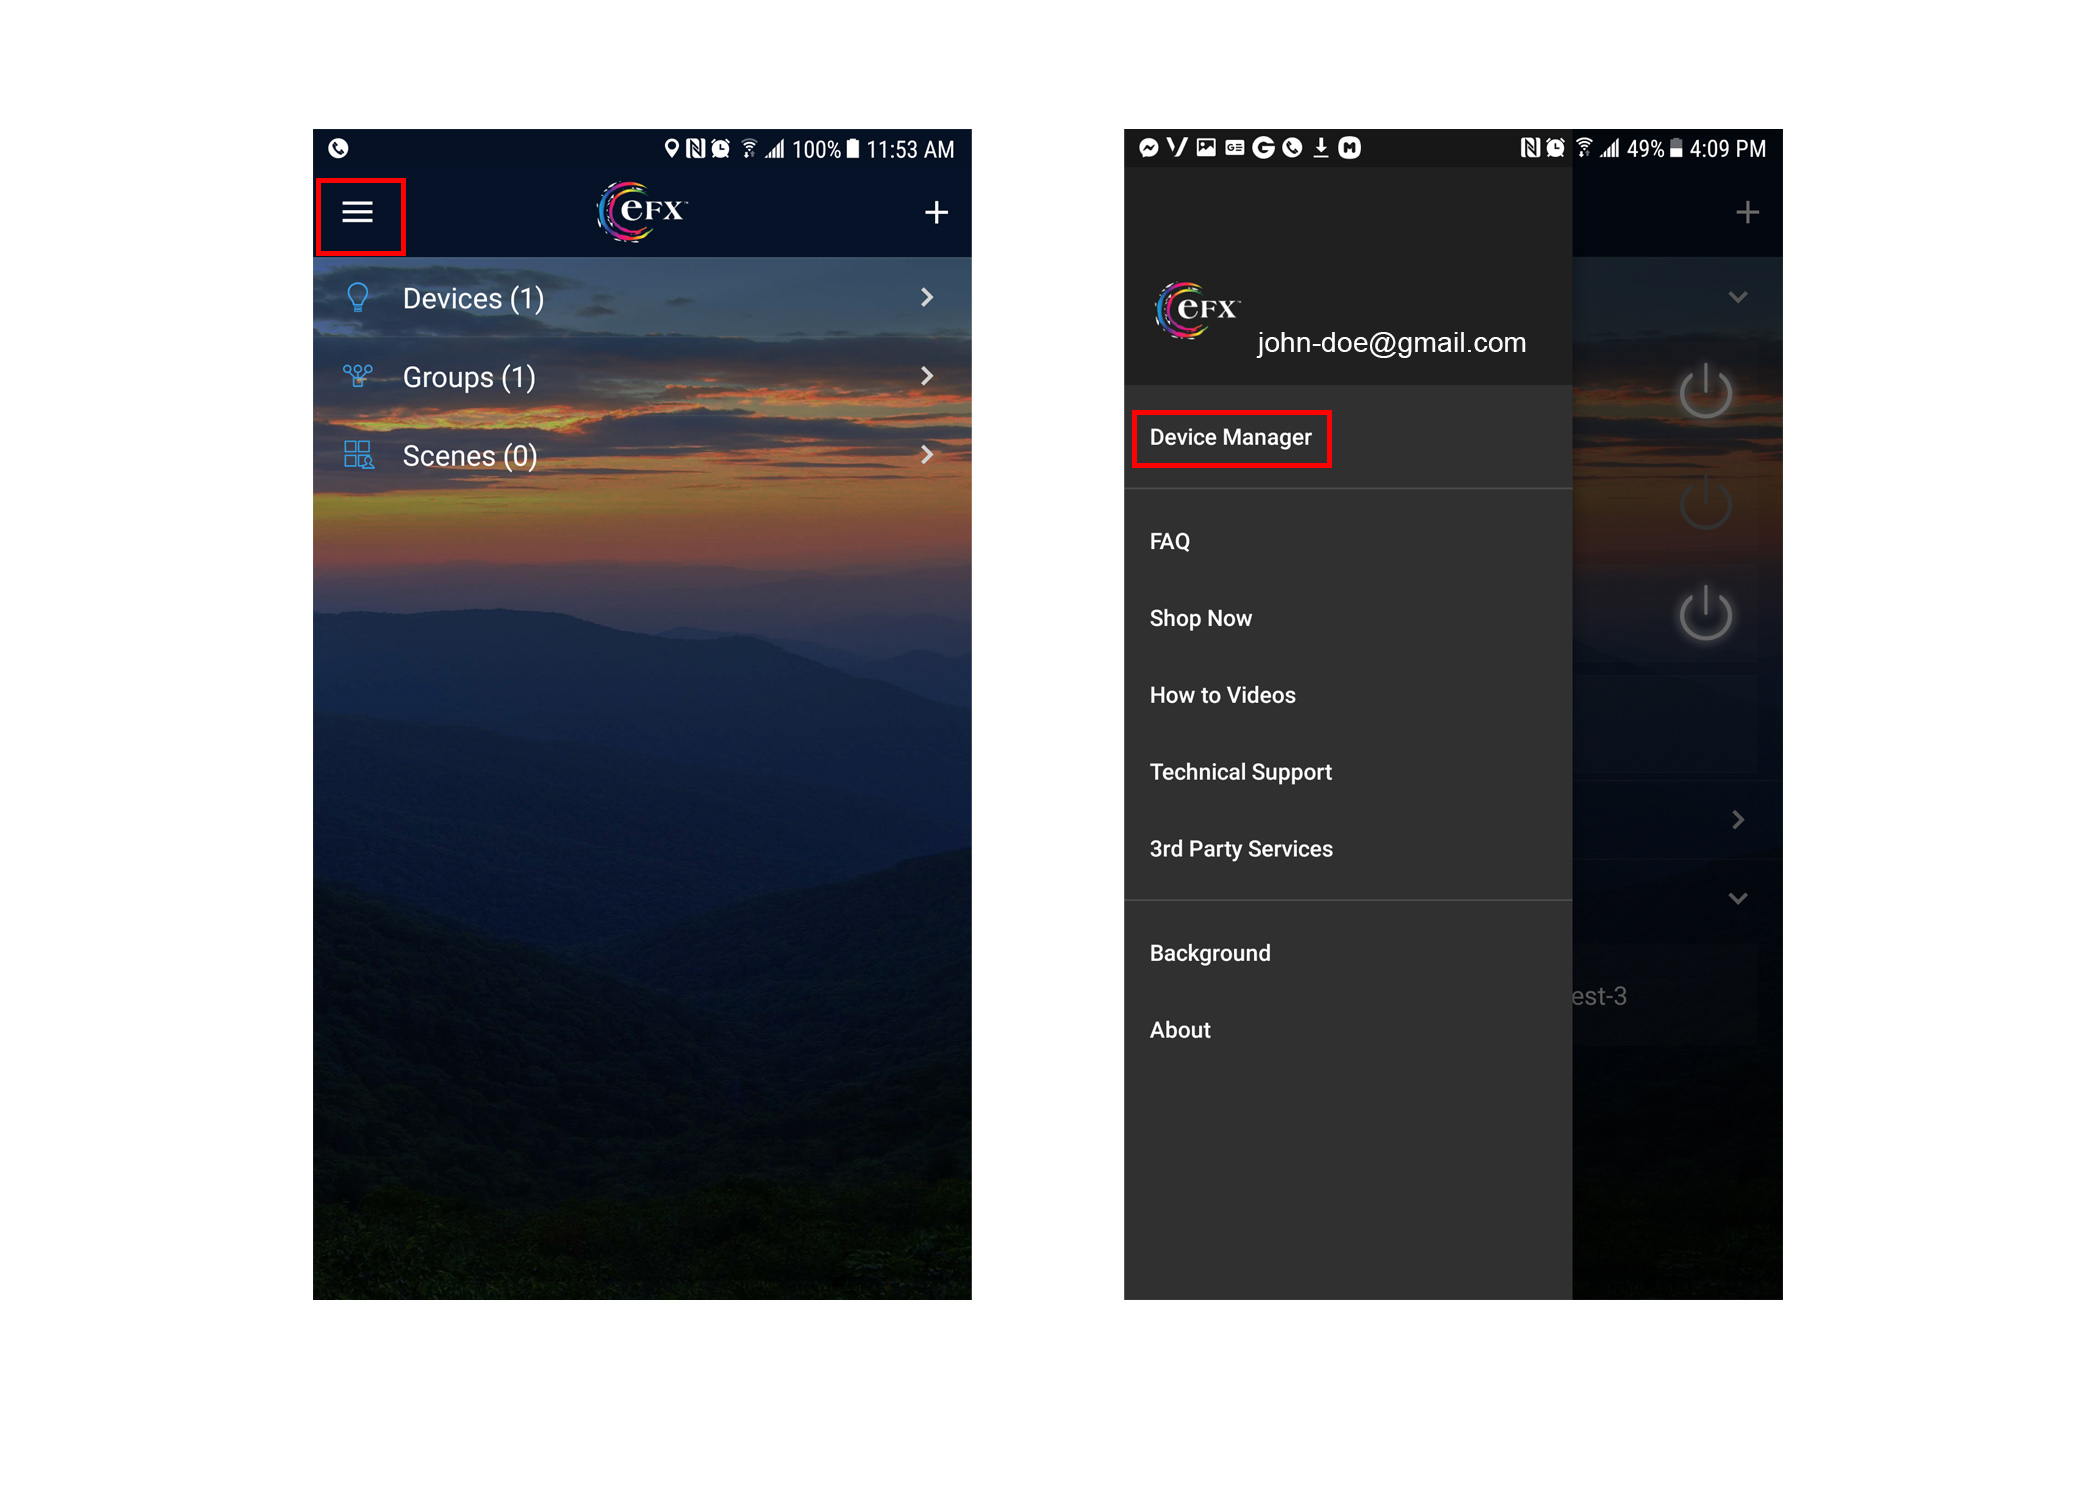
Overview
  • A user can link multiple devices together to make a group of devices. This allows for seamless control of multiple devices without the need of changing every device’s settings individually.
How to:
  • Add a Group:
  • Picture of Groups EFX apps Menu
  • Add a Device(s) to a Group and managing your Group.
  • Picture of adding a device to group

Overview
  • A user can coordinate multiple EFXTM Devices to play synchronously with each other; for example, to turn on at the same time or for one Device to turn to one set fix color and another Device to set to run a color pattern. Another example of a scene is multiple EFXTM Devices run coordinated lighting patterns so that all devices are playing the same color at a particular time.
How to Use
  1. From the main menu screen, select the + button in the top right corner.
  2. Select “Add Scene”.
  3. Picture of EFX Scenes Menu
  4. Name the Scene.
  5. Add the devices you want to add by selecting the devices under “add devices”.
  6. Picture of EFX Scenes Menu
  7. Once added to list, you can have the scene trigger the device on and off.
  8. Select save in the top right corner of the screen.
  9. Picture of EFX Scenes Menu

Overview

  • Timers allow you to program when an EFXTM Device turns on and off, what color or function (i.e. preset or custom) to run, and what time during the day or night, and what days of the week to run it.
  • Timers that are set to repeat will remain on the timer list, but any timer that is not set to repeat will be removed, once the timer has already run.
How to Use
  • Timers are specific to the EFXTM Device. Start by first selecting the device you would like to set a timer for.
  • Select the alarm click icon (top right corner).
  • Hit the Create Timer button.
  • Picture of EFX Timer Menu
  • Now you can set the time, whether it repeats or not, and the action.
  • Picture of EFX Timer Menu
  • If you select the timer to turn ON, it will run the last color or function that it had previously been set to.
  • If you select the timer to run a color or function, the timer will turn your device ON and run that color or function. So you do not have to set a timer to turn the Device ON and then a separate timer to turn it to a particular color.
  • Note, at this time the Timer feature allows you to select either a color or a preset function.
  • In the event you need one of your Custom functions to run, you can create a Scene, select the Device to run that Custom function and have either Amazon Alexa or Google Home to play that Scene at a particular time (provided you have one of these 3rd party devices).
  • Picture of EFX Timer Menu

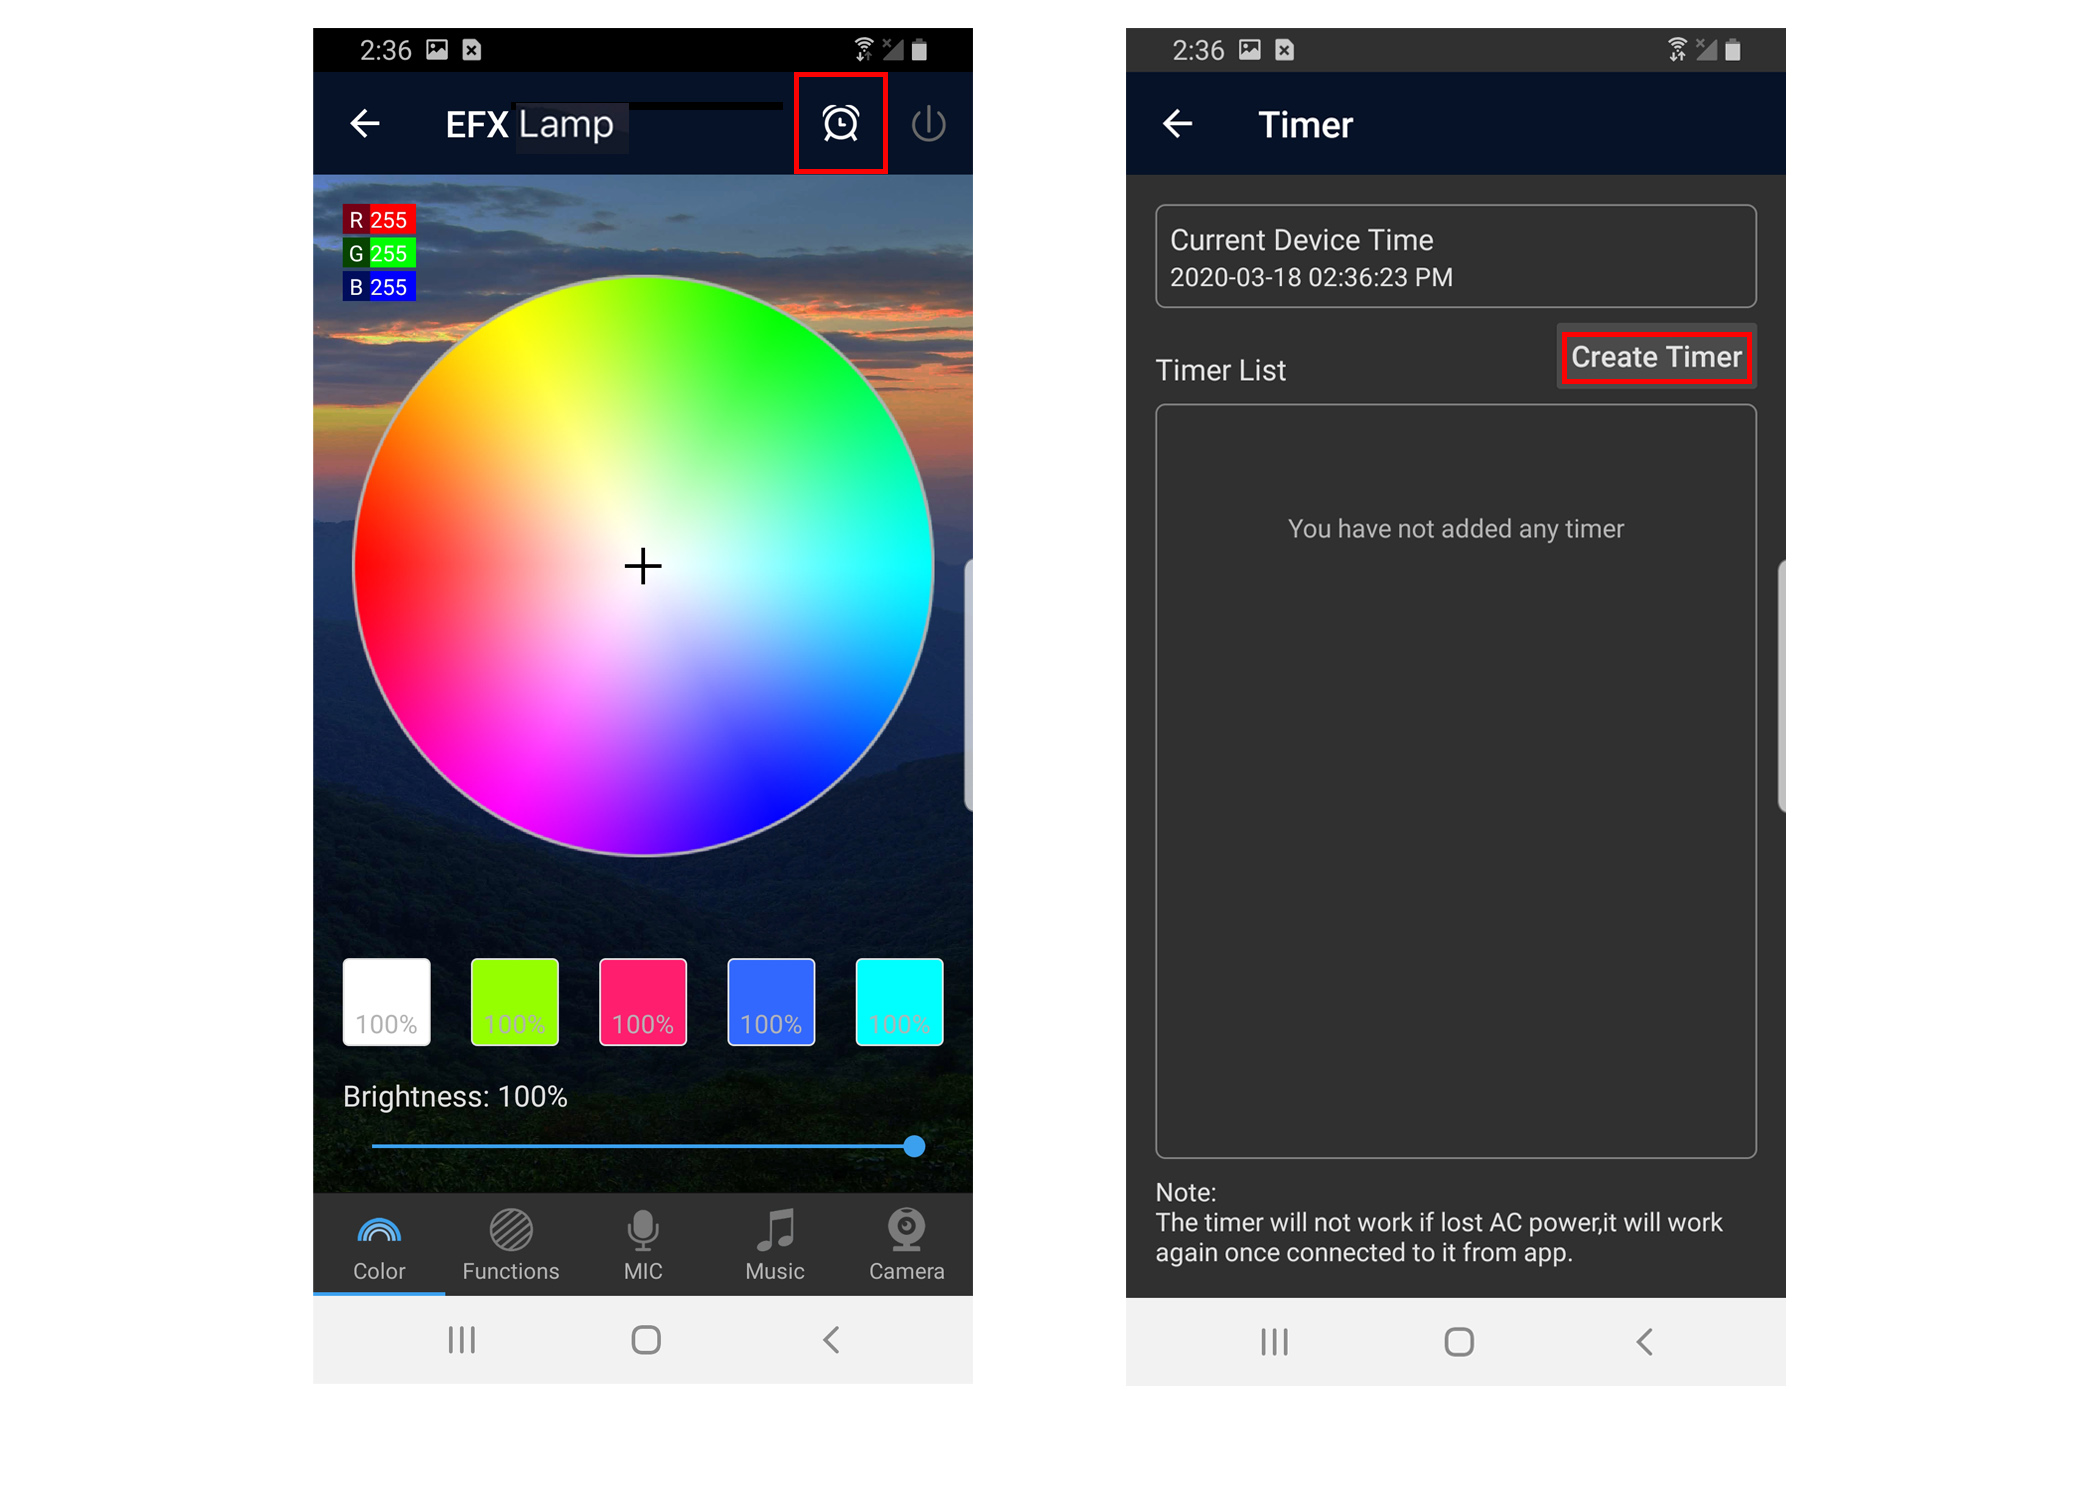
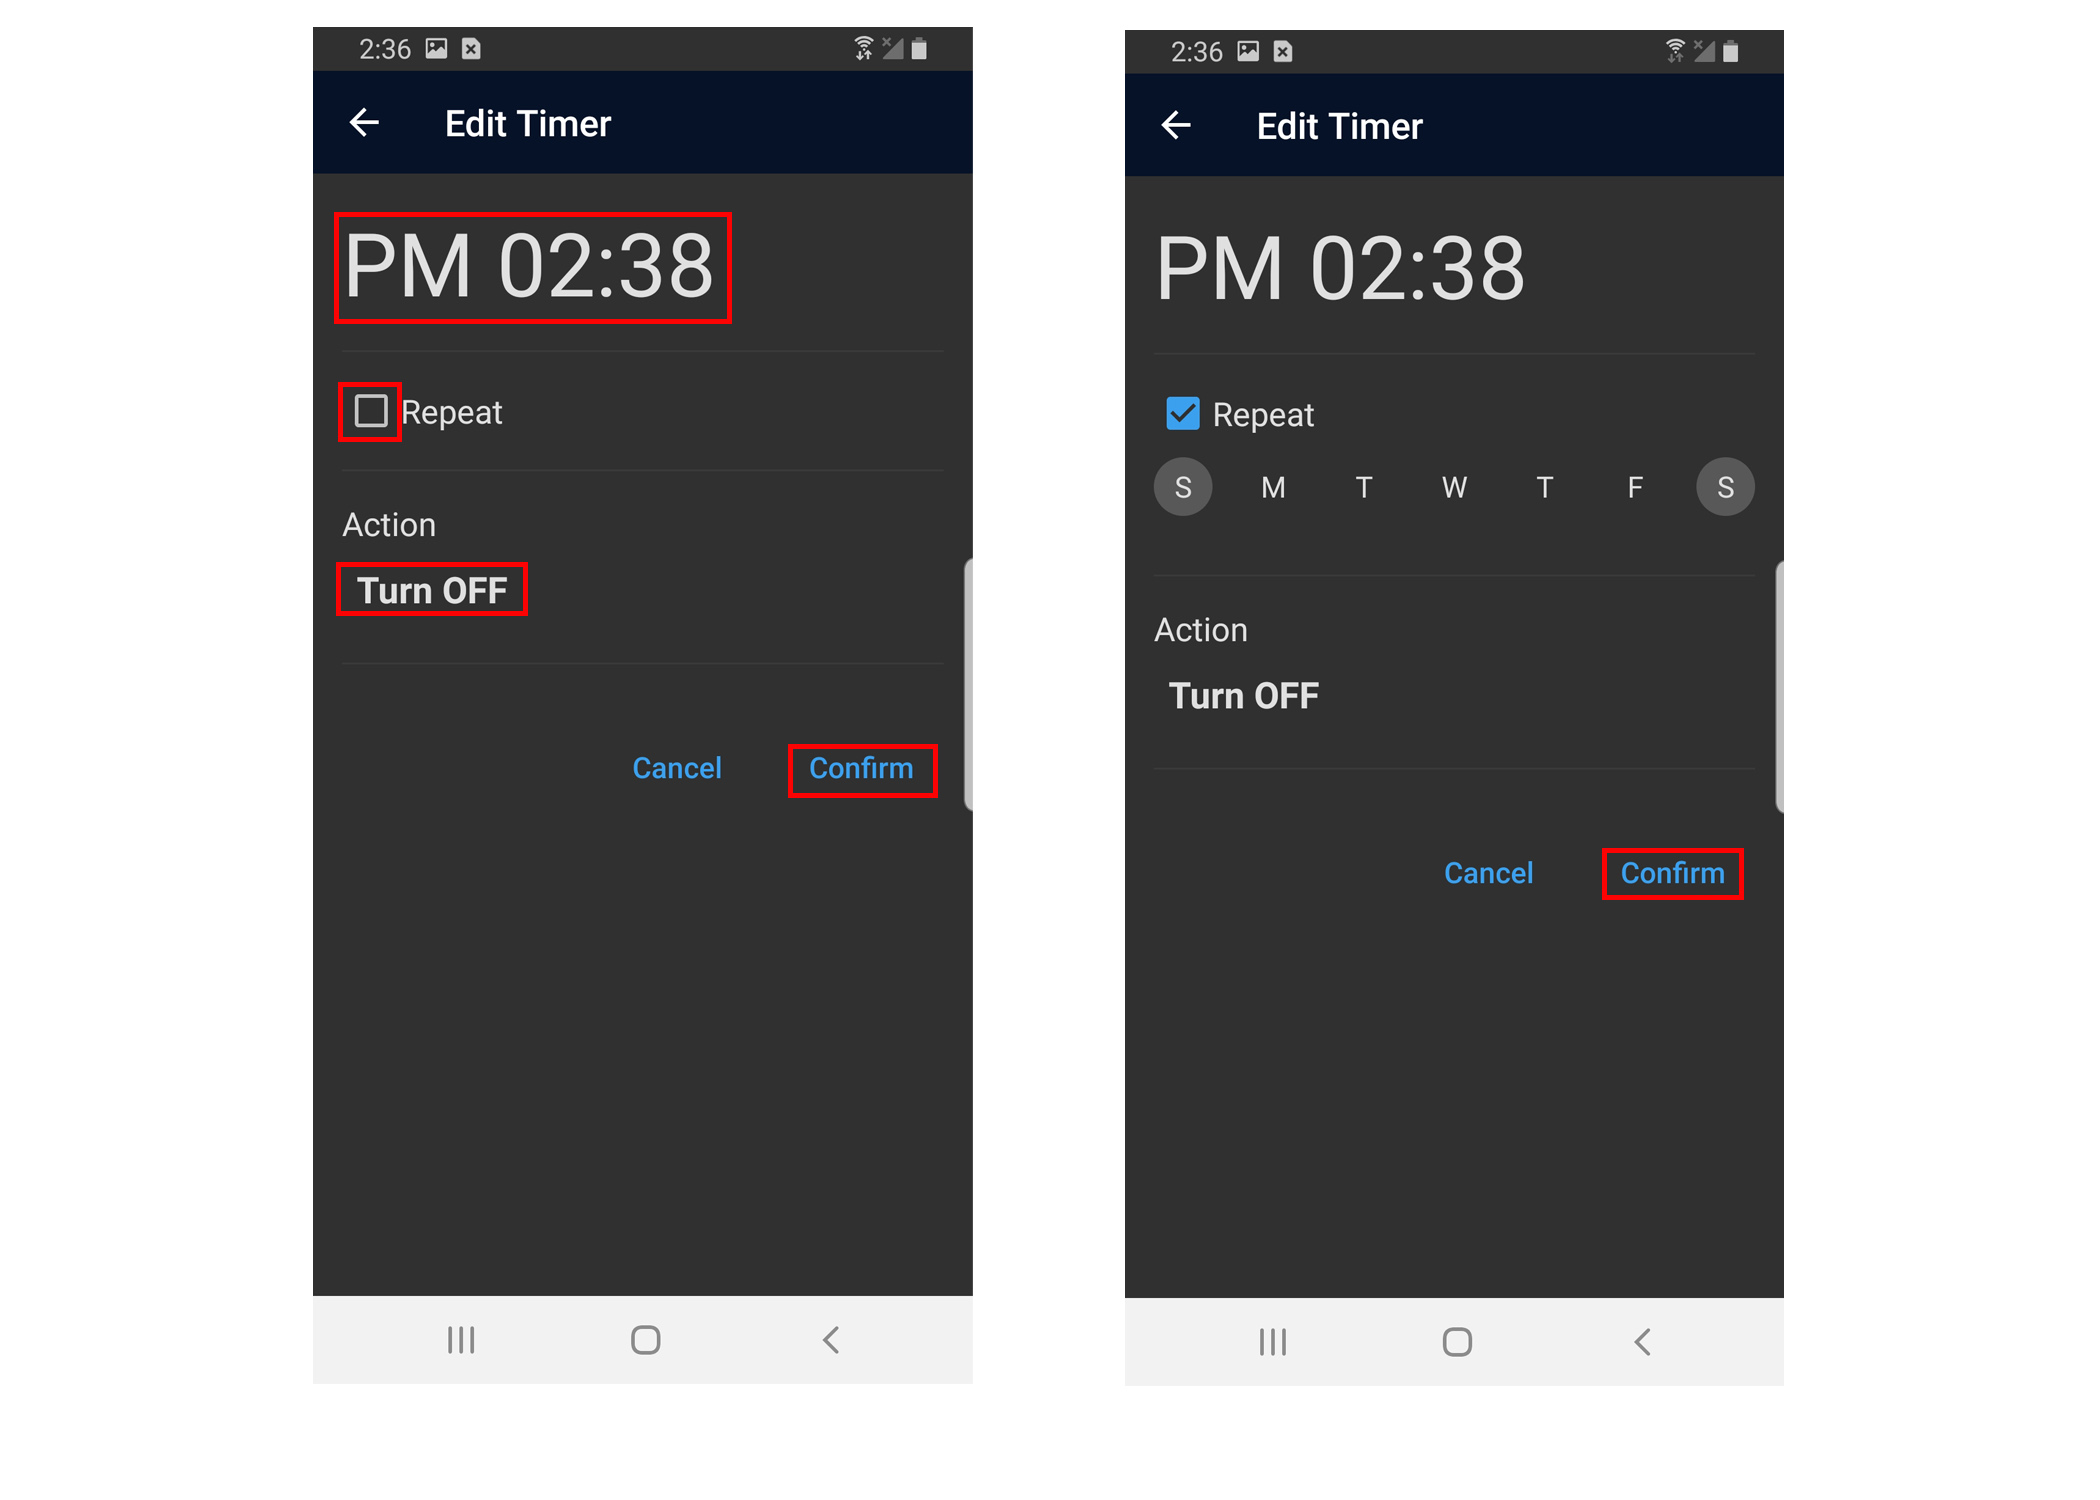
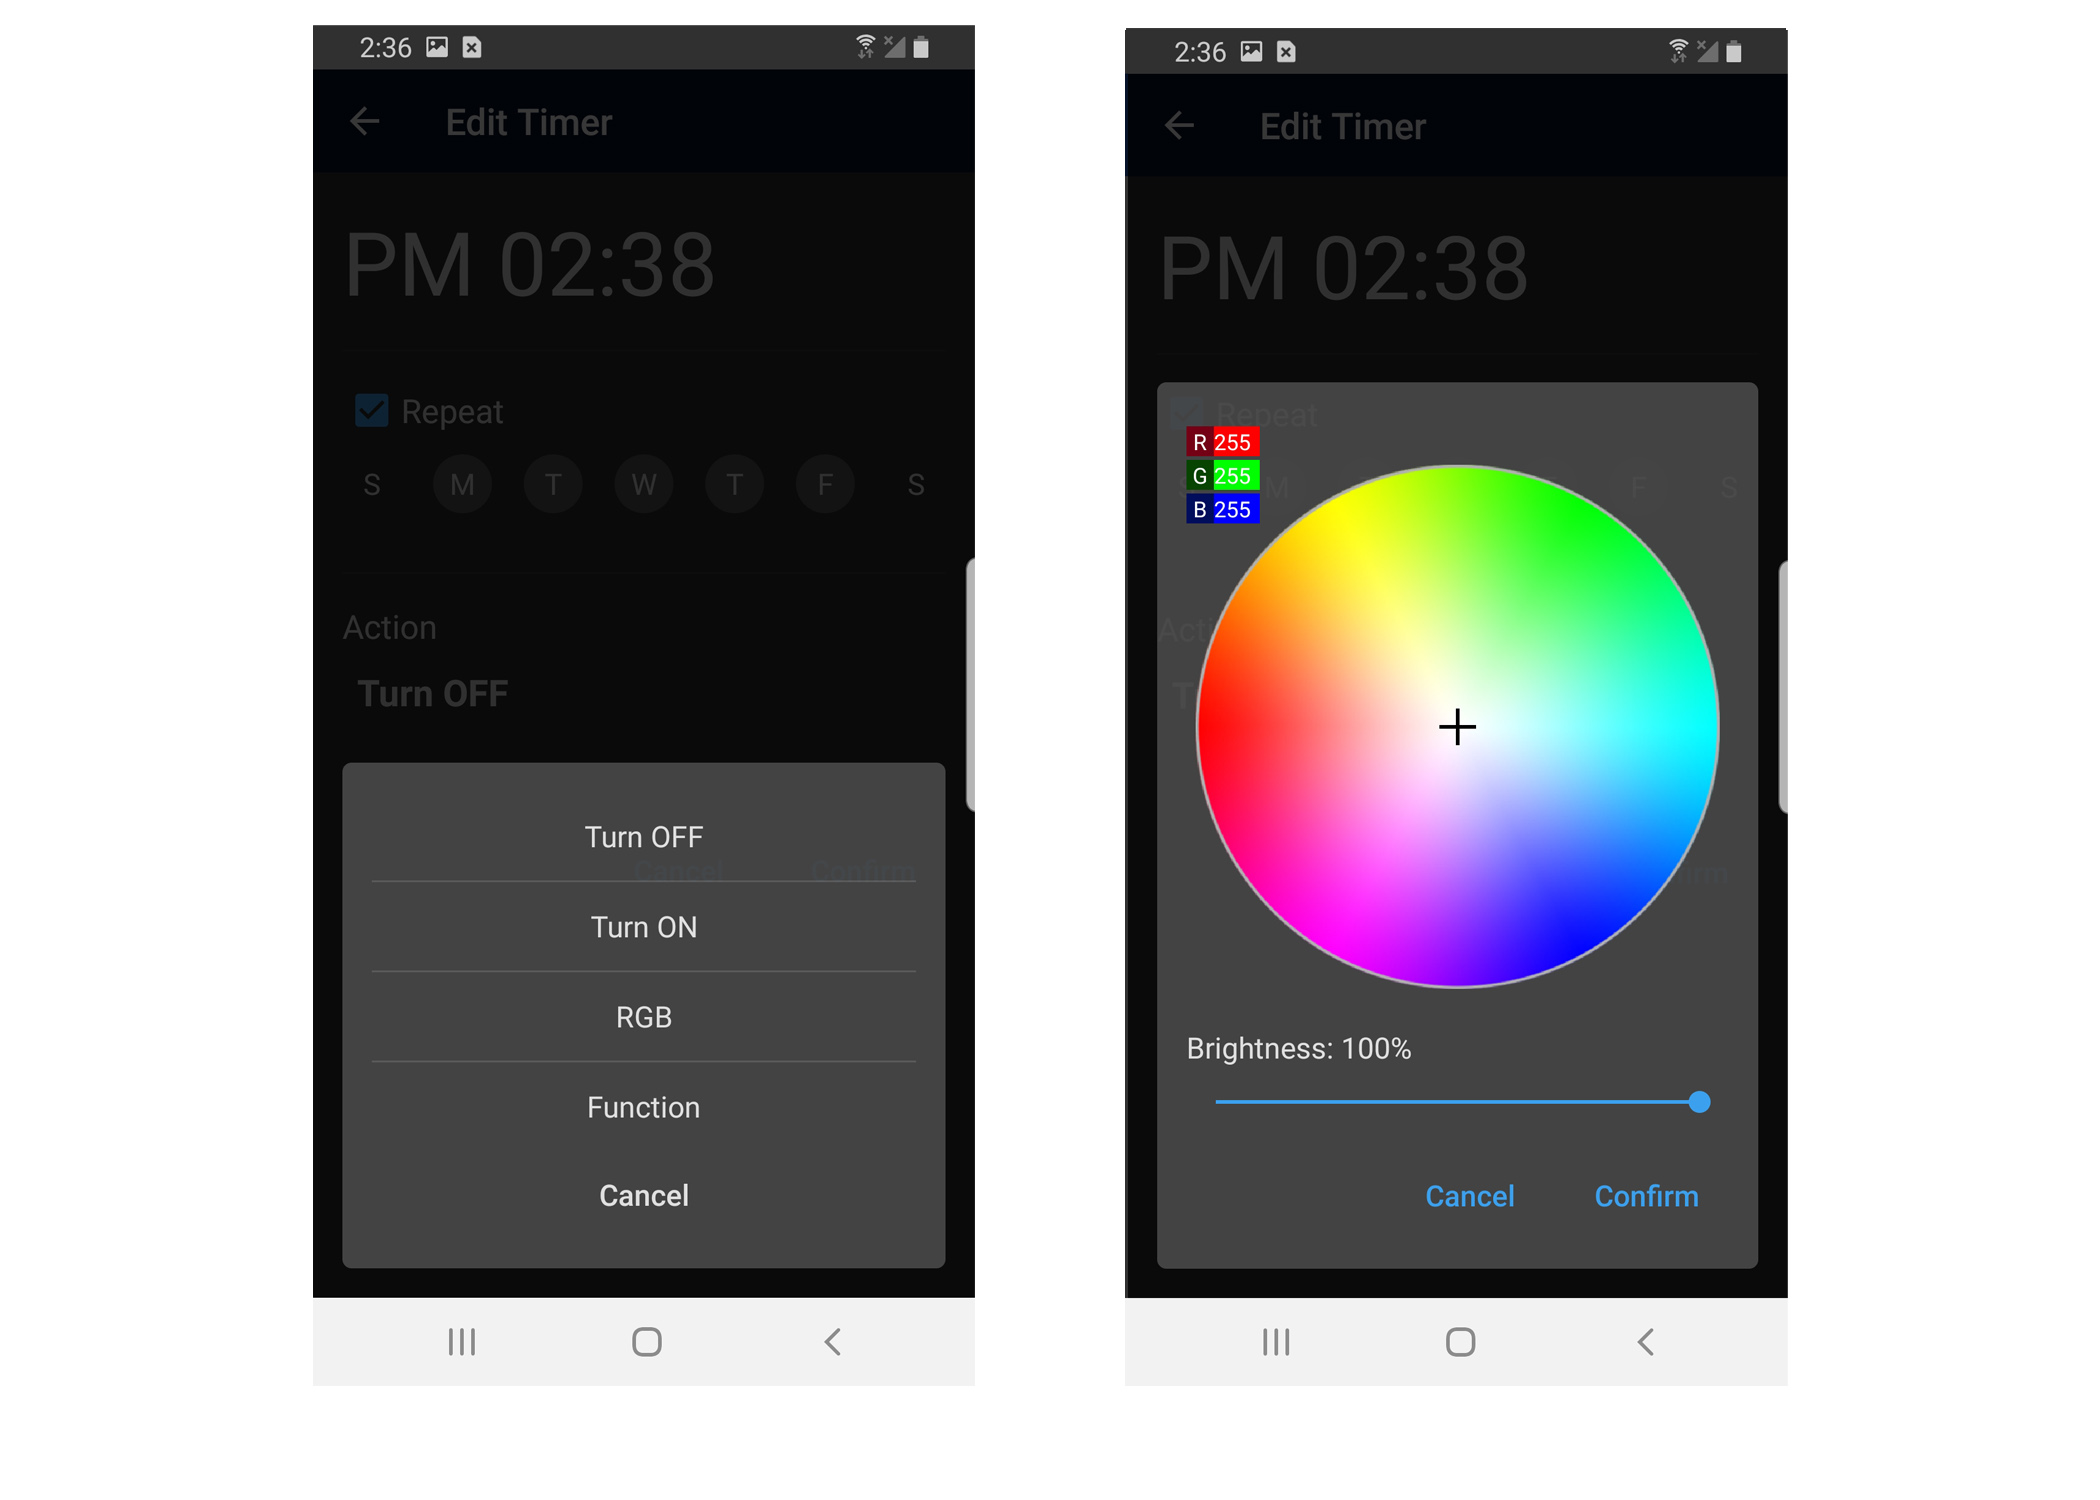
Note: Once you set a timer for one of your EFXTM Devices, this information is stored locally on the device itself and the App does NOT have to be running in order for your timer to work; This then permits you to close the EFXTM App, not even be present, and you don't even need to be connected to the our Cloud Server in order for the timer(s) to activate. However, the EFXTM does need to be connected to power for the timer to go off at the appropriate time. Check to see that the electrical outlet that is powering your EFXTM Device is not connected to a wall switch that allows people to turn on and off the power to that particular outlet.

Overview
  • The colors menu allows you to specify which color you want on the RGB color wheel or use the RGB color slider tool to select the exact output for each of the color channels.
Picture of Colors Menu How to Use
  • From the Main Menus, select the EFXTM Device you wish to control.
  • Note that the EFXTM Device must support RGB functionality. Devices like Smart Sockets do not and are only switches.
  • Once you have selected a EFXTM Device by a single tap on the name, you will be brought to the Color Wheel menu. Select from over 16 million color combinations.
  • For even more color control, open the RGB color channel slider window by tapping on the RGB values readout found in the upper left corner.
  • You can save up to 5 different preset colors and its brightness level by holding down on one of the 5 boxes found below the color wheel.
  • Note that these preset colors are only saved locally on your EFXTM App. If you share this device with another user, these preset colors are not shared with other users.

Overview
  • The Functions menu allows the user to run preset color patterns or custom color changing patterns.
How to Use
  1. After selecting the desired EFXTM Device to control, the Functions menu is accessible by selecting the "Functions" icon found on the bottom row.
  2. The Functions menu has two labels found at the top of the menu: "FUNCTIONS" and "CUSTOMS".
  3. Picture of Functions Menu
  4. The FUNCTIONS menu provides preset color changing patterns.
  5. The CUSTOM menu provides the ability for you to program your own colors. You can choose up to 16 different colors, set their speed, brightness level, and how you want the colors to transition (e.g. gradual, jump, or strobe).

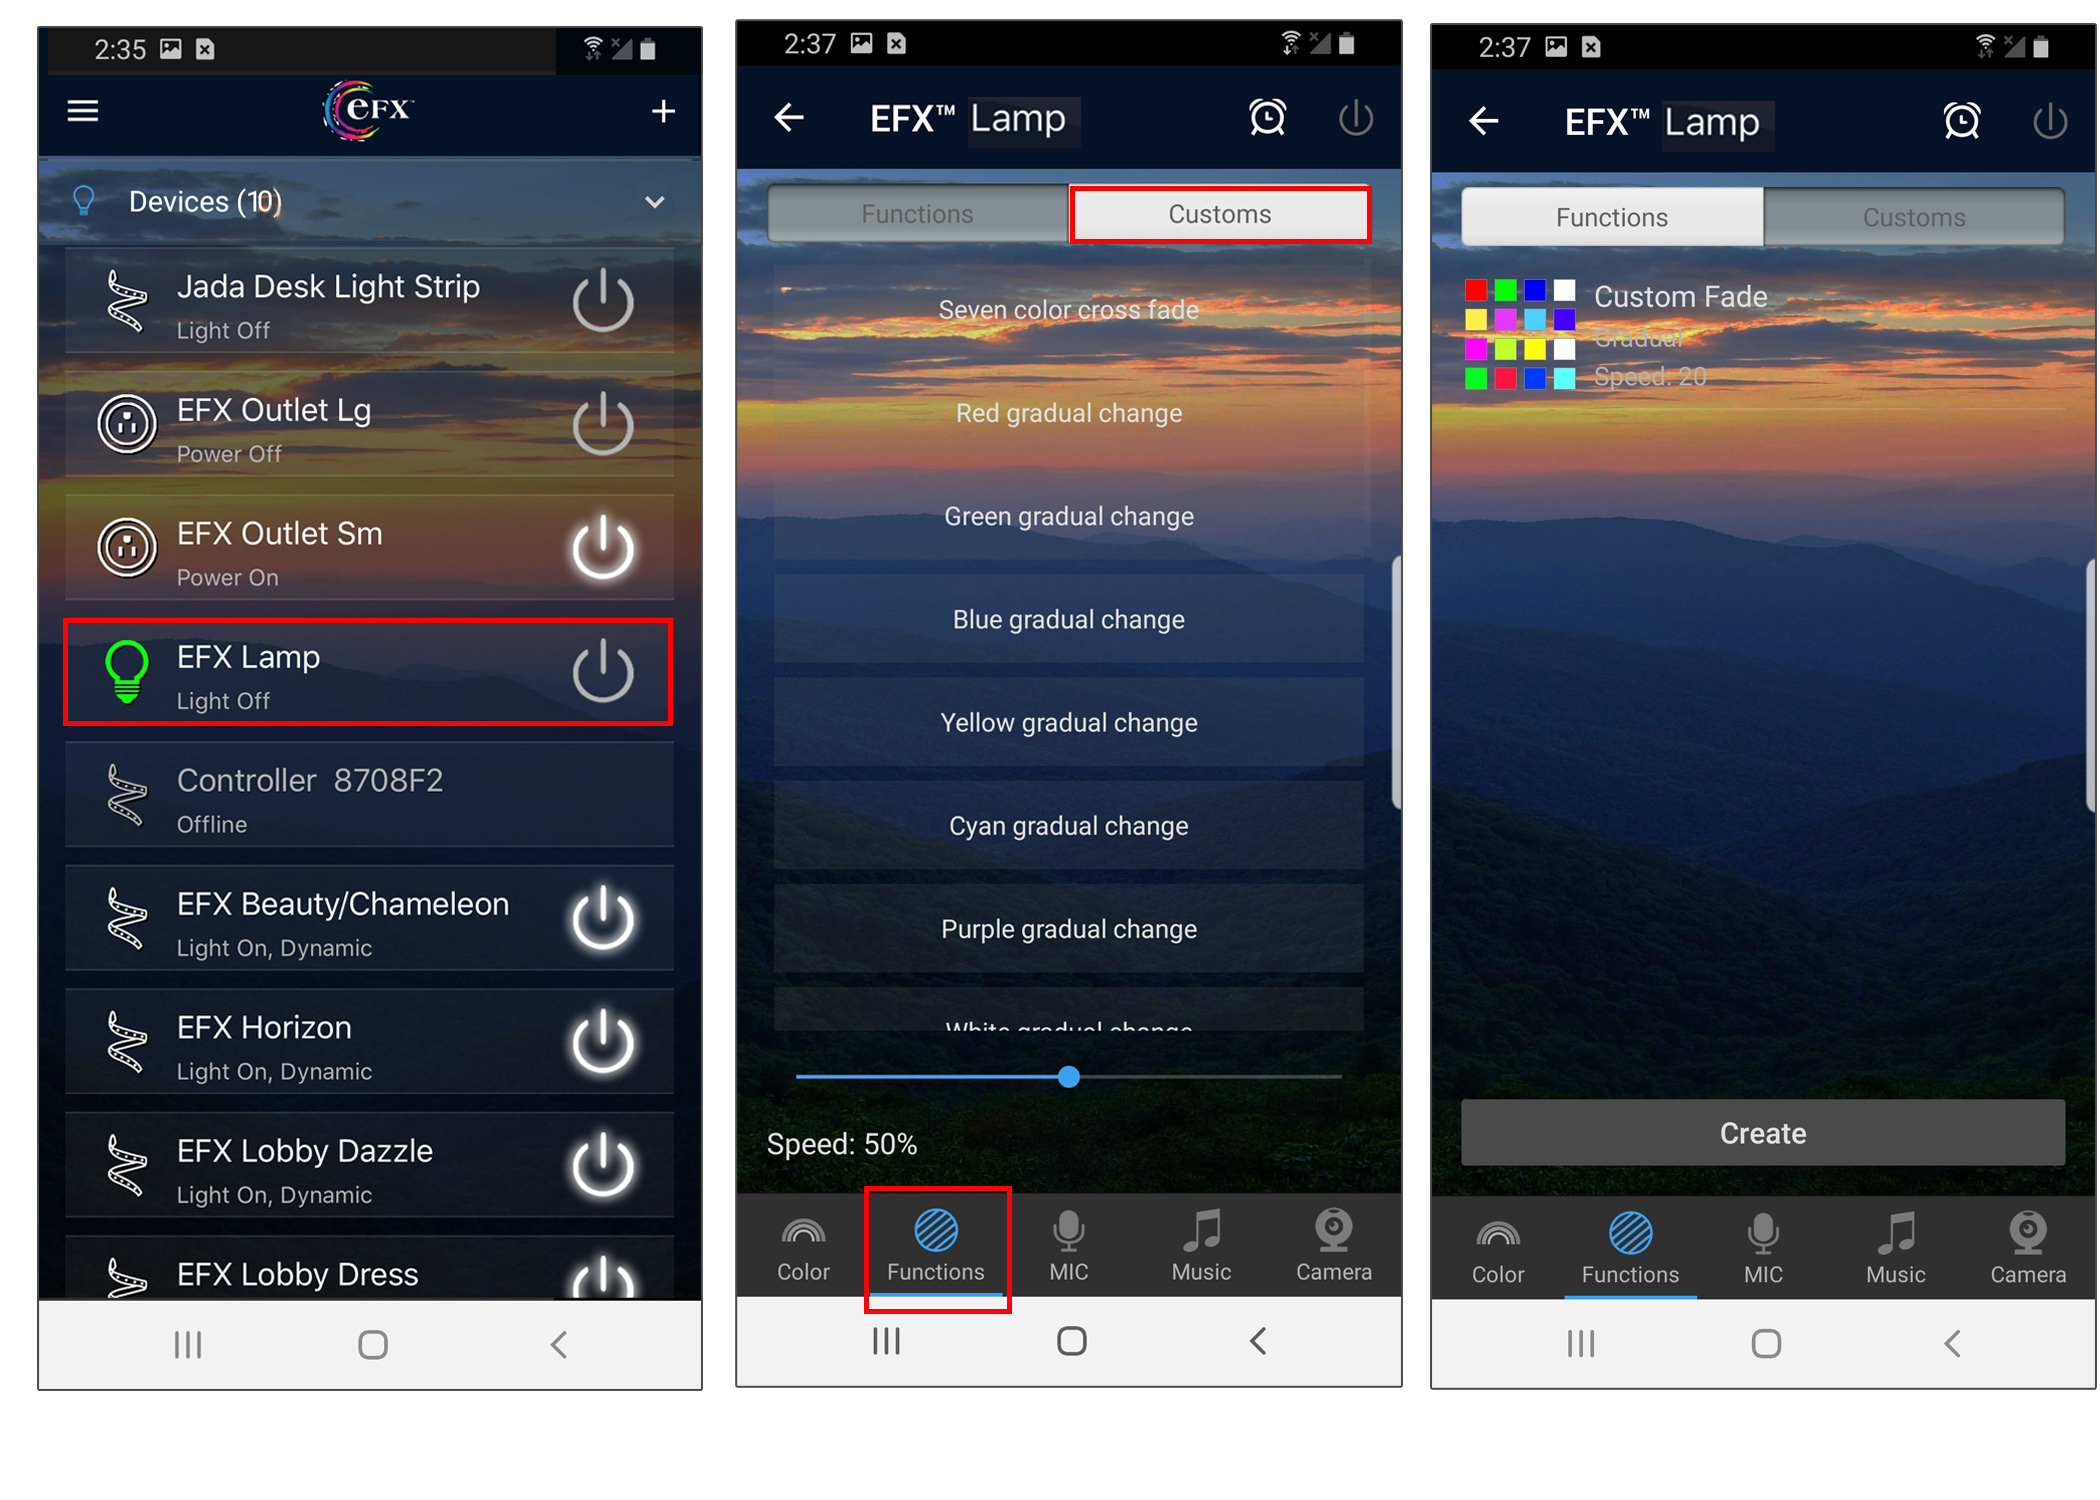
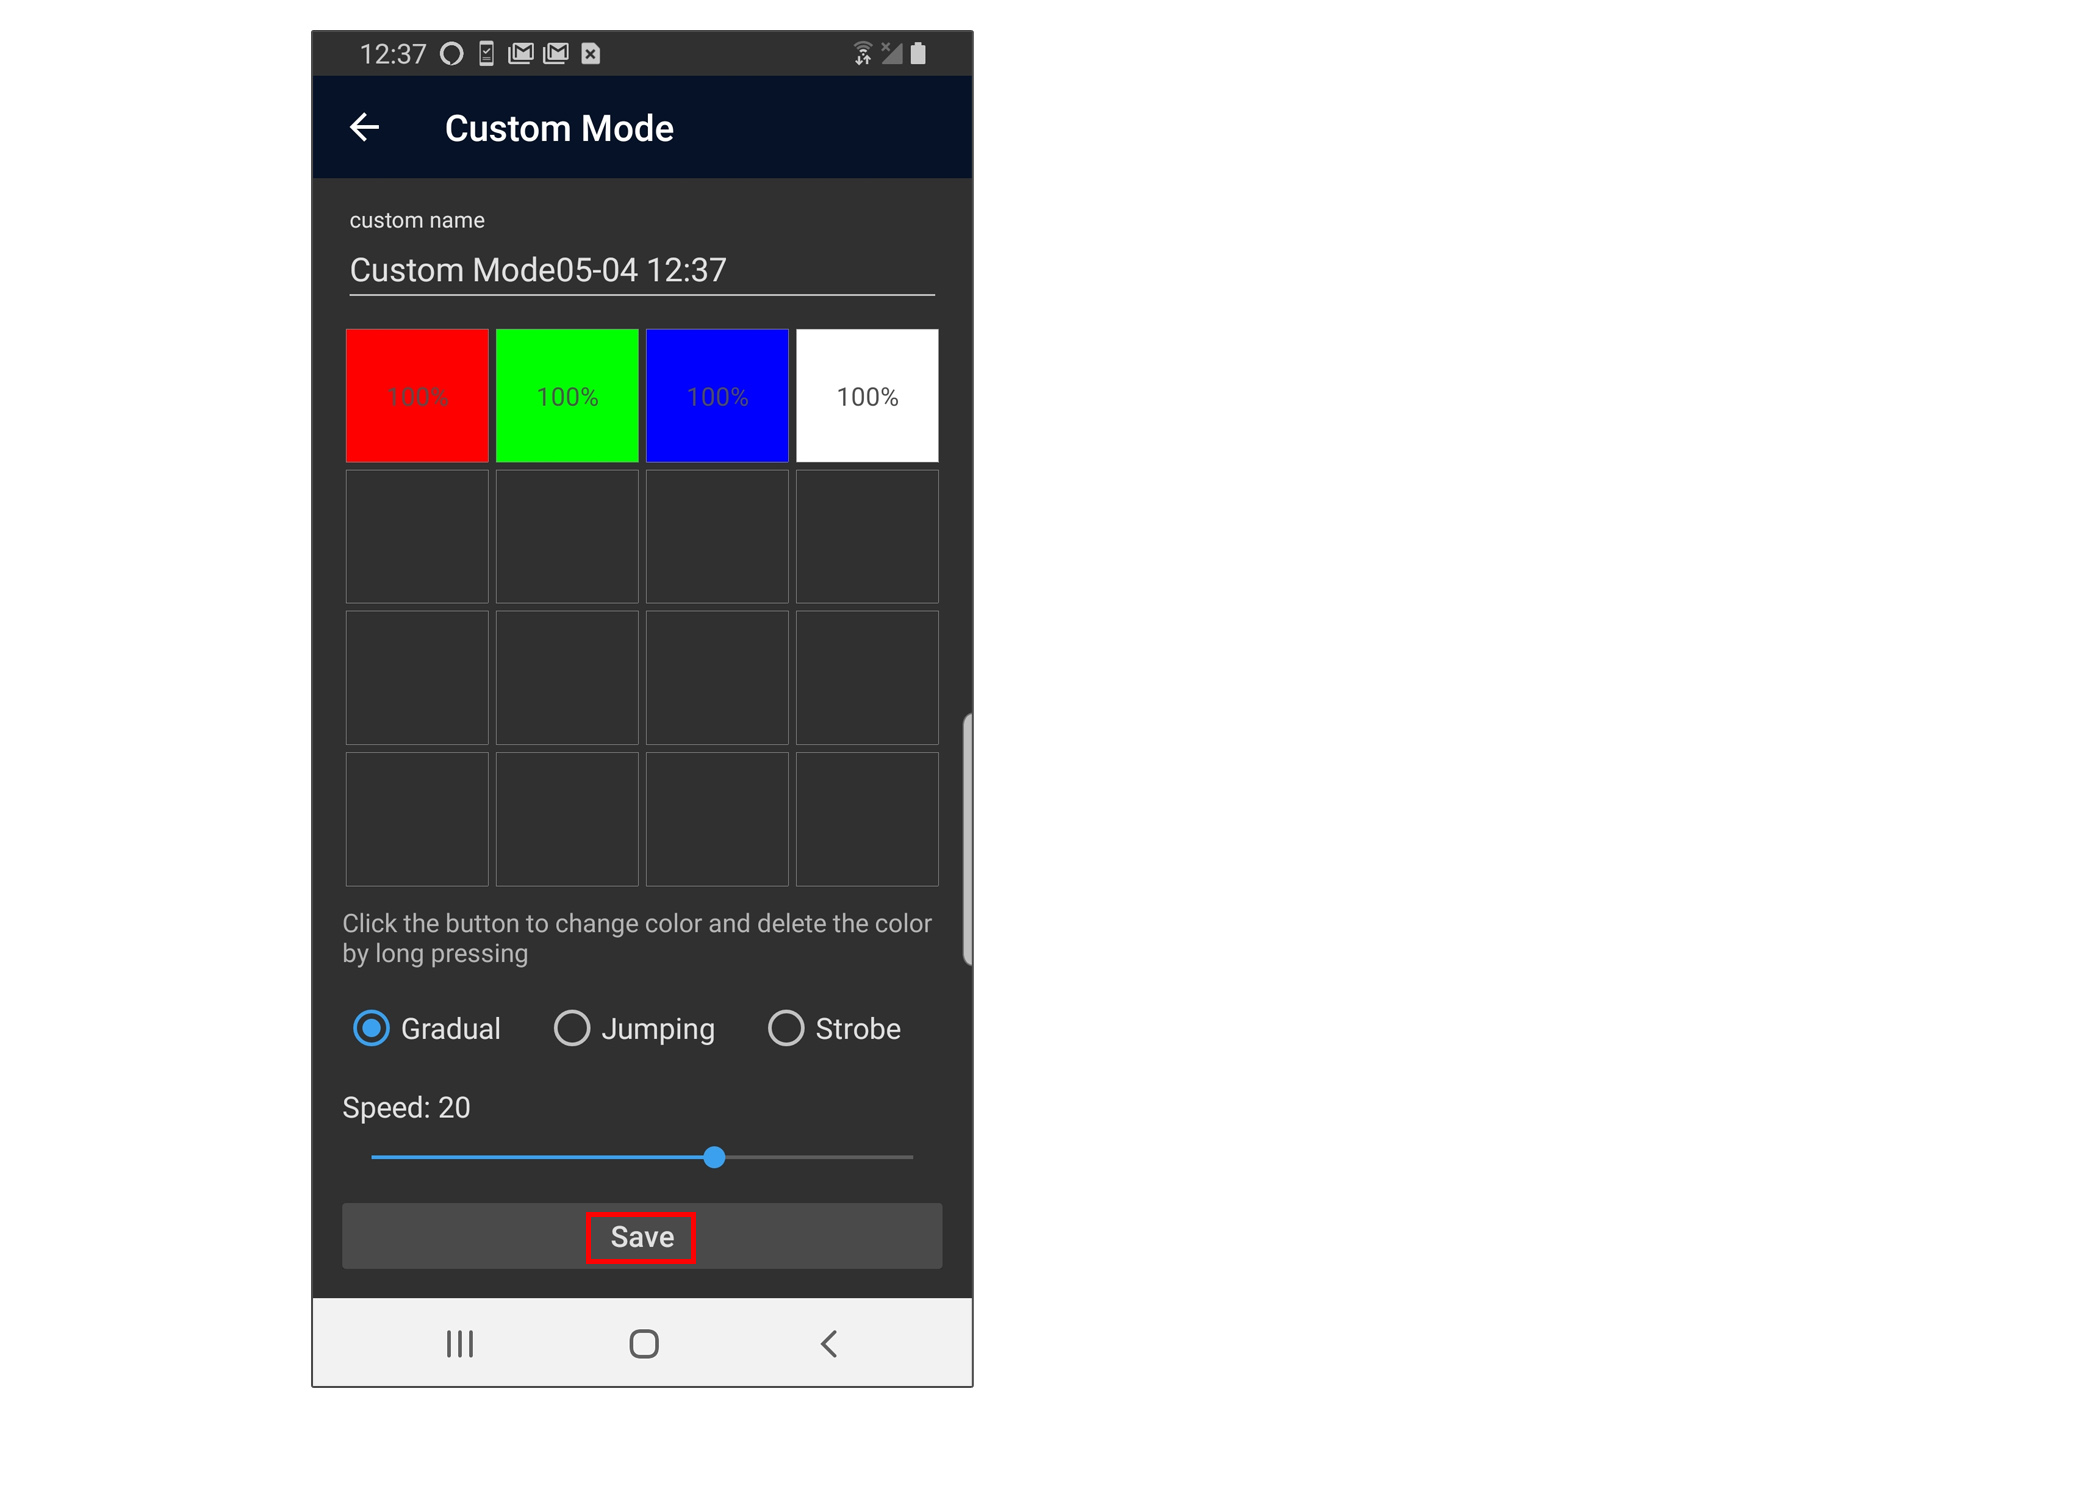
Setting a Custom Function

  1. To set a custom function, begin by selecting the CUSTOMS menu on the EFXTM app.
  2. Select “Add New Mode” to create a new mode to create a new custom function
  3. By long pressing on any of the 16 different boxes, you can program what color (over 16 million to choose from), you want the Custom Functions to change to and the speed on how fast it should cycle through the custom colors you had selected.
  4. Enter a name for your custom function.
  5. Hit the "Save" button.
Picture of Custom Mode

Overview
  • The Microphone features allows your EFXTM Frames and Lights Bulbs to dance (i.e. change colors) to the beat of the music that is coming in from the user's microphone.
  • This feature is handy, especially for those who stream music (e.g. Spotify, Pandora, Apple Music) from the internet instead of playing a stored song on their smartphone.
  • The Microphone feature only works for EFXTM devices that are on the local network (i.e. both the EFXTM App and Device are connected to the same router).
  • If your EFXTM Device is not connected to the same local network as your EFXTM App, the Microphone icon will not appear.
  • Note that the EFXTM App must have permission access to your microphone for this feature to work.
How to Use
  1. The Microphone feature is accessible by first selecting the EFXTM Device on the main menu.
  2. Then select the "MIC" icon located on the bottom row of the menu.
  3. Music or sounds that your smartphone's microphone picks up will now change the color of lights on your EFXTM Device. When using the microphone feature, try to position your phone near the music source.
  4. You can also adjust the microphone's sensitivity. The more you slide the ball to the right, the more sensitive your microphone becomes.
  5. Picture of Custom Mode

Note that the EFXTM App must have permission to access your smartphone's microphone, in order for this feature to work.

Overview
  • The Music feature allows the user to select a .mp3 music file that is physically stored in your smartphone's music library. The music will synchronize with the EFXTM Device and change color based on the beat of the music.
How to Use
  • The Music icon is accessible by selecting the Device on the main menu.
  • After pressing the Device go to the Music icon and press.
  • Select a song and press the play button.
  • Towards the bottom of the screen, you can select different music modes (e.g. Rock, Normal, Classical) that affect how the lights responds to the beat of the music. For example, Rock mode will cause the lights to bounce more when transitioning to another color.
  • Picture of Music icon


FAQ on Connectivity


  1. Install the EFXTM App from the iOS or Google Play Store depending on which device you have.
  2. Connect your mobile to your home network (NOTE: It must be a 2.4GHz Wi-Fi channel).
  3. Register/Login to your EFXTM Cloud Account.
  4. In the EFXTM App home screen, select the "+" symbol at the top of the screen and select "Add Device" from the options provided. If this is the first time connecting, it should be quickly flashing red, green, blue, and repeating this pattern.
  5. If no EFXTM Devices are listed, move the phone closer and hit the Rescan button.
  6. Picture of adding to a wifi connection
  7. Select the Device, it will start with “LEDnetxxxx”
  8. Your smartphone is now going to connect directly with the EFXTM Device. Note that you will lose your Wi-Fi internet connection temporarily.
  9. Picture of adding to a wifi connection II
  10. Select the Wi-fi network you want to connect this new Device to be connected to. Avoid using any 5G networks.
  11. Lastly, you should see the “Add Successfully” message.
  12. Picture of adding to a wifi connection II

  • Select the hamburger icon in the top left corner of the EFXTM App's home screen.
  • Select "Device Manager" and confirm that the globe icon adjacent to the device name is shown in blue.
  • If the device status is displayed as a gray globe icon, the EFXTM device is not remotely accessible.

  • Picture of EFX remote access
  • To enable, select the EFXTM device's name then select "Remote Settings" to confirm the Remote Status is enabled.
  • If the remote access status fails to open or turn on, please refer to REMOTE ACCESS FAILED TO OPEN, WHAT SHOULD I DO?
  • NOTE: The remote access function must be enabled to Amazon Alexa voice control, Google Home voice control, Siri Shortcut voice control and other remote functions.

  • Reboot both your EFXTM device and your router waiting 2-3 minutes in between actions.
  • Confirm that the EFXTM device and the router are both receiving sufficient power.
  • Confirm the EFXTM device and your smartphone are not being blocked physically or via firewall to your wireless network's router.
  • Confirm the Wi-Fi network is not a public network or one that needs a login page to access the internet. (i.e. the ones found in airports, cafes, hotels, etc.)

  • Ensure the router and the EFXTM Device are receiving sufficient power and that all connection points are properly connected.

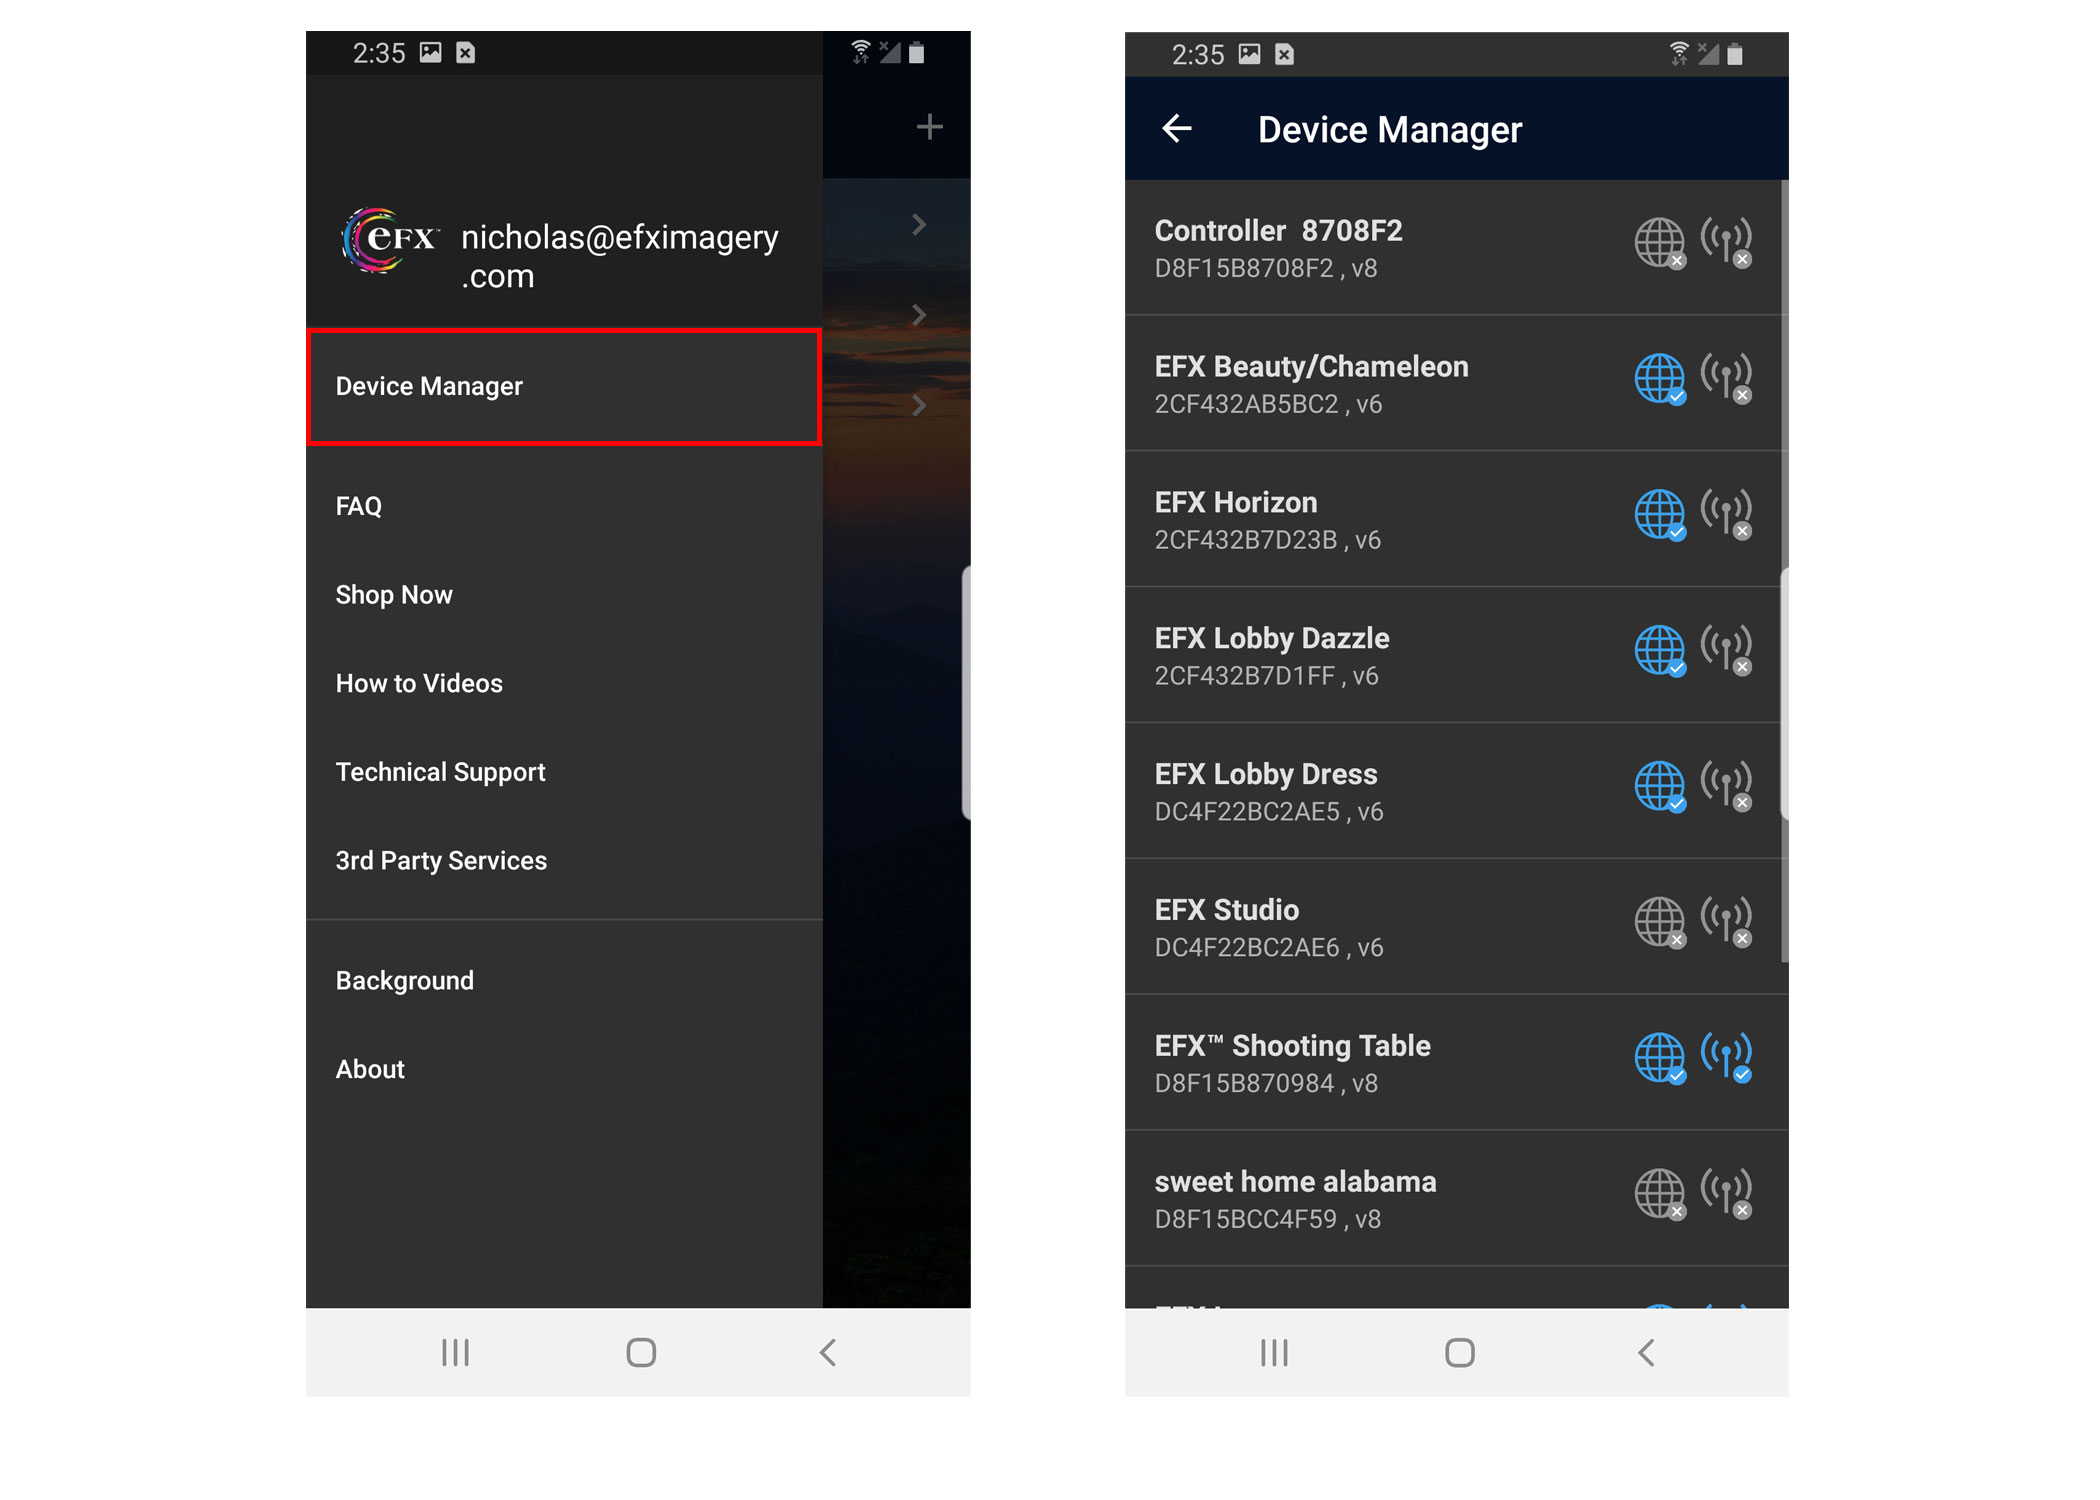
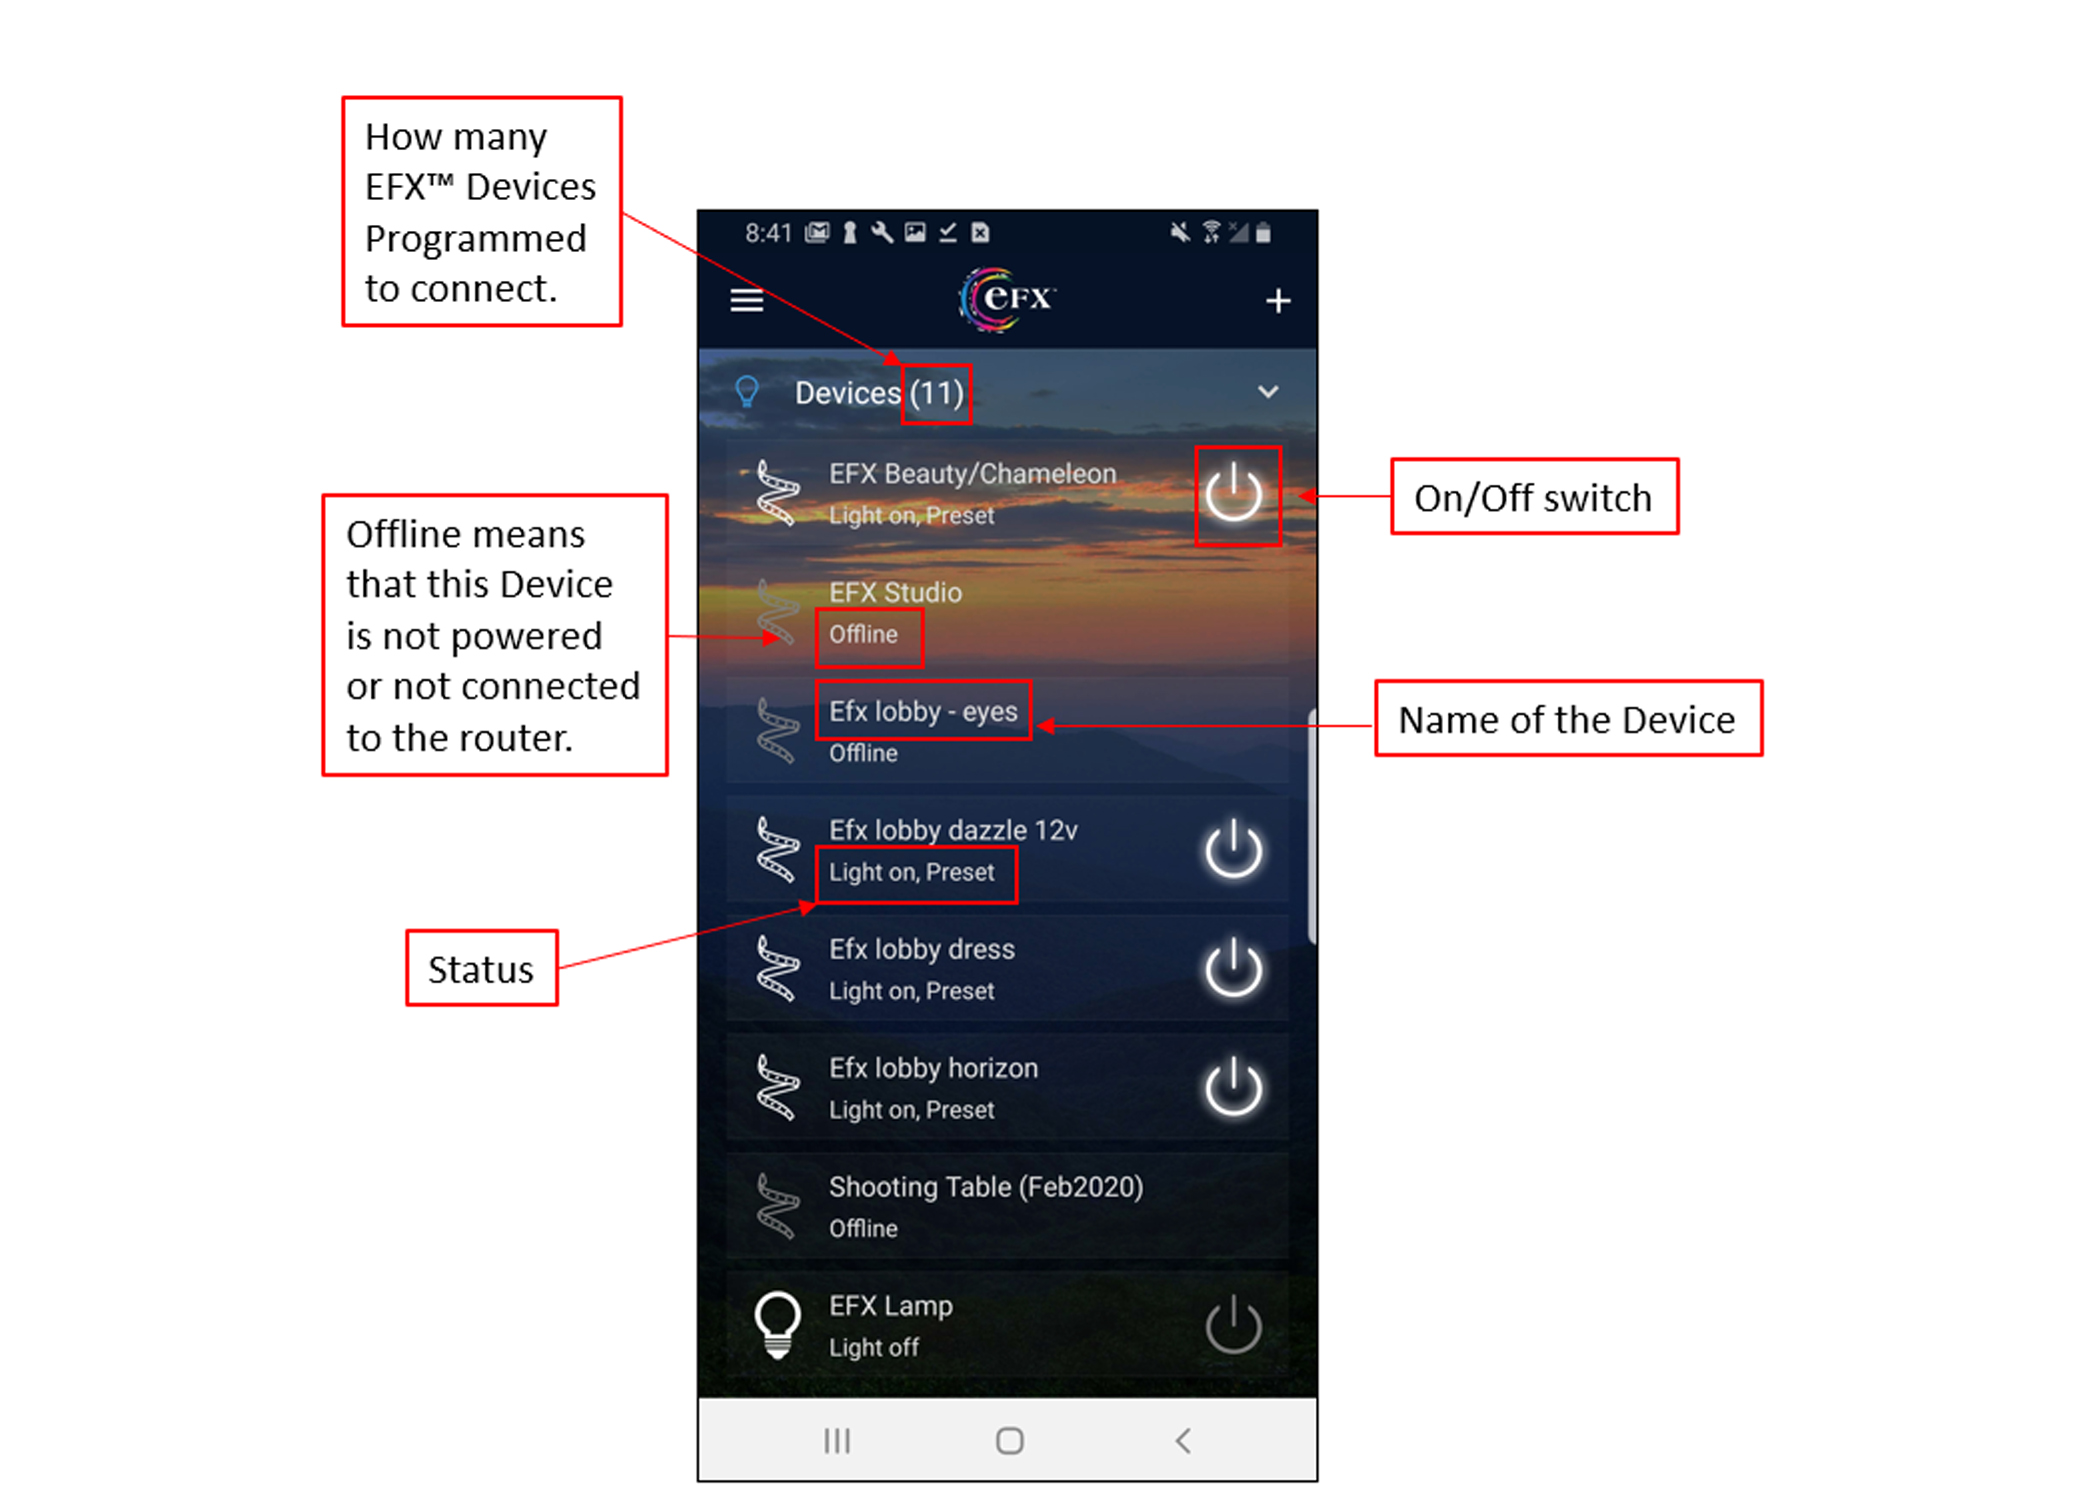
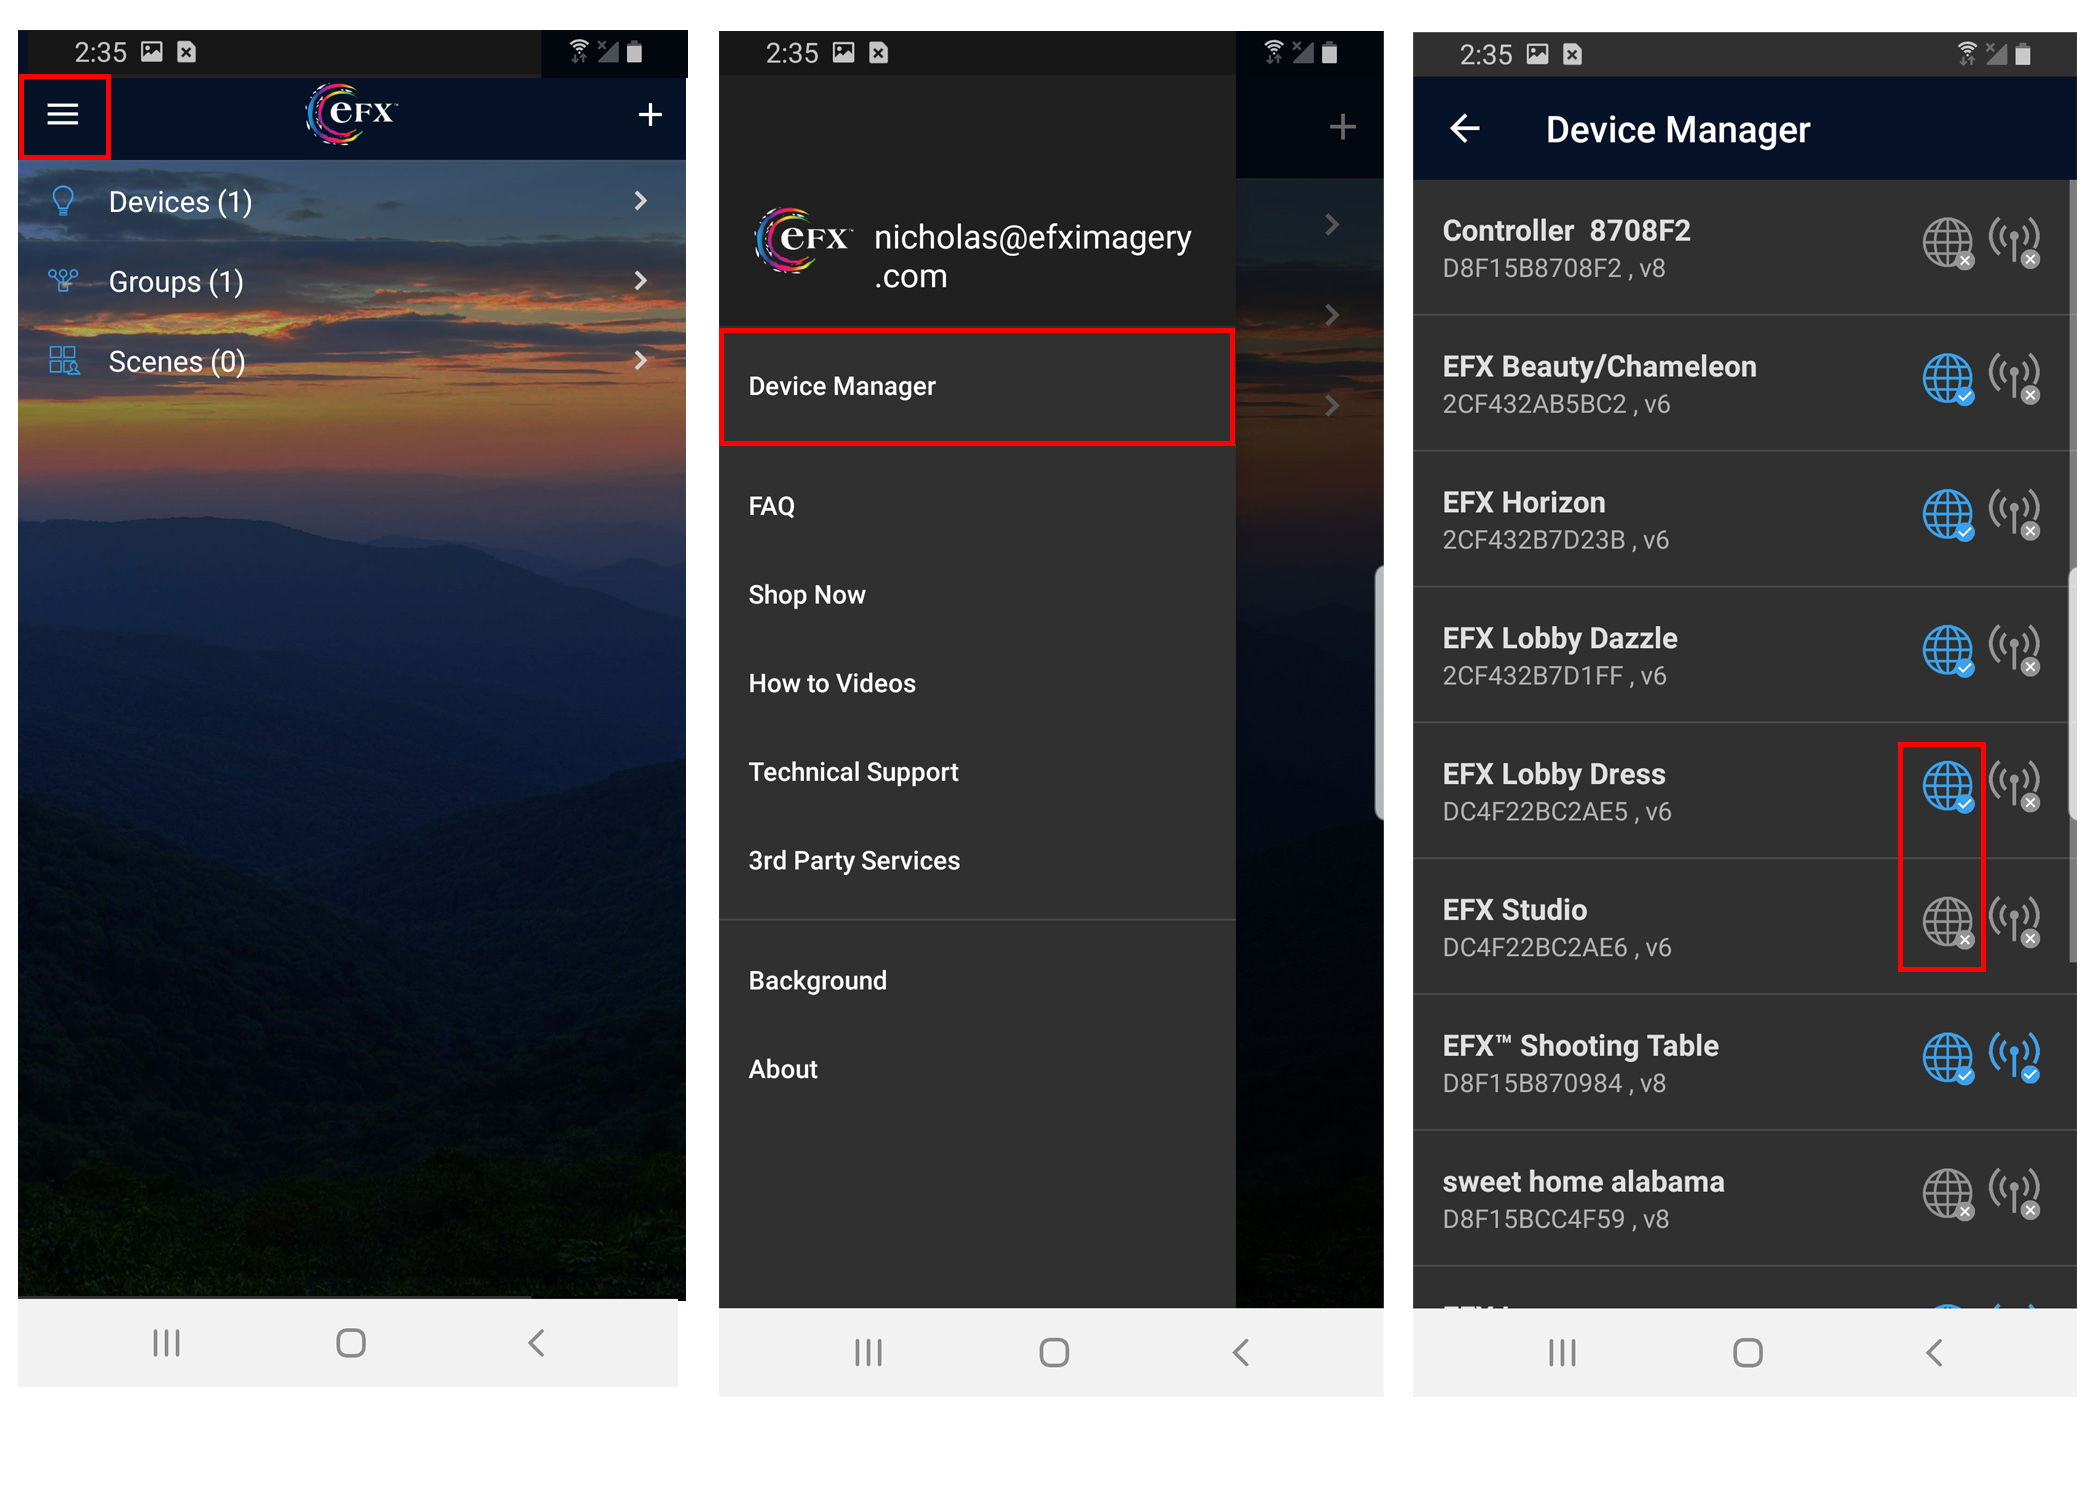
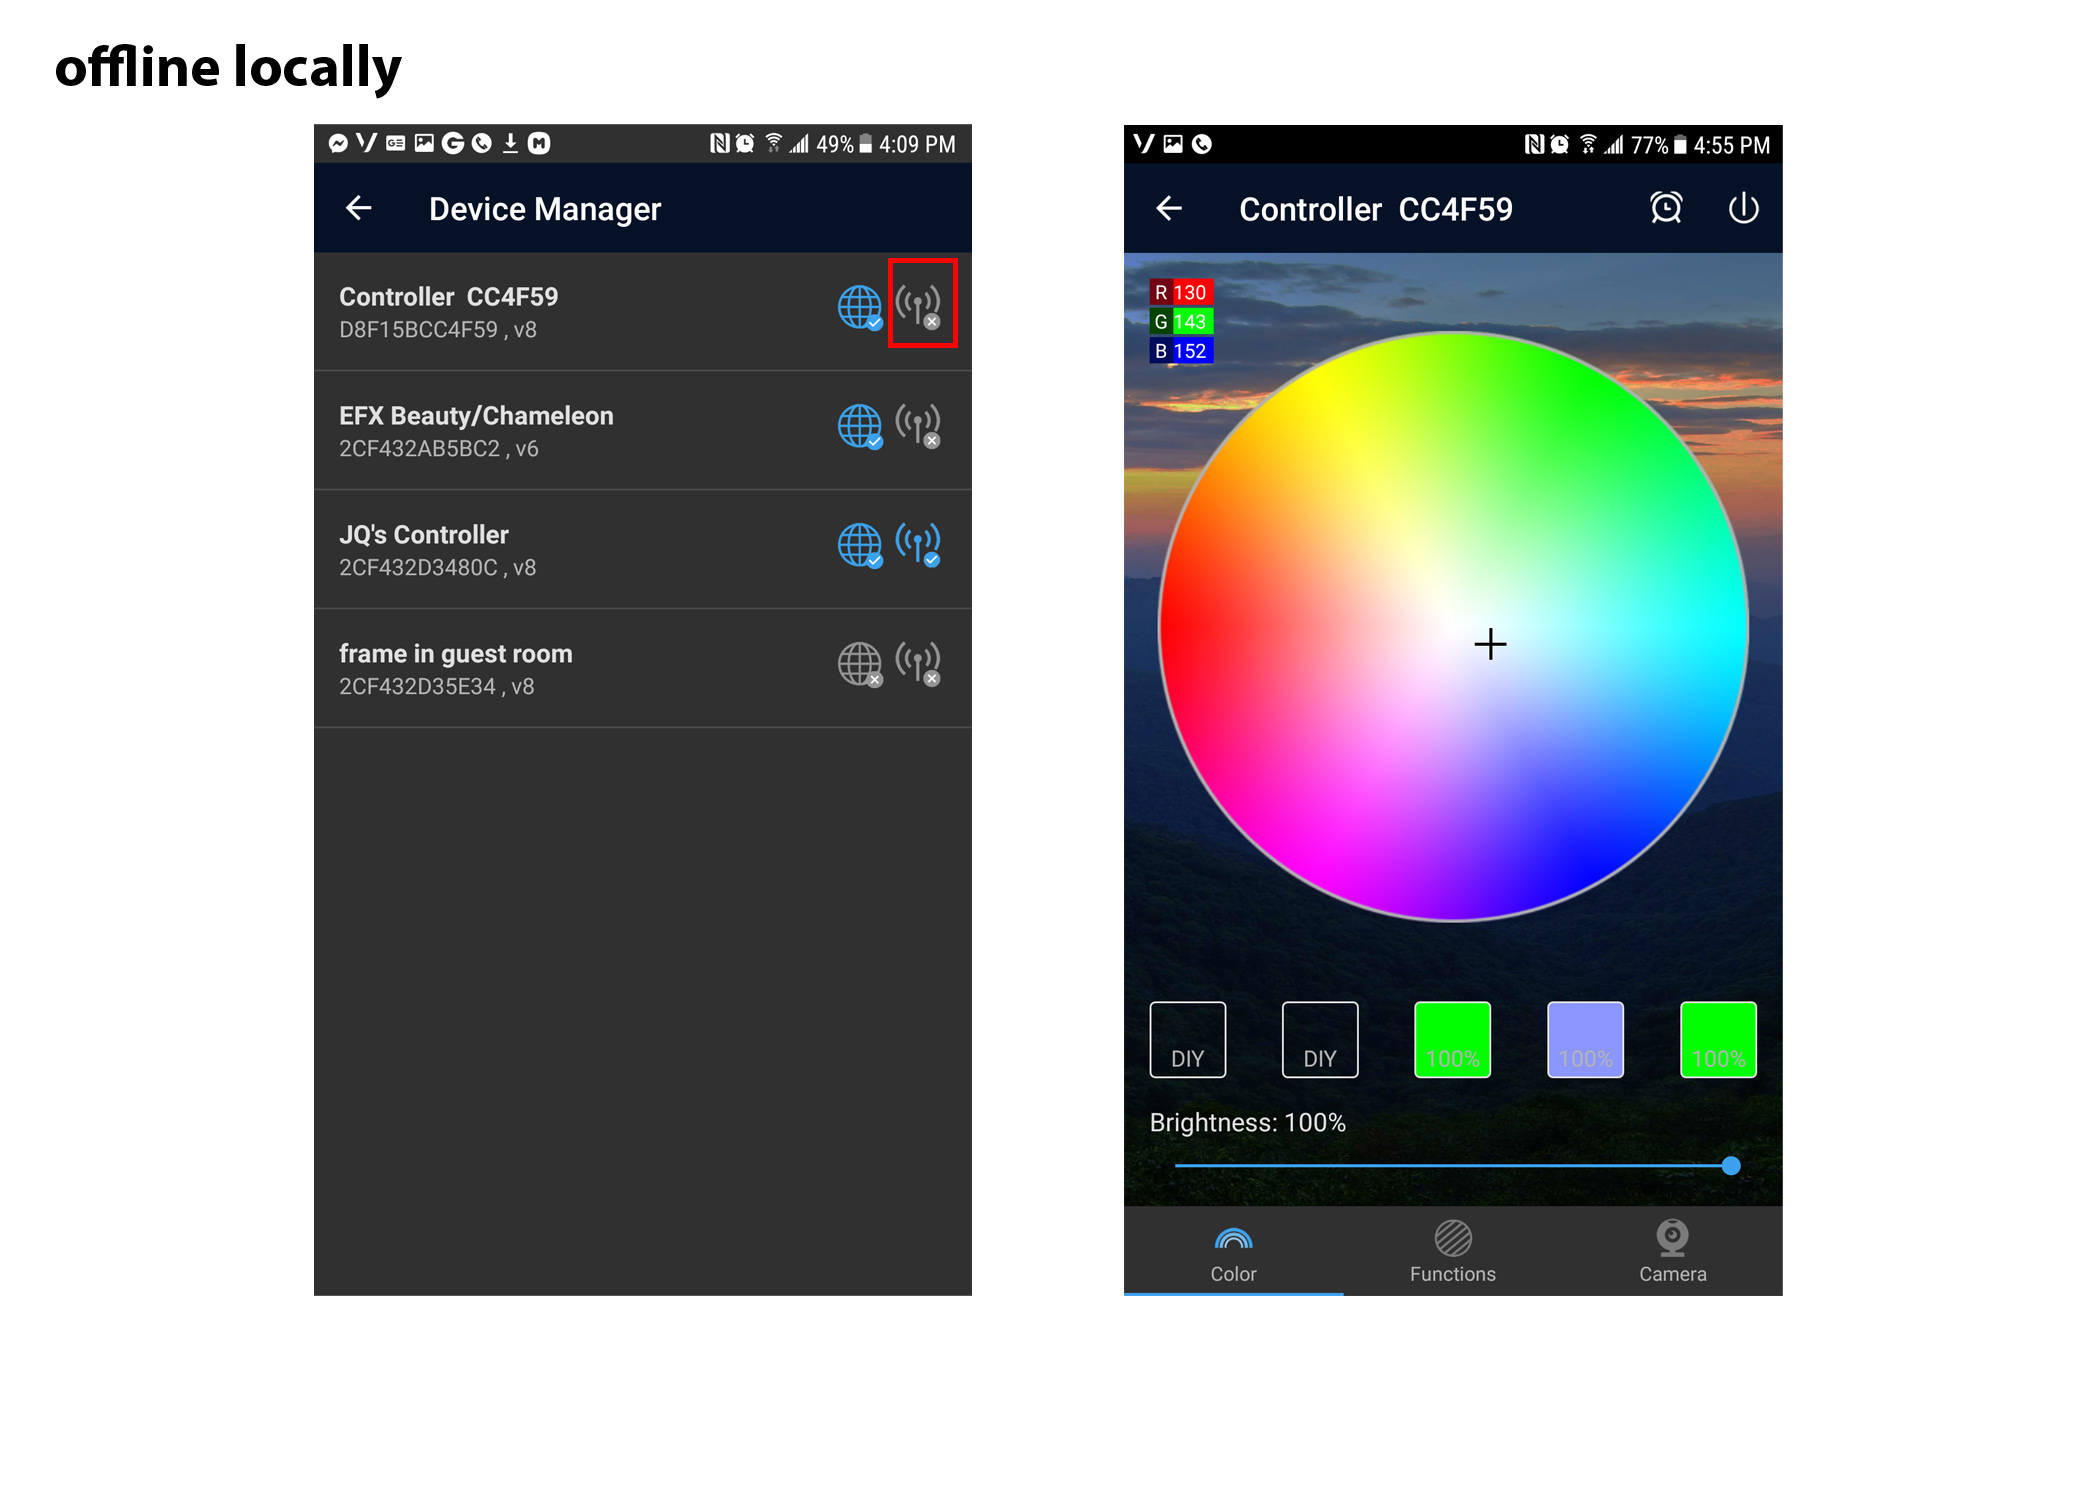
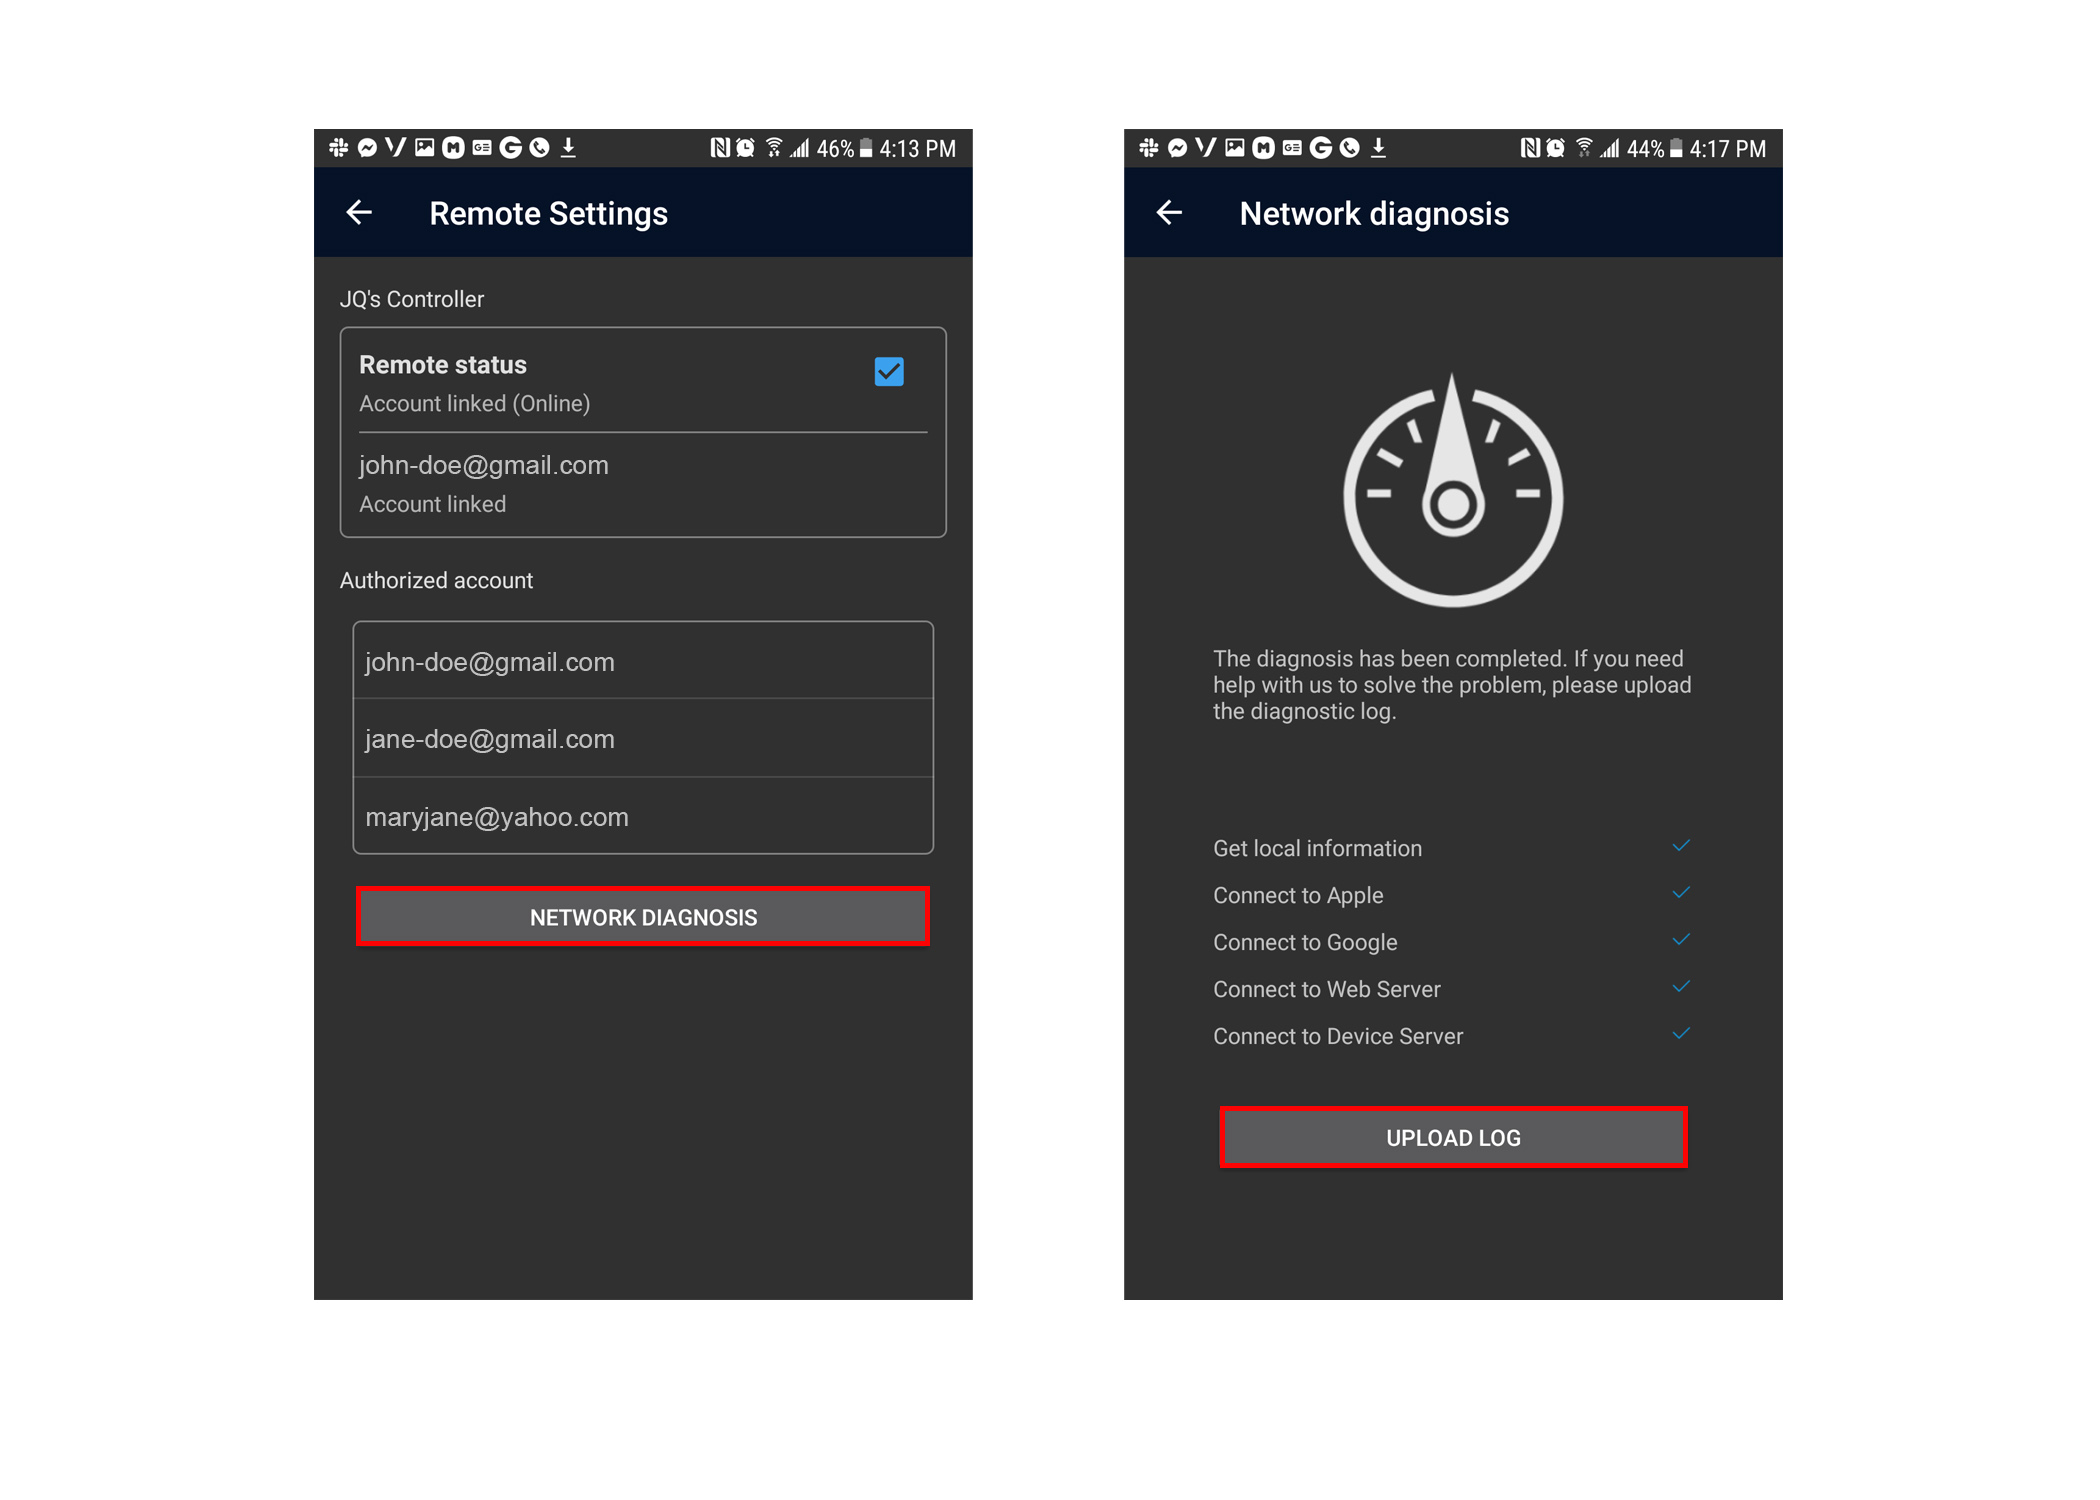
If the display status in the device settings menu is displayed as EFX Offline Icon the device is online but offline locally. To regain access on your local device, your smartphone device and your EFXTM device must be connected to the same wireless network.

If connect to the same network but still encountering issues, please try troubleshooting with the steps below.

  • Move the EFXTM device and smartphone device closer to the source of the wireless (Wi-Fi) signal.
  • Ensure there are minimal interference points as possible. Walls, furniture, and other electronic devices may create interference in signal to/from the wireless router.
  • Restart the EFXTM device (powering the device off then on) and refresh the EFXTM app's main device screen.
  • Restart the smartphone device's wireless connections by powering the Wi-Fi capabilities on and off from the smartphone's settings menu.
  • Restart the wireless router by unplugging the router from the power source, waiting 2 minutes then plugging the router into power.
  • Try using other smartphone devices and/or Wi-Fi routers.


FAQ on Troubleshooting


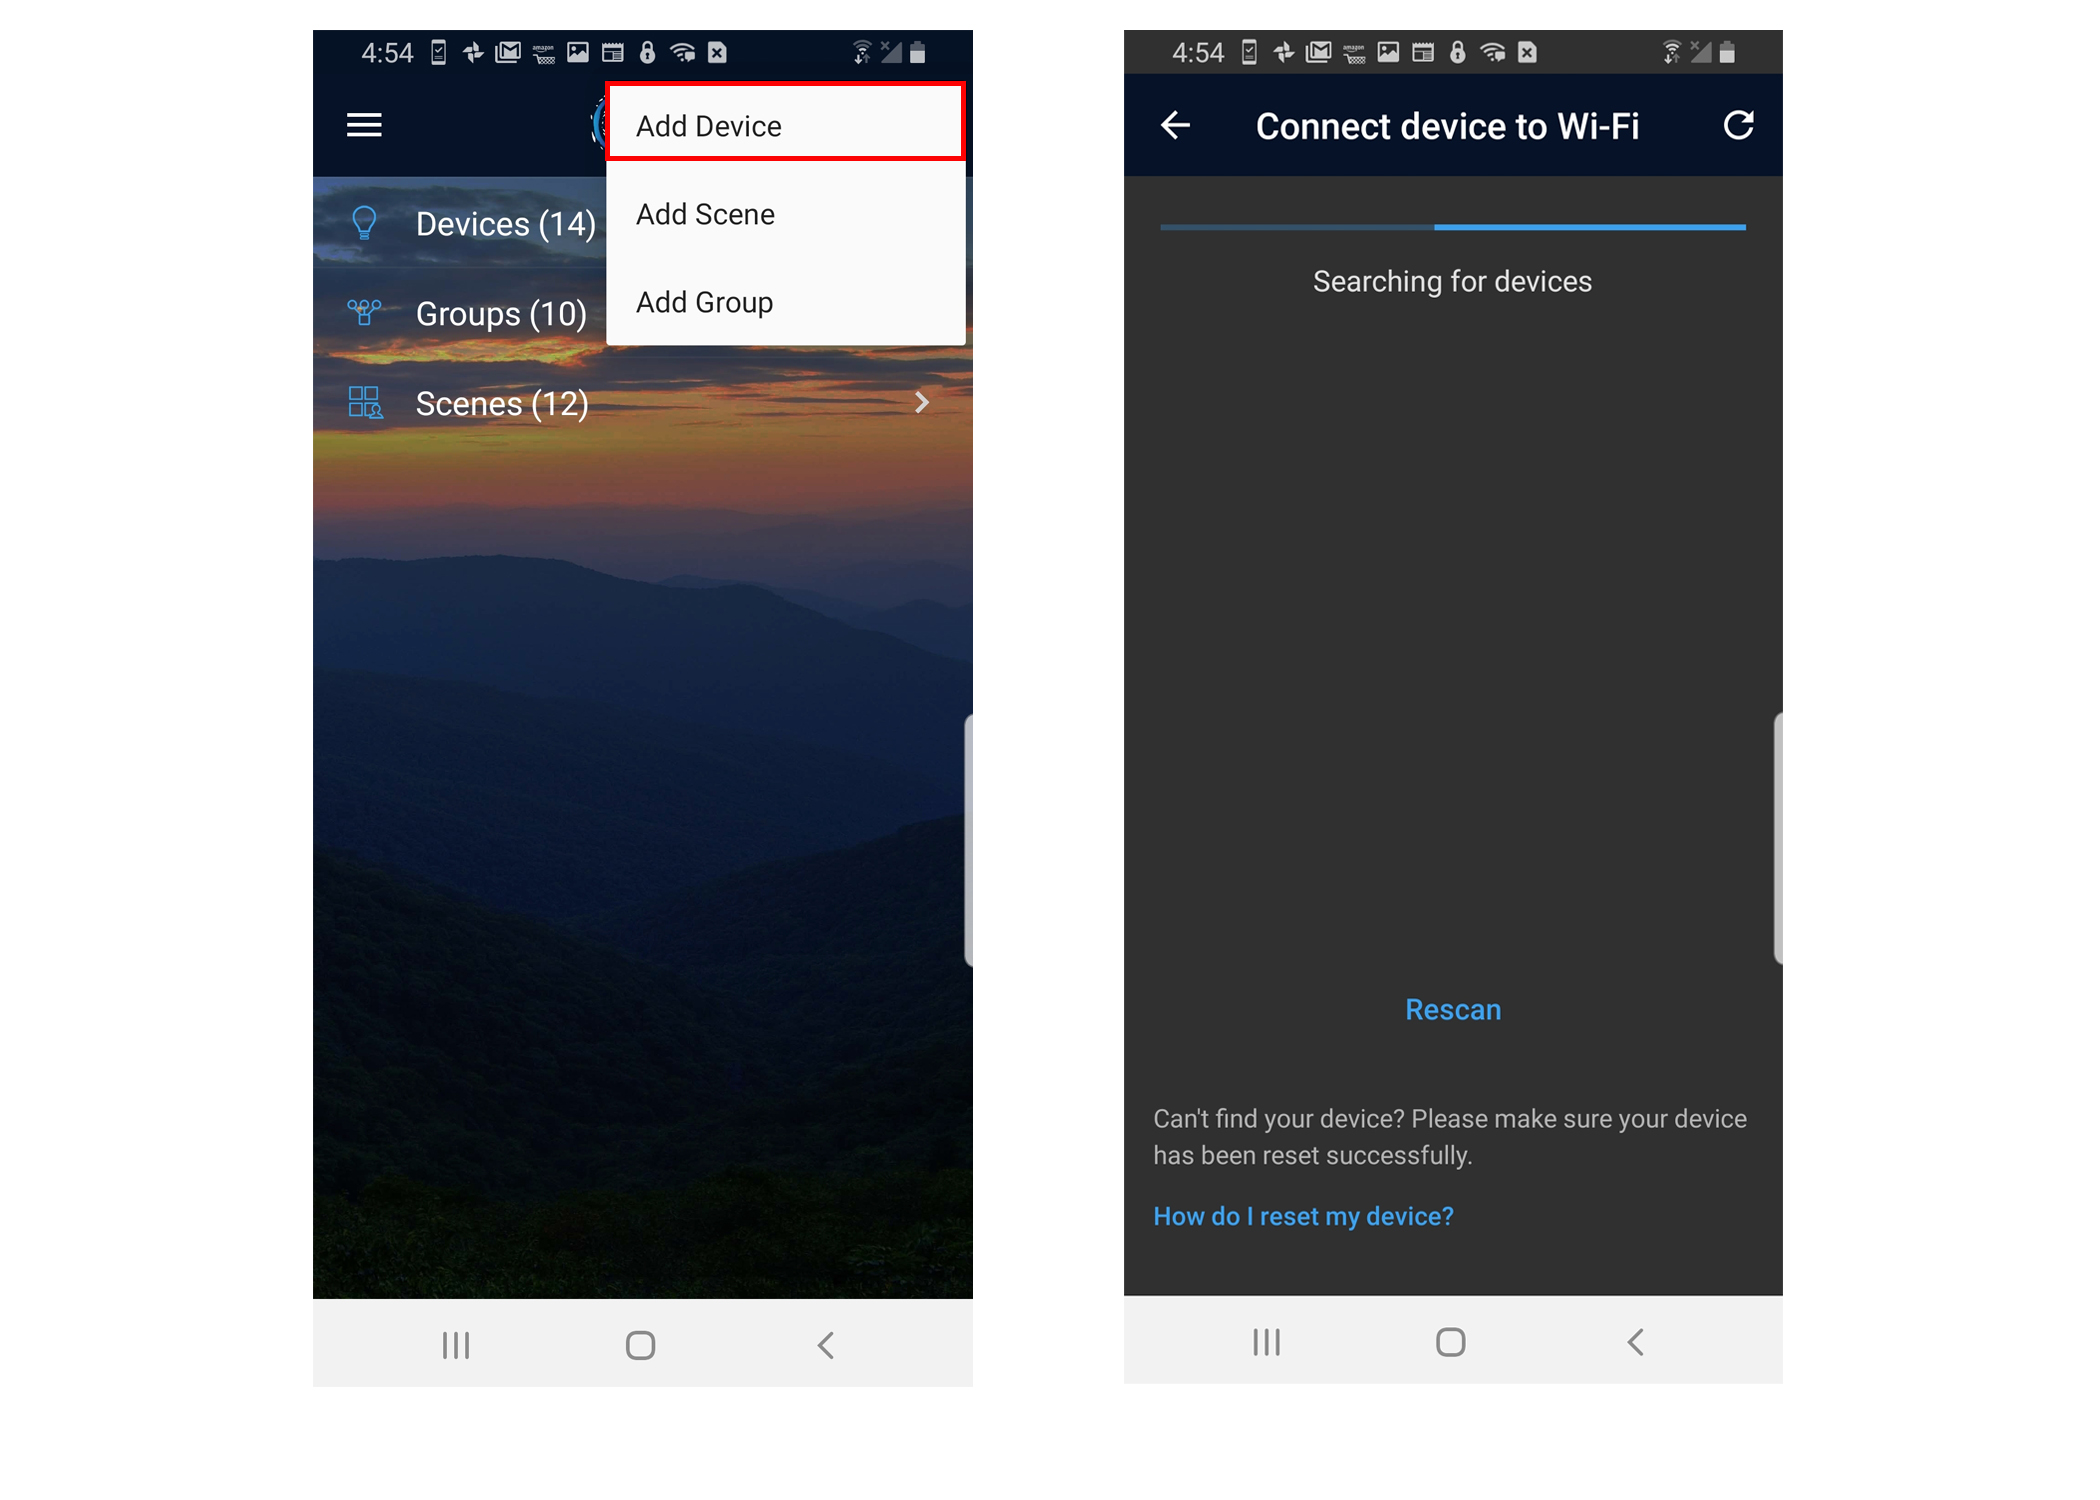
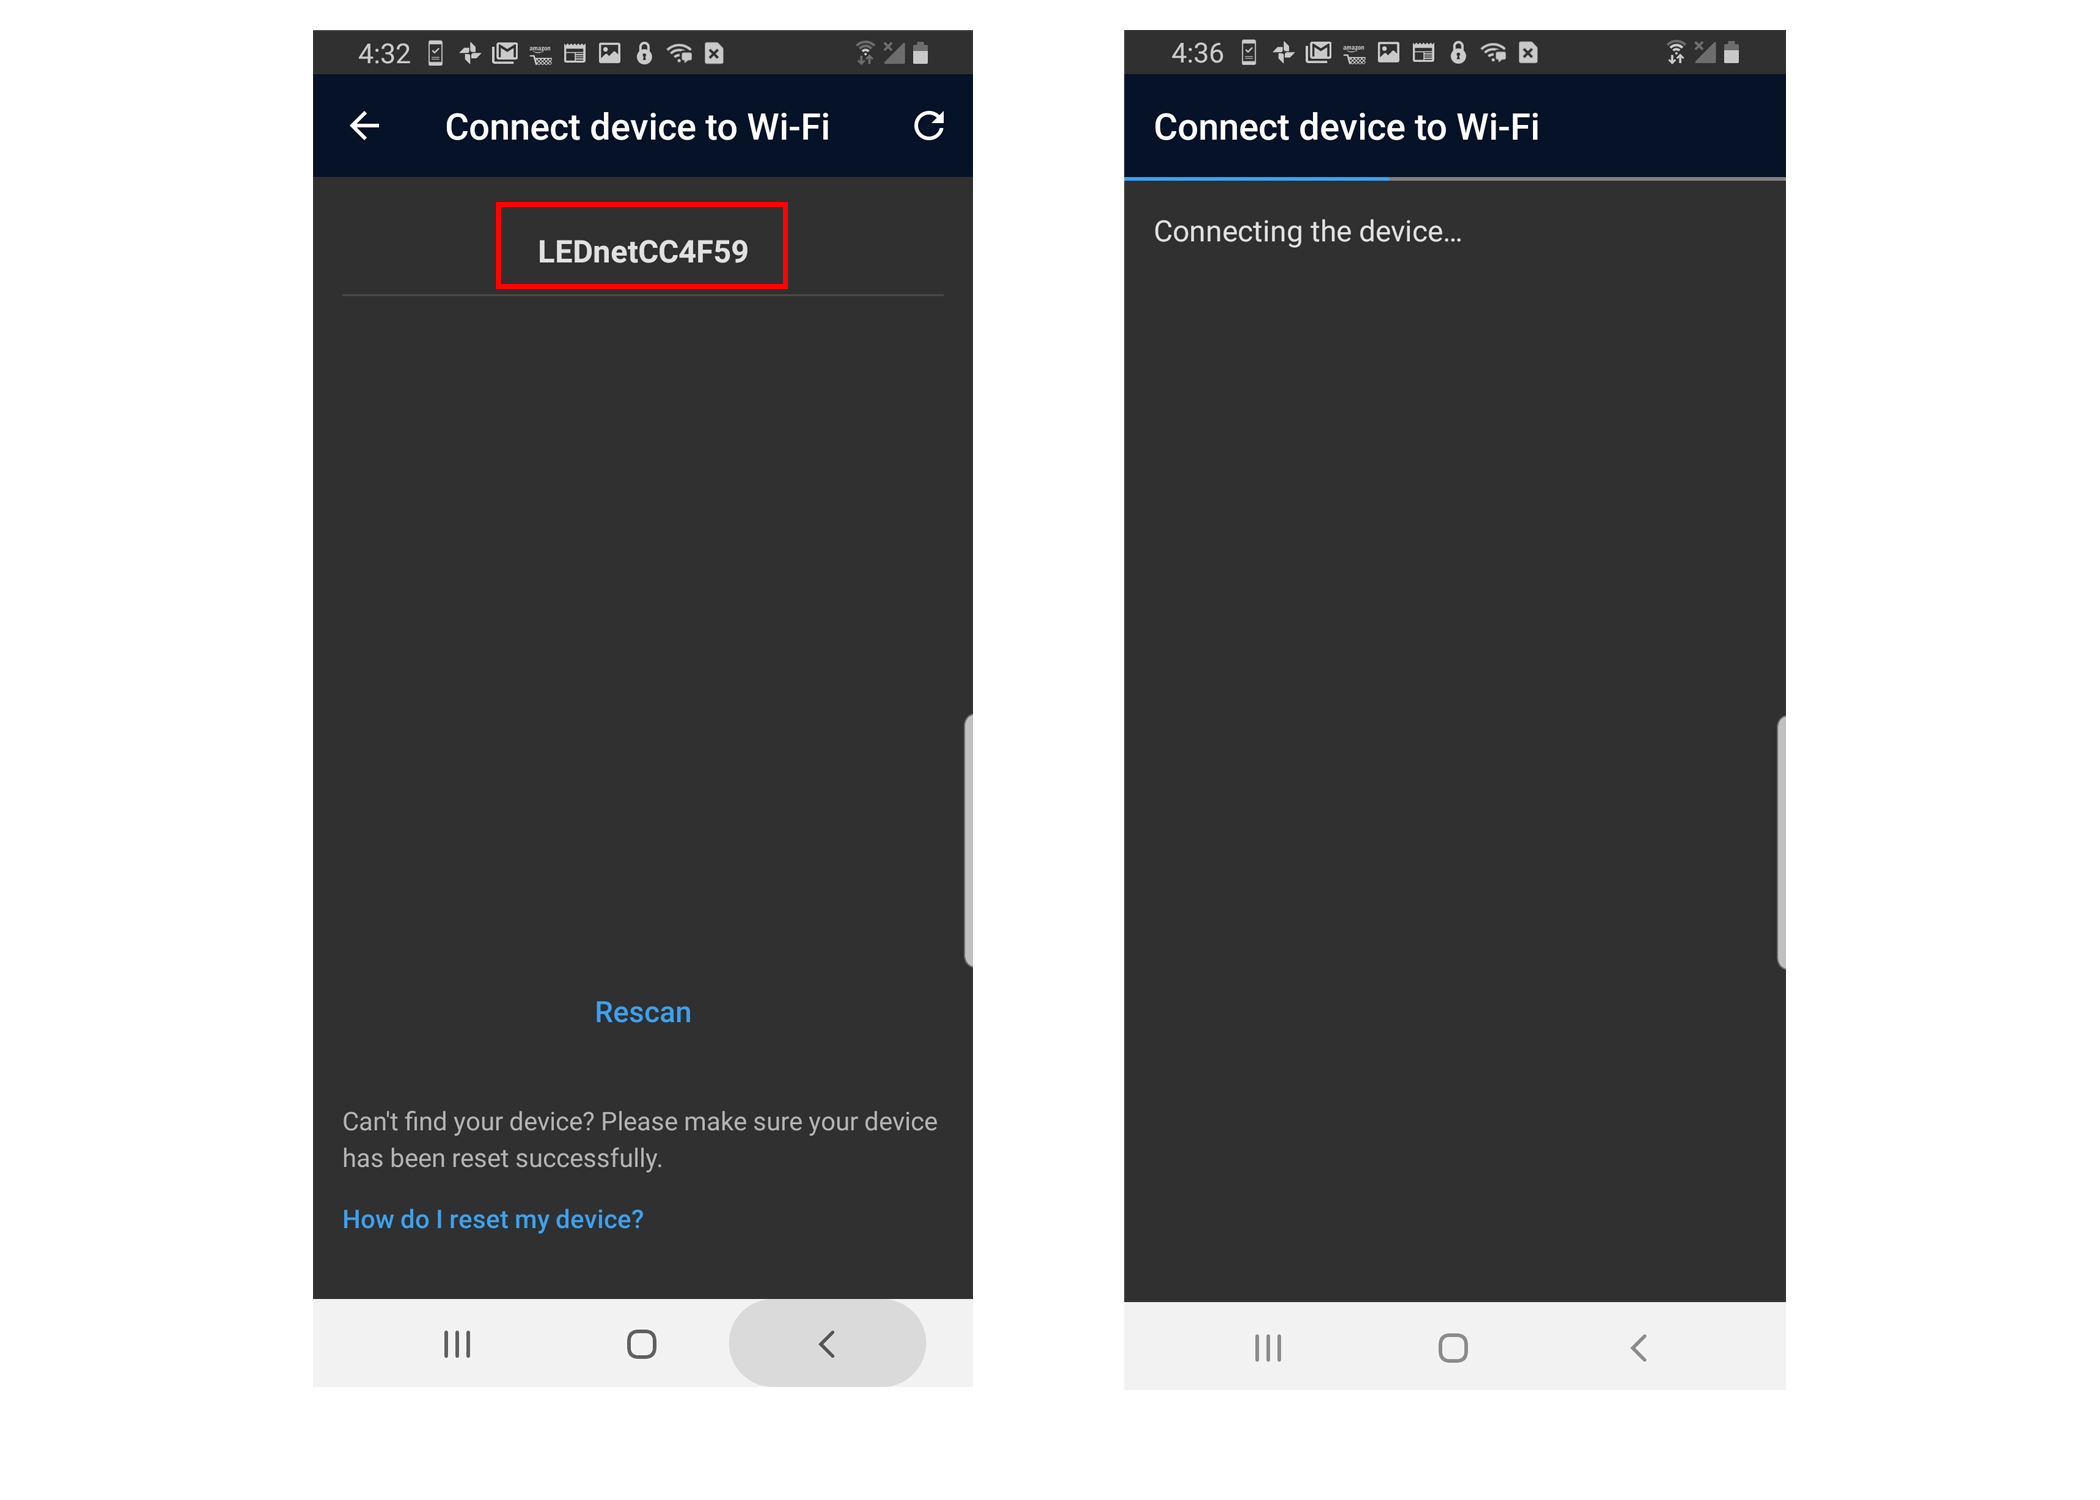
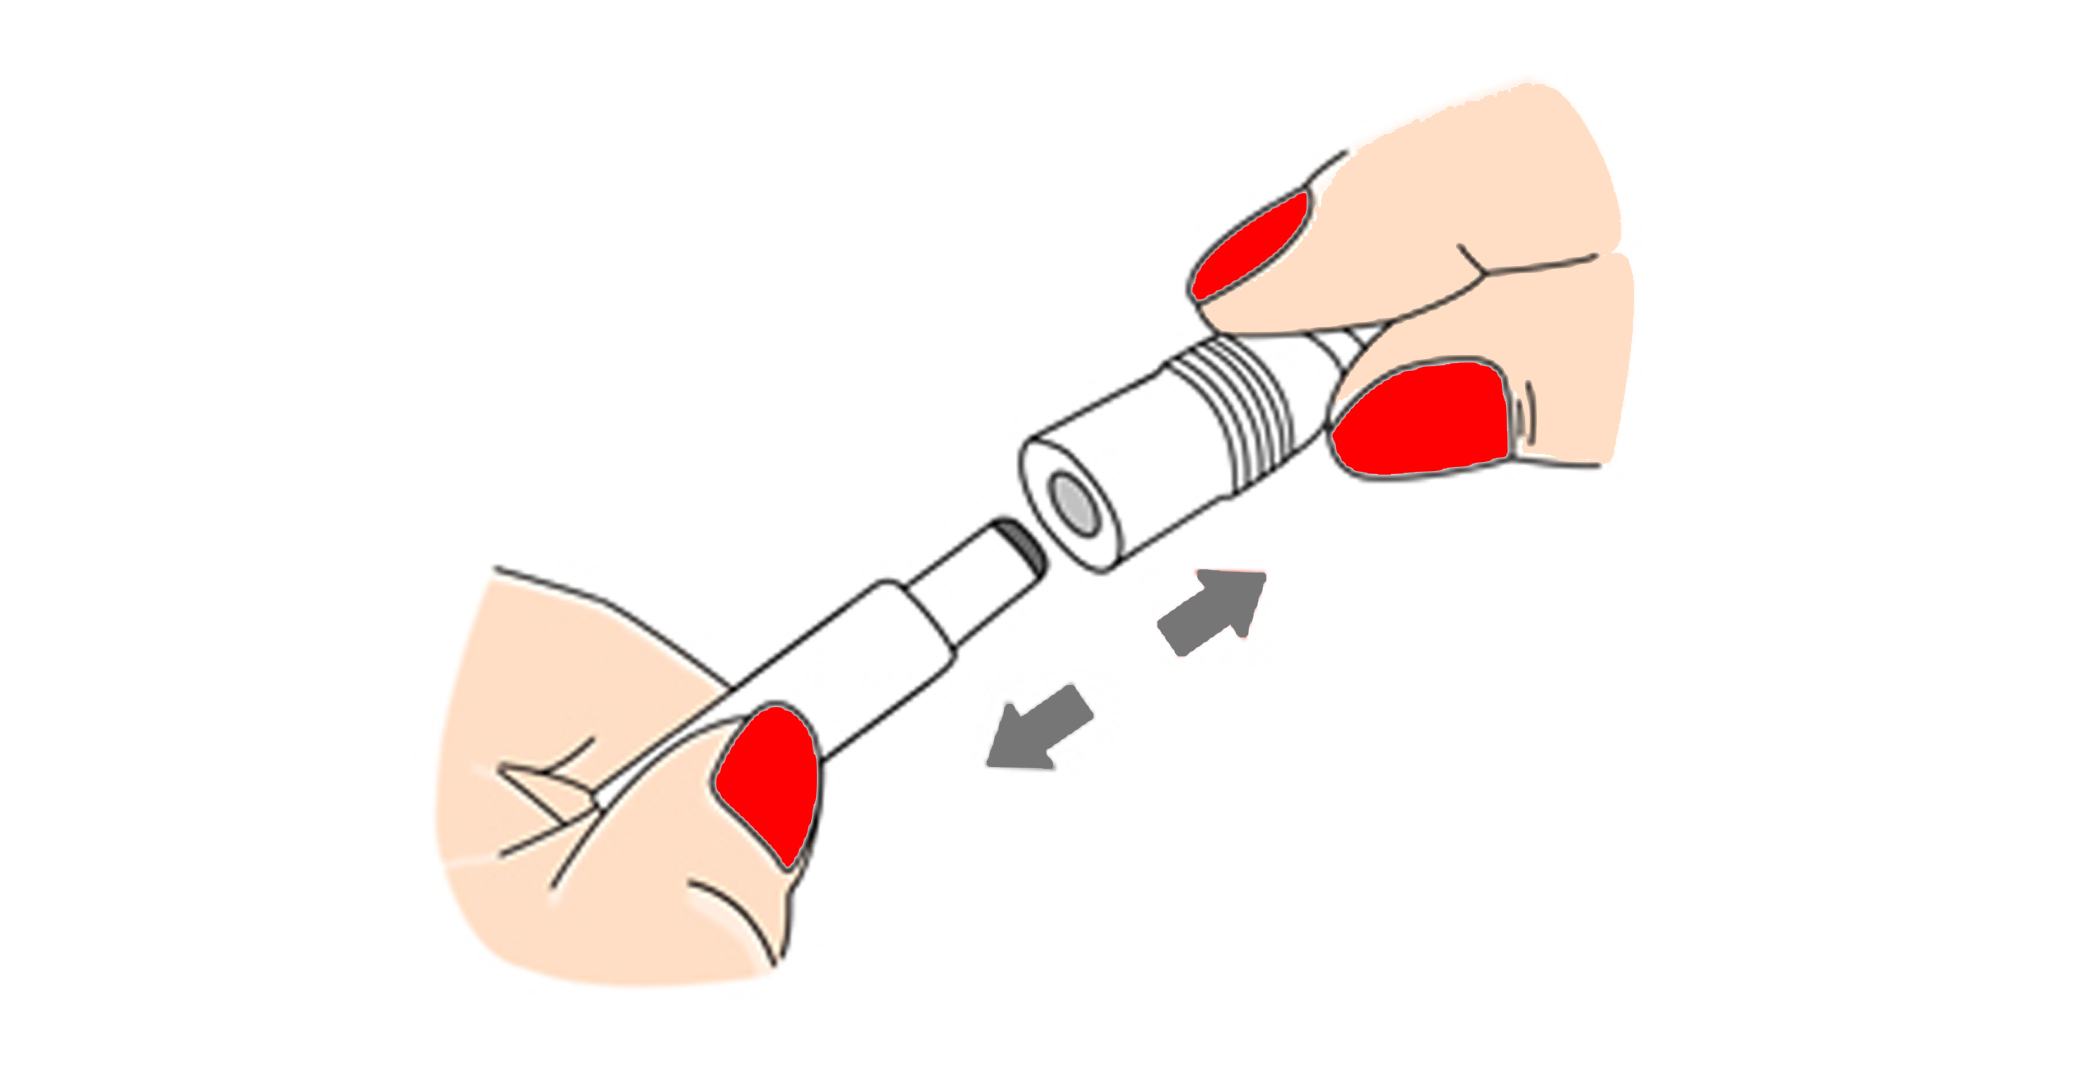
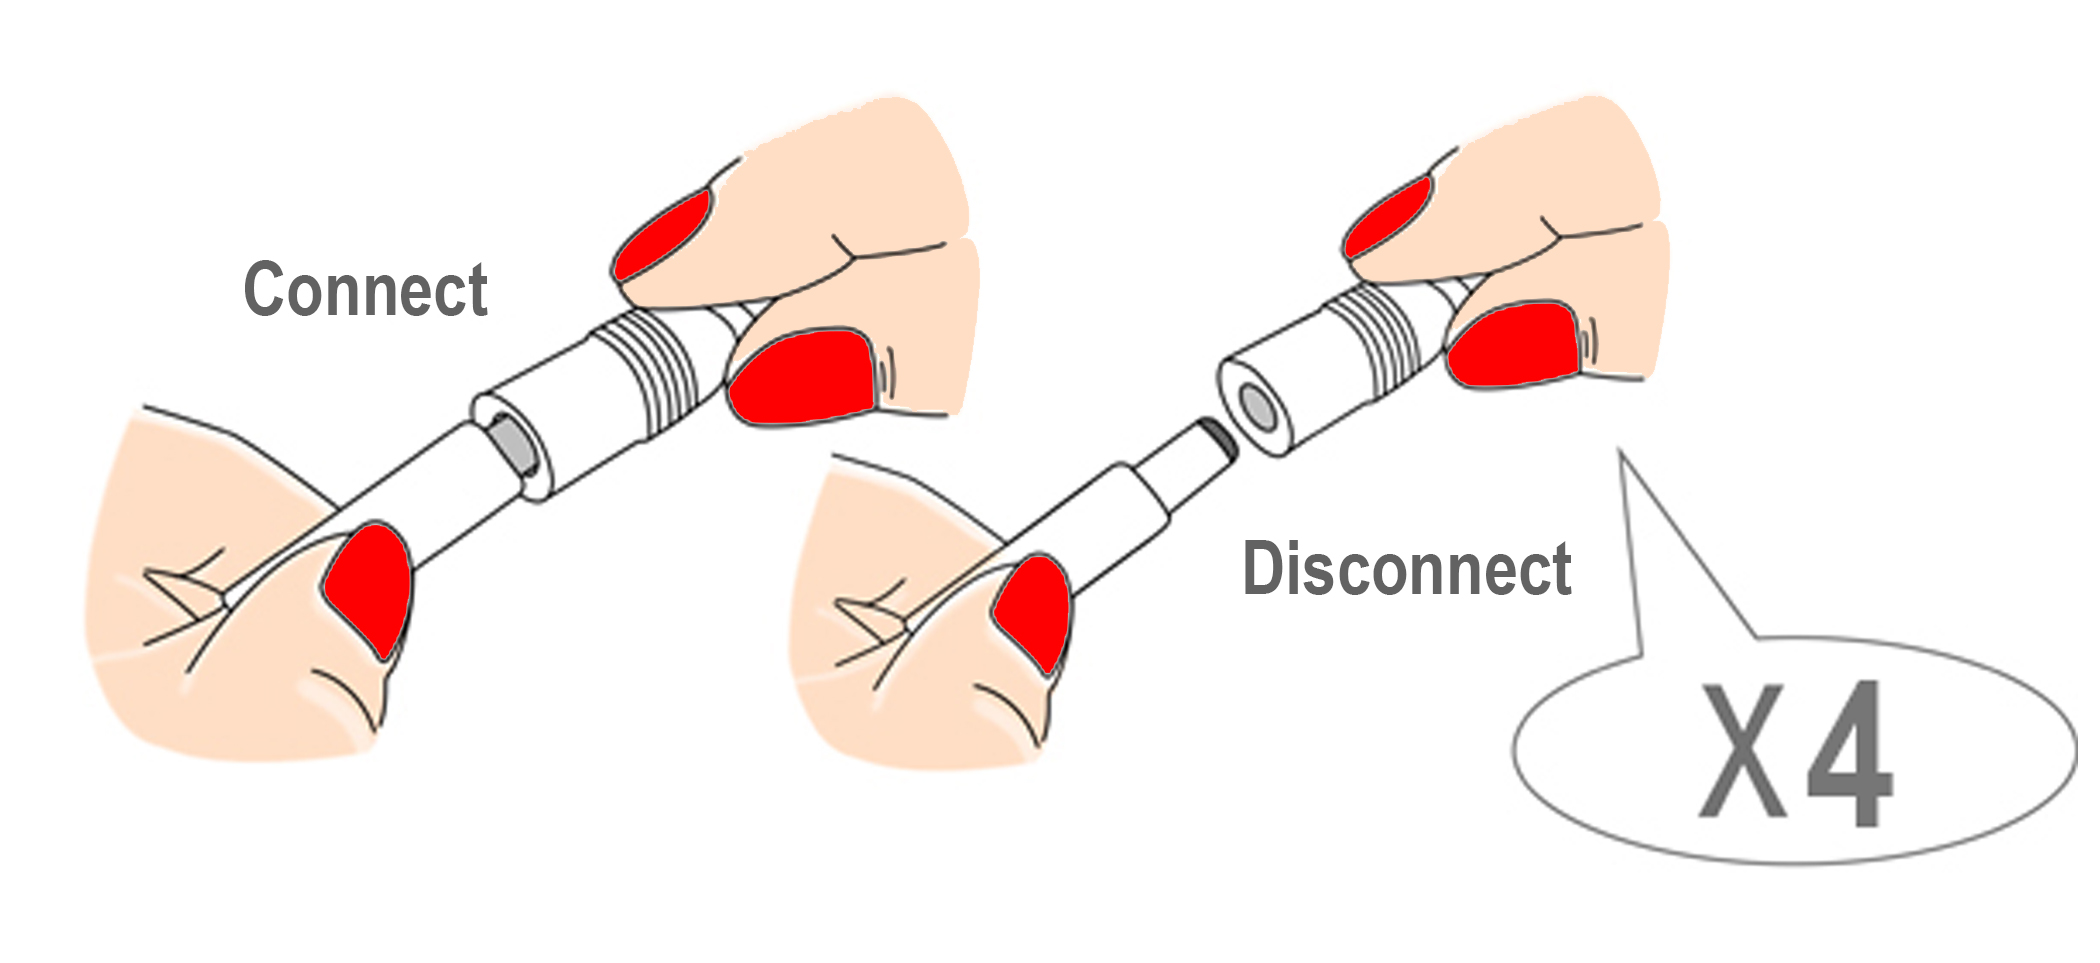
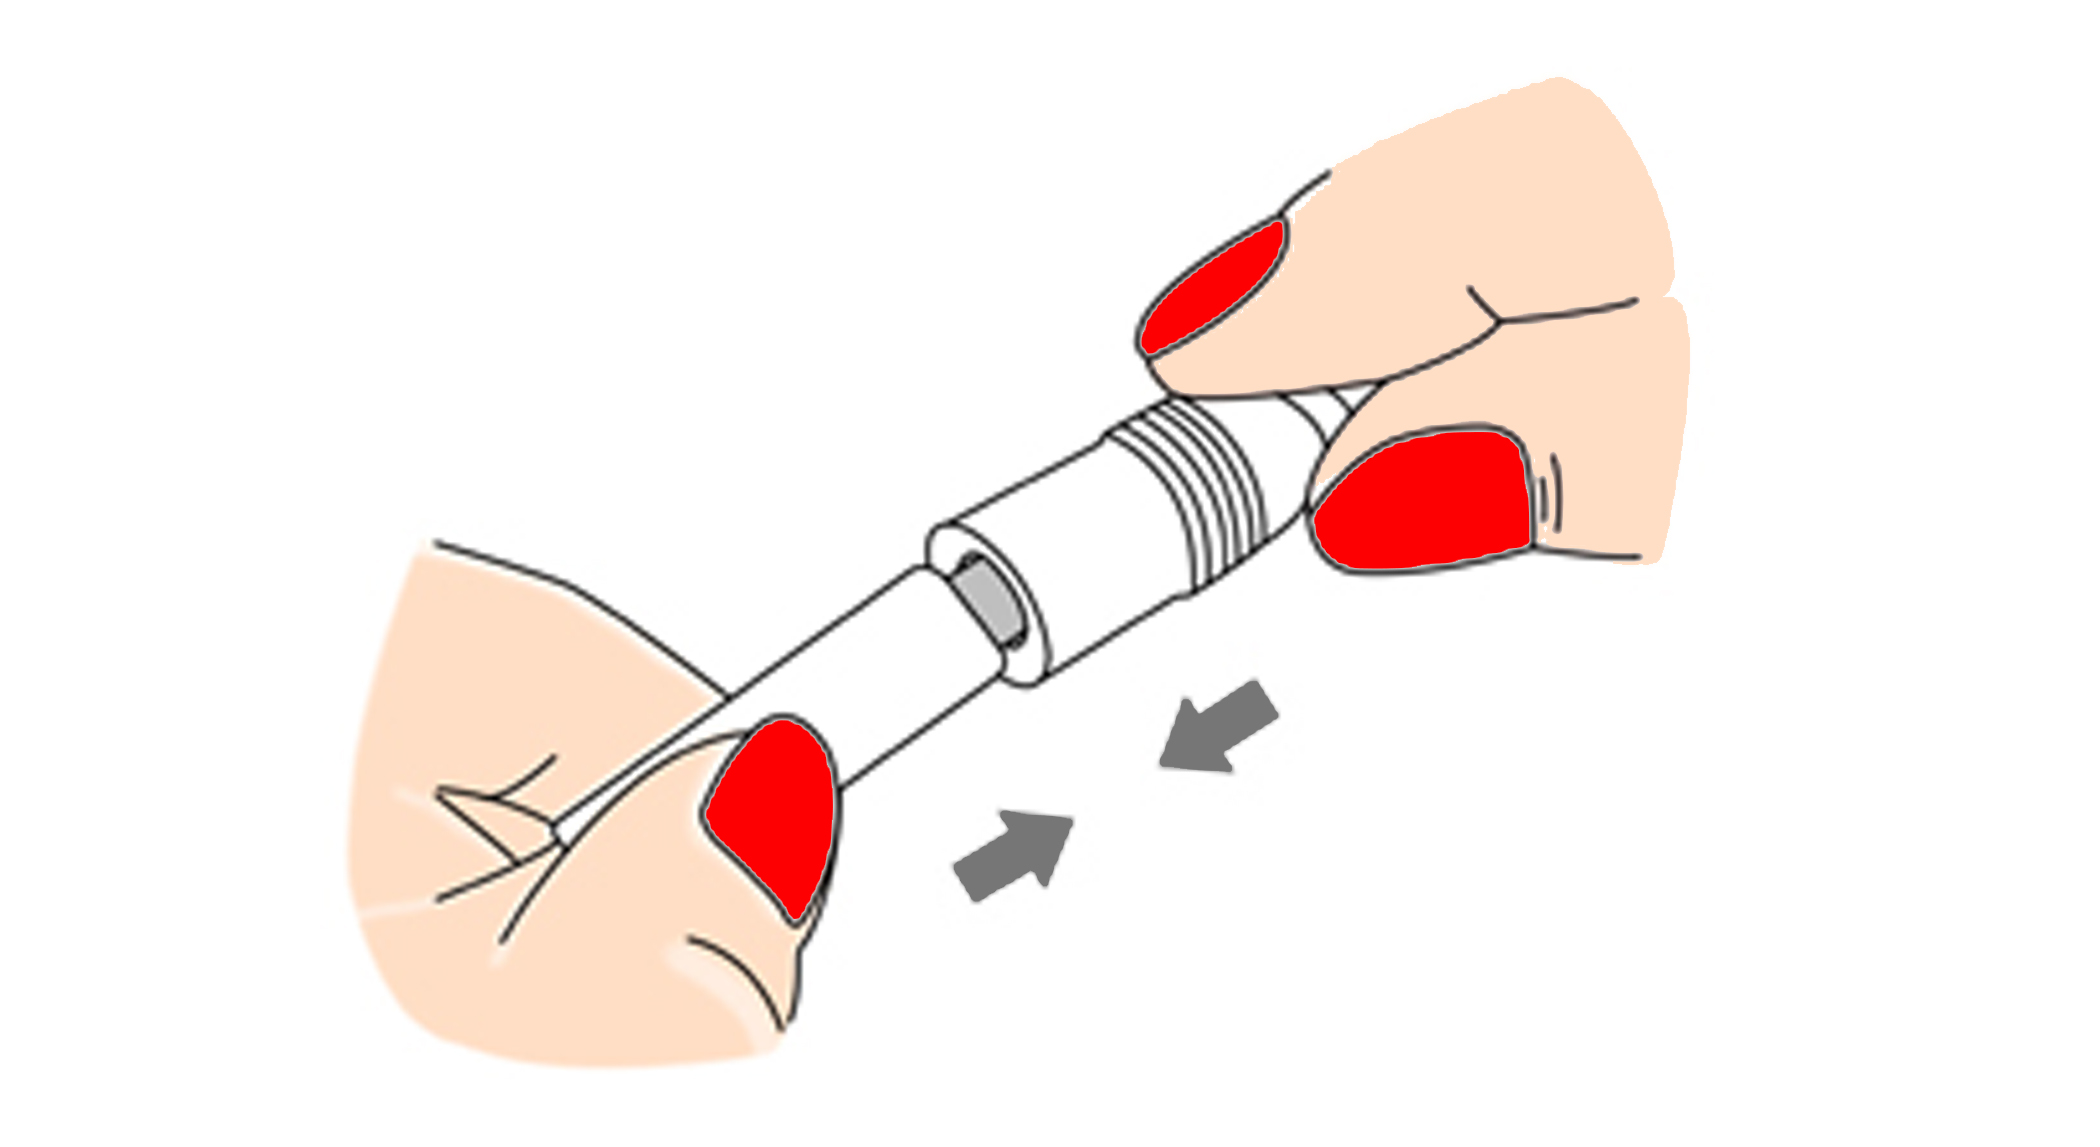
The EFXTM device is designed to broadcast a Wi-Fi signal when first powered during the setup process. Once connected to your personal Wi-Fi network, connect your smartphone device to that network to control your EFXTM device.

The EFXTM Device and EFXTM App must be either directly connected to each other via Wi-Fi or both connected to the same Wi-Fi network, which is the preferred configuration. If you do not see music and microphone icons, most likely your Wi-Fi network is down or the EFXTM App or Device is not connected to that network. You can confirm which of your EFXTM Devices are online locally by going to the control panel, then device settings. The devices that have the broadcasting antenna icon lit up are the ones that are online locally and will provide both music and microphone features. If your device is not online locally, try these troubleshooting tips:

Picture of offline locally Picture of online locally
    • Confirm that your smartphone is connected to the local Wi-Fi network, and not in airplane mode or have its Wi-Fi connection turned off.
    • Confirm that the router is powered on.
    • Confirm that the EFXTM Device is powered on and in range of the local router (e.g. it hasn't been moved to a location where the Wi-Fi signal can no longer reach it).
    • Try restarting the EFXTM App.
    • Try unplugging the EFXTM Device and plugging it in again.
    • Last resort, try restarting your router.


FAQ on How To:


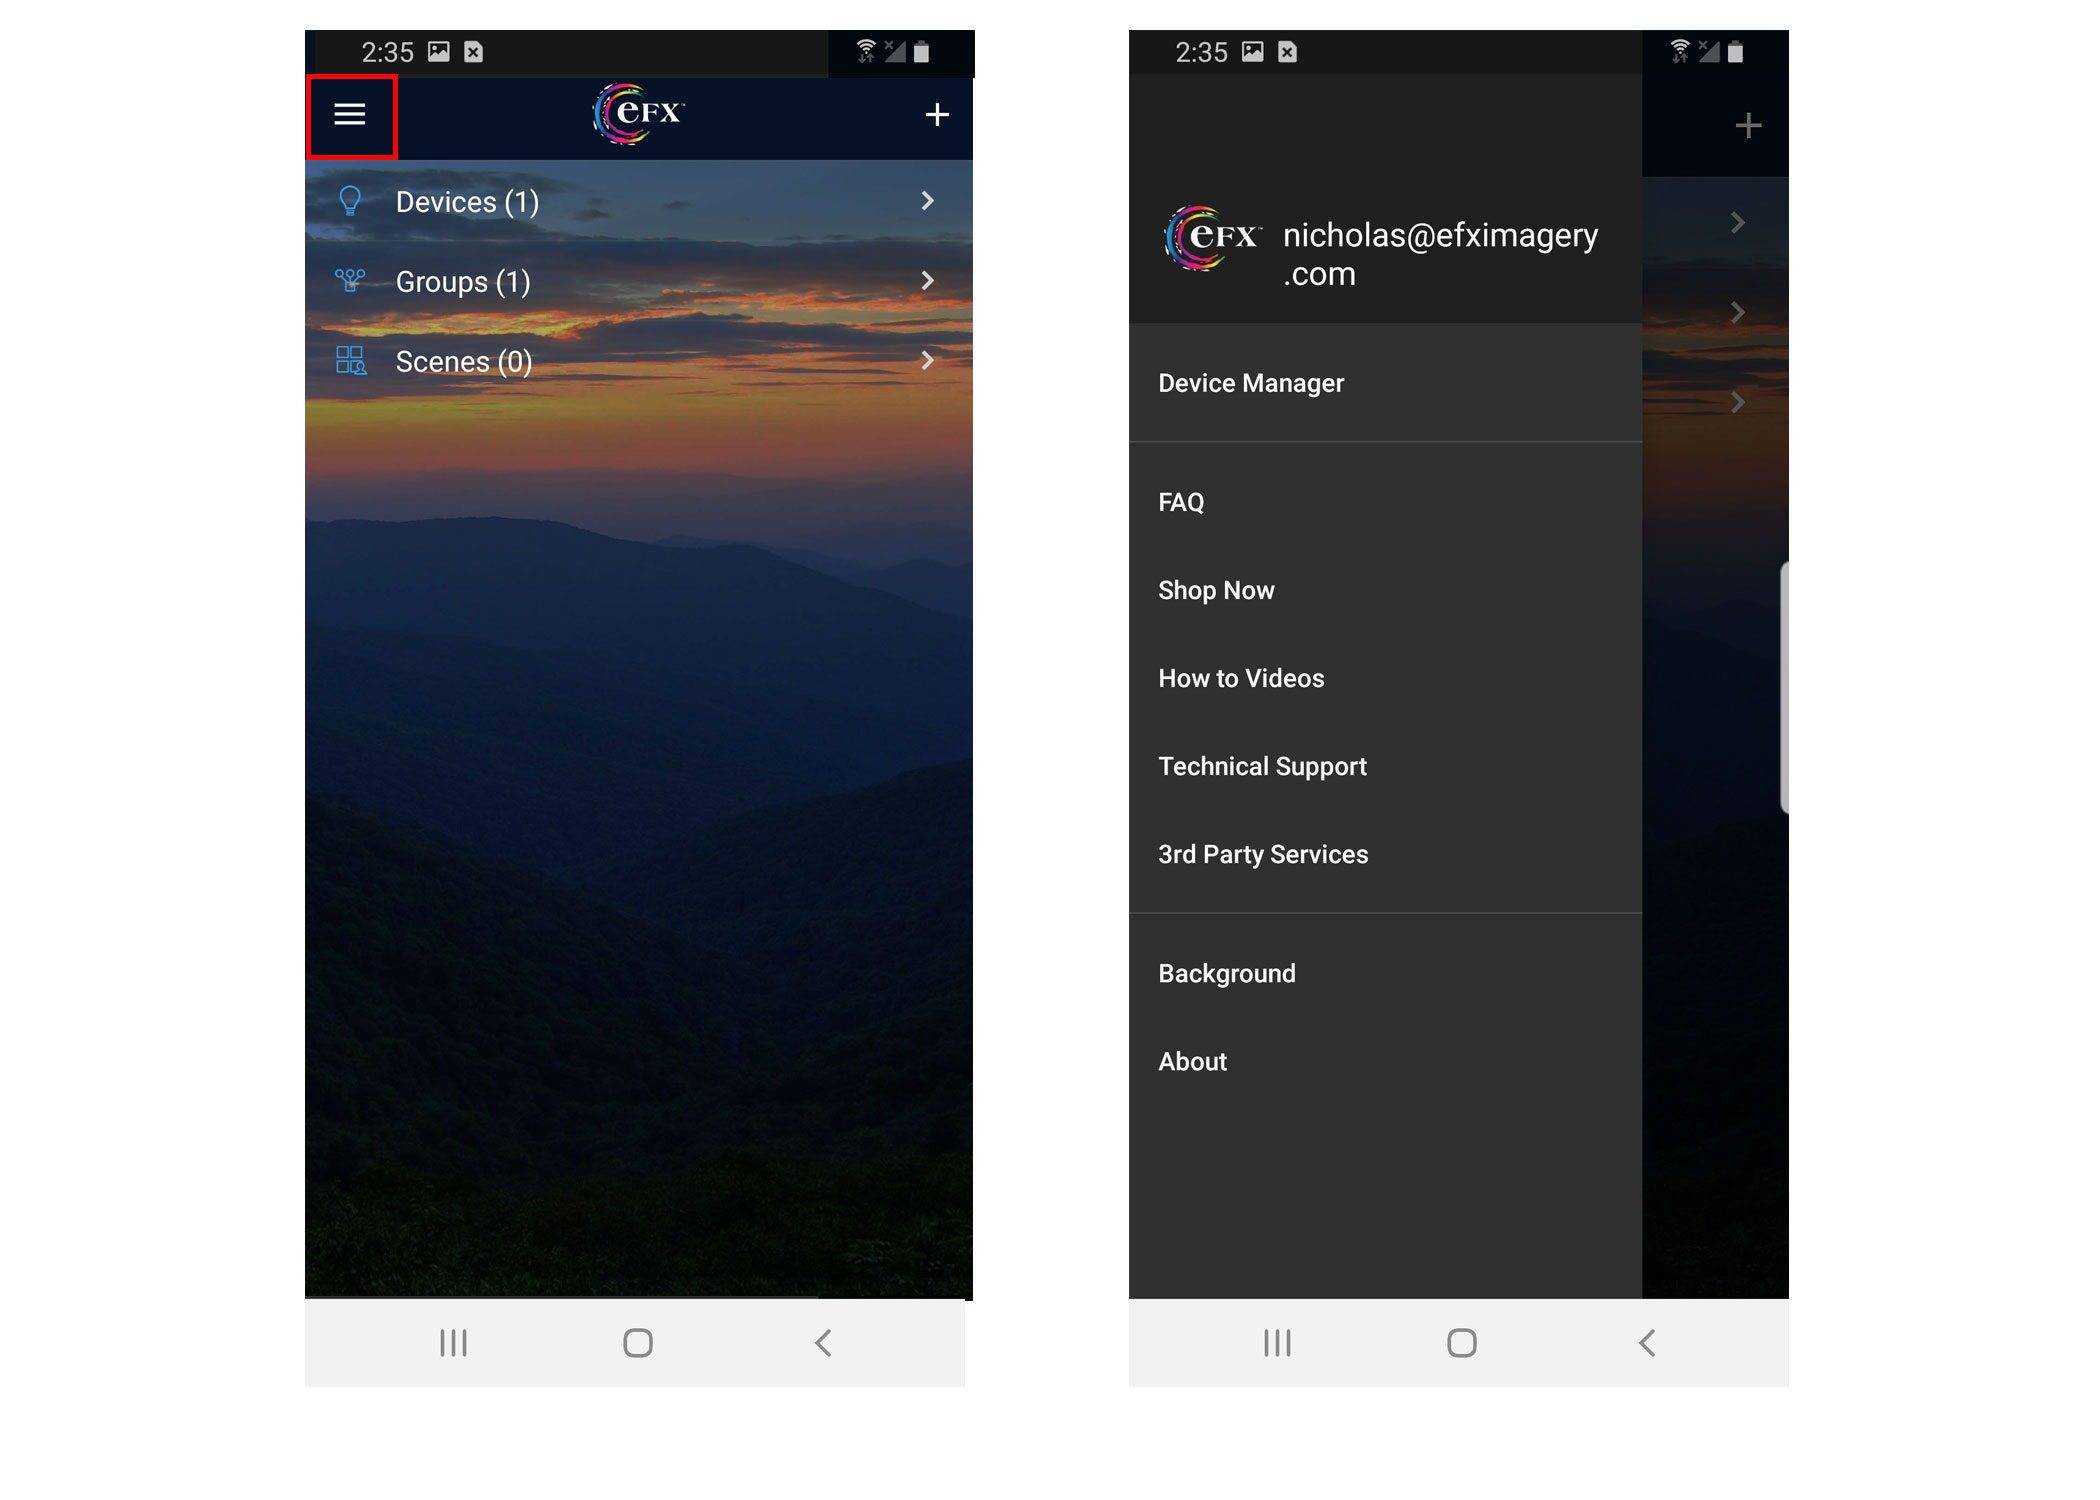
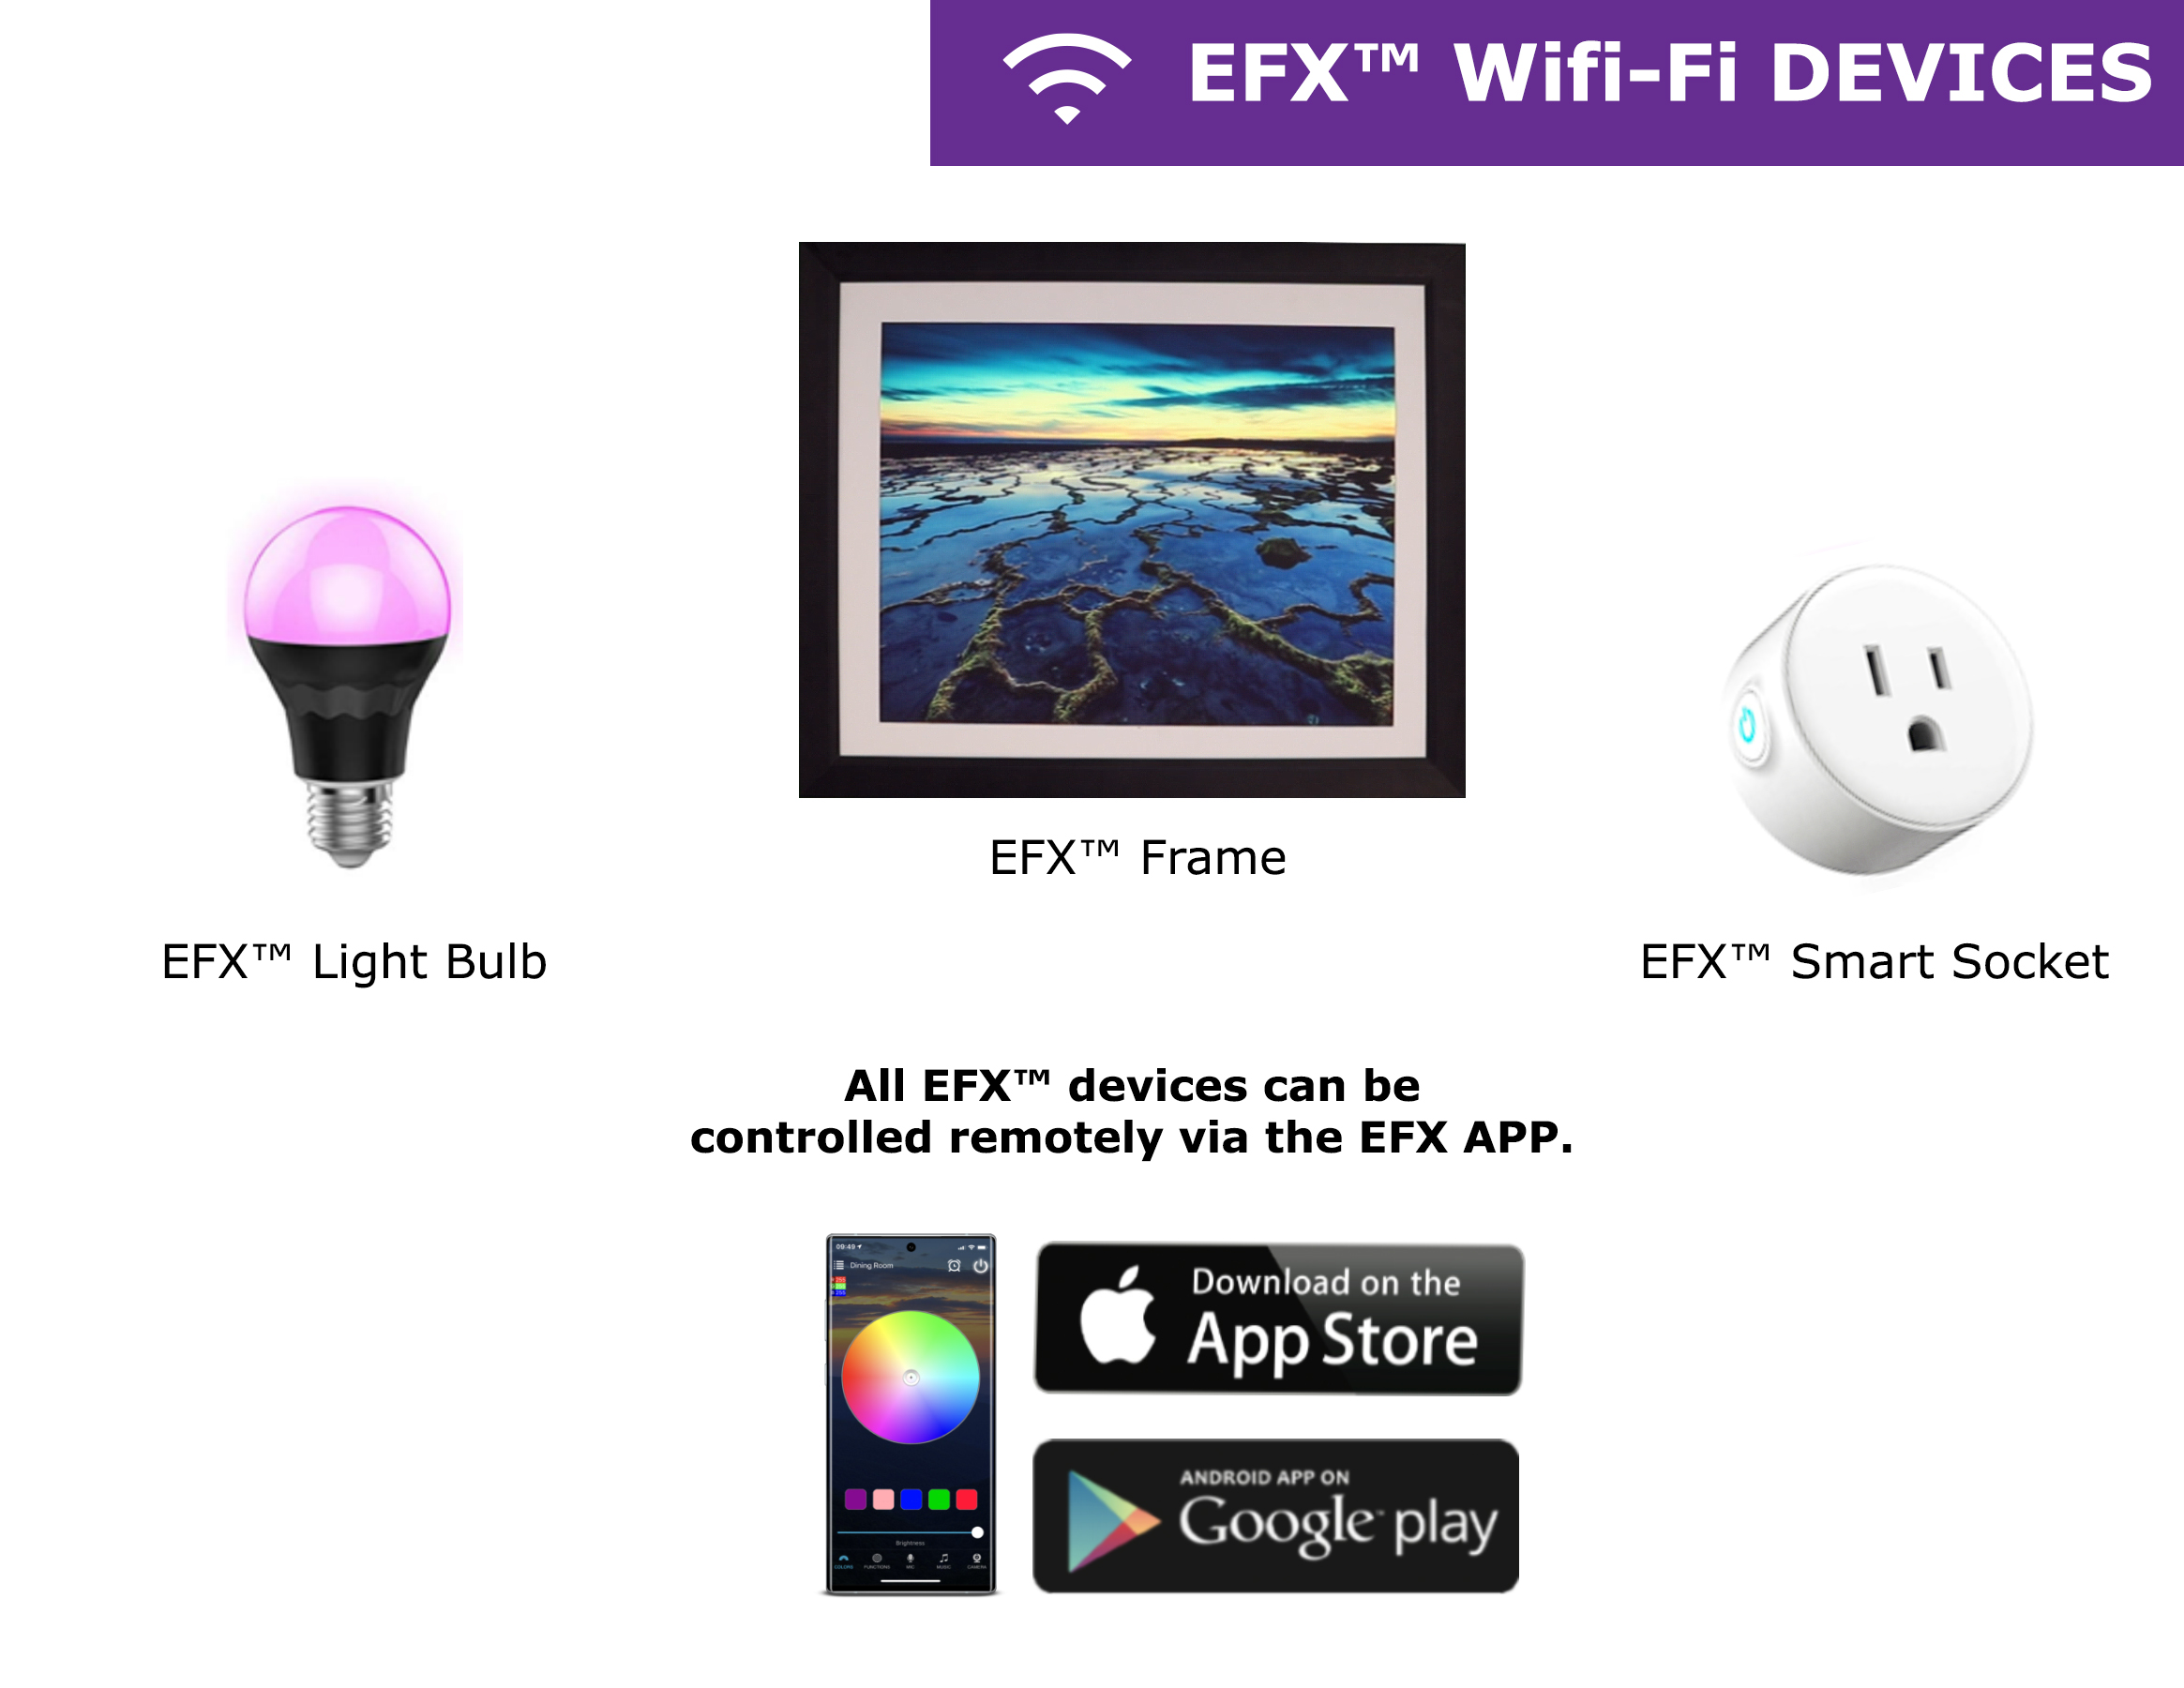
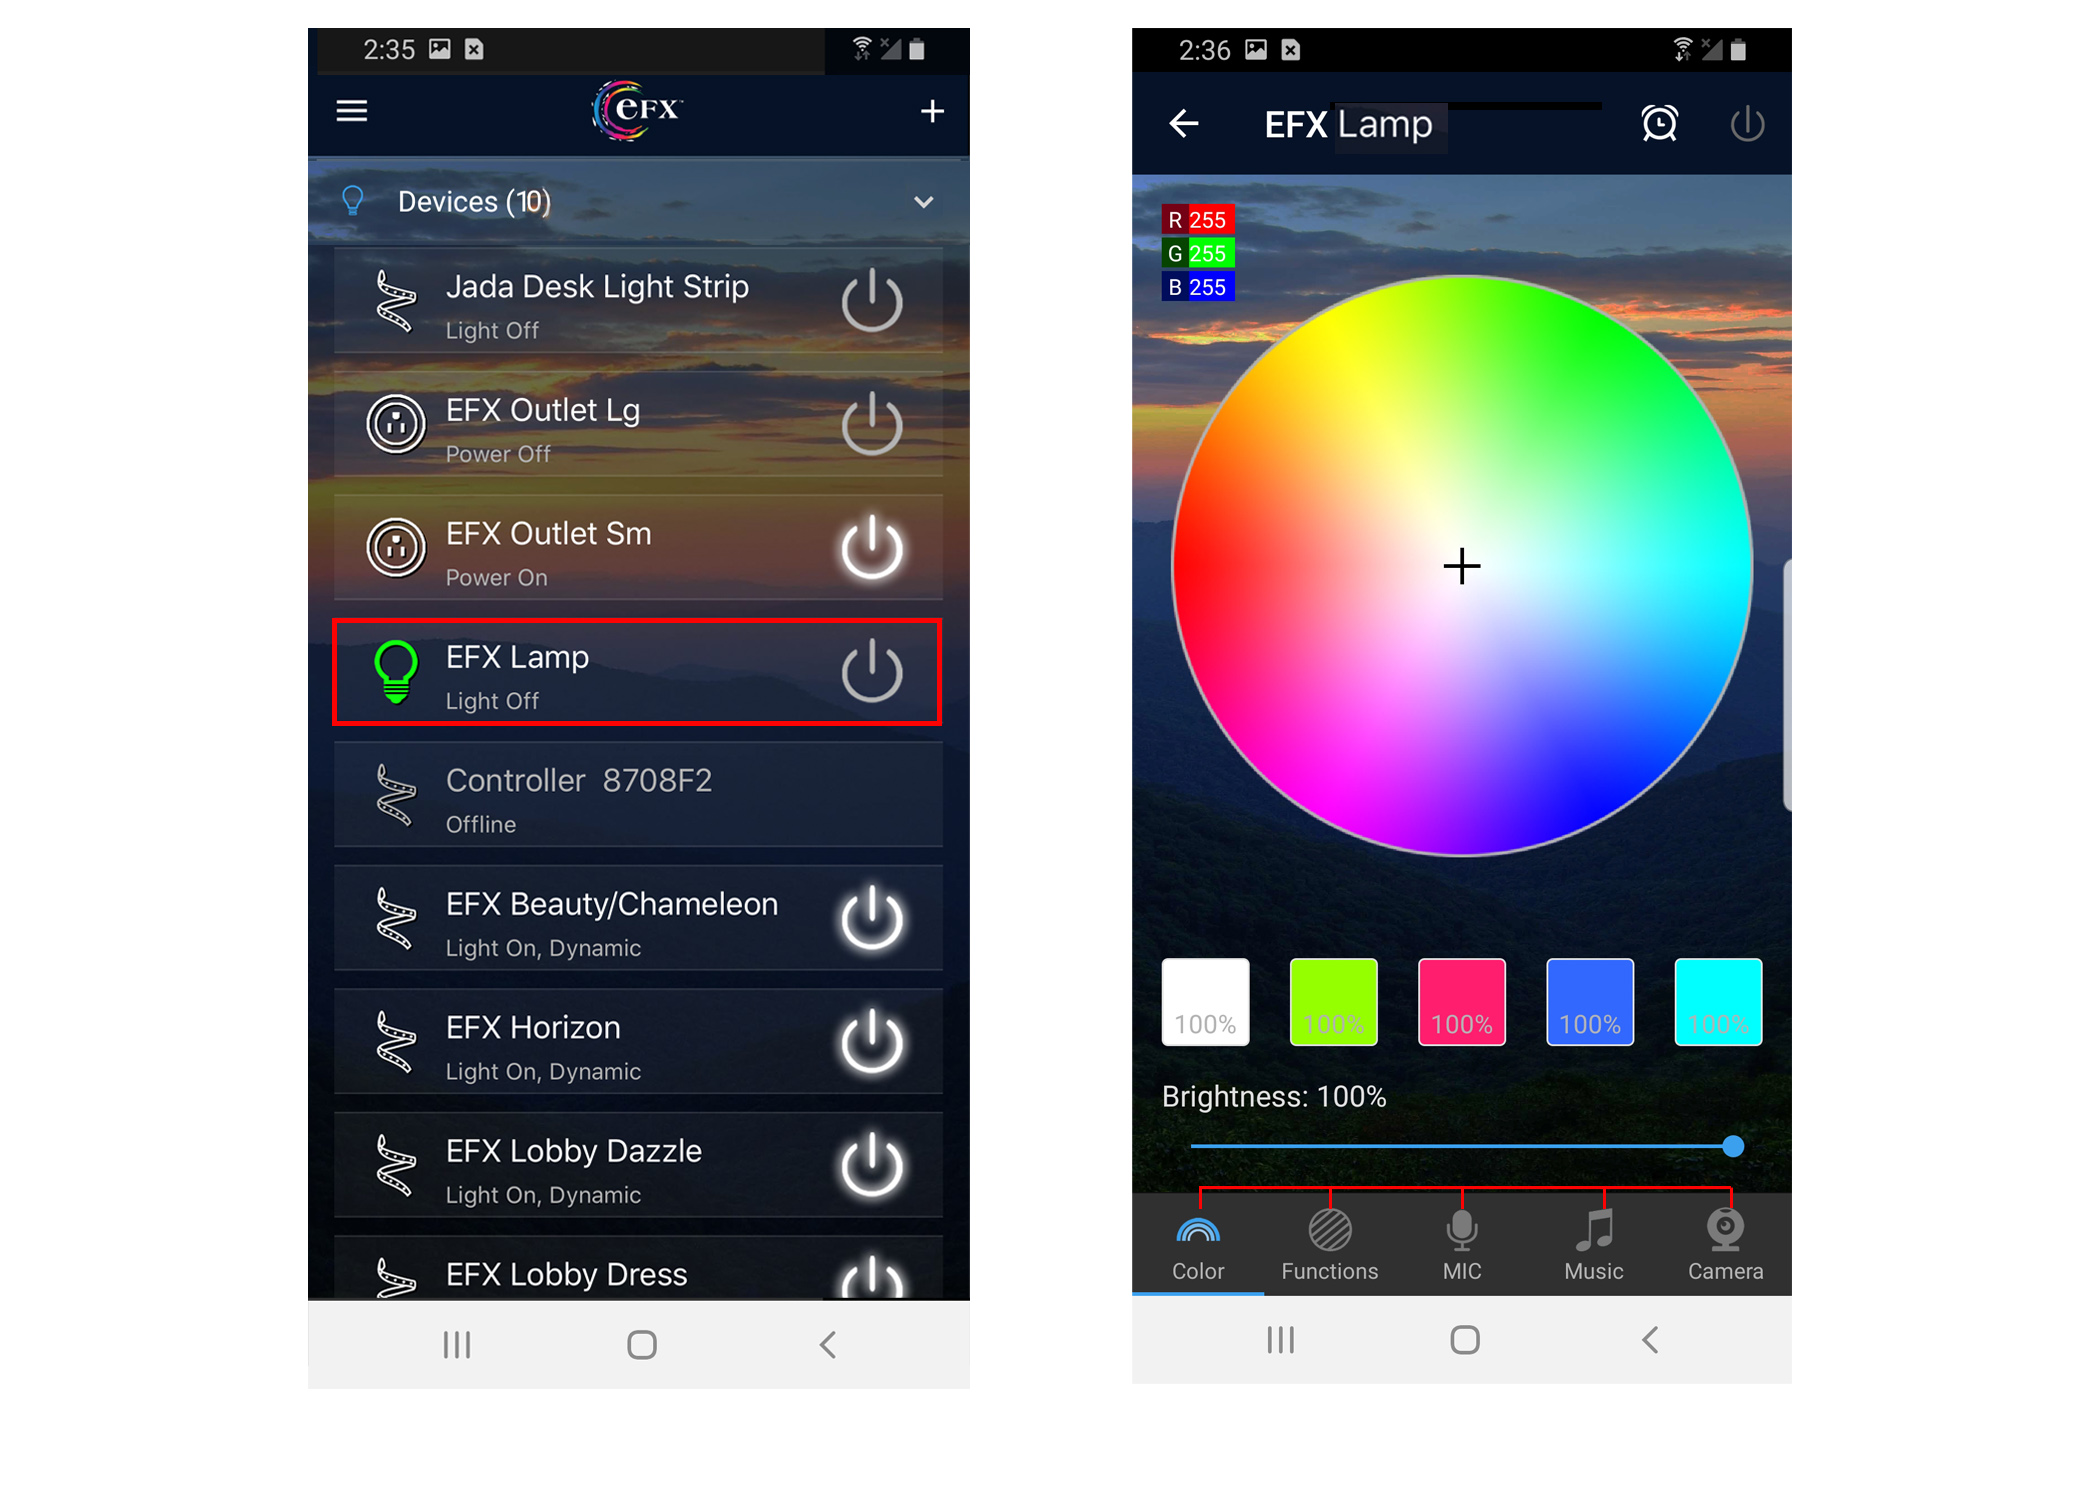
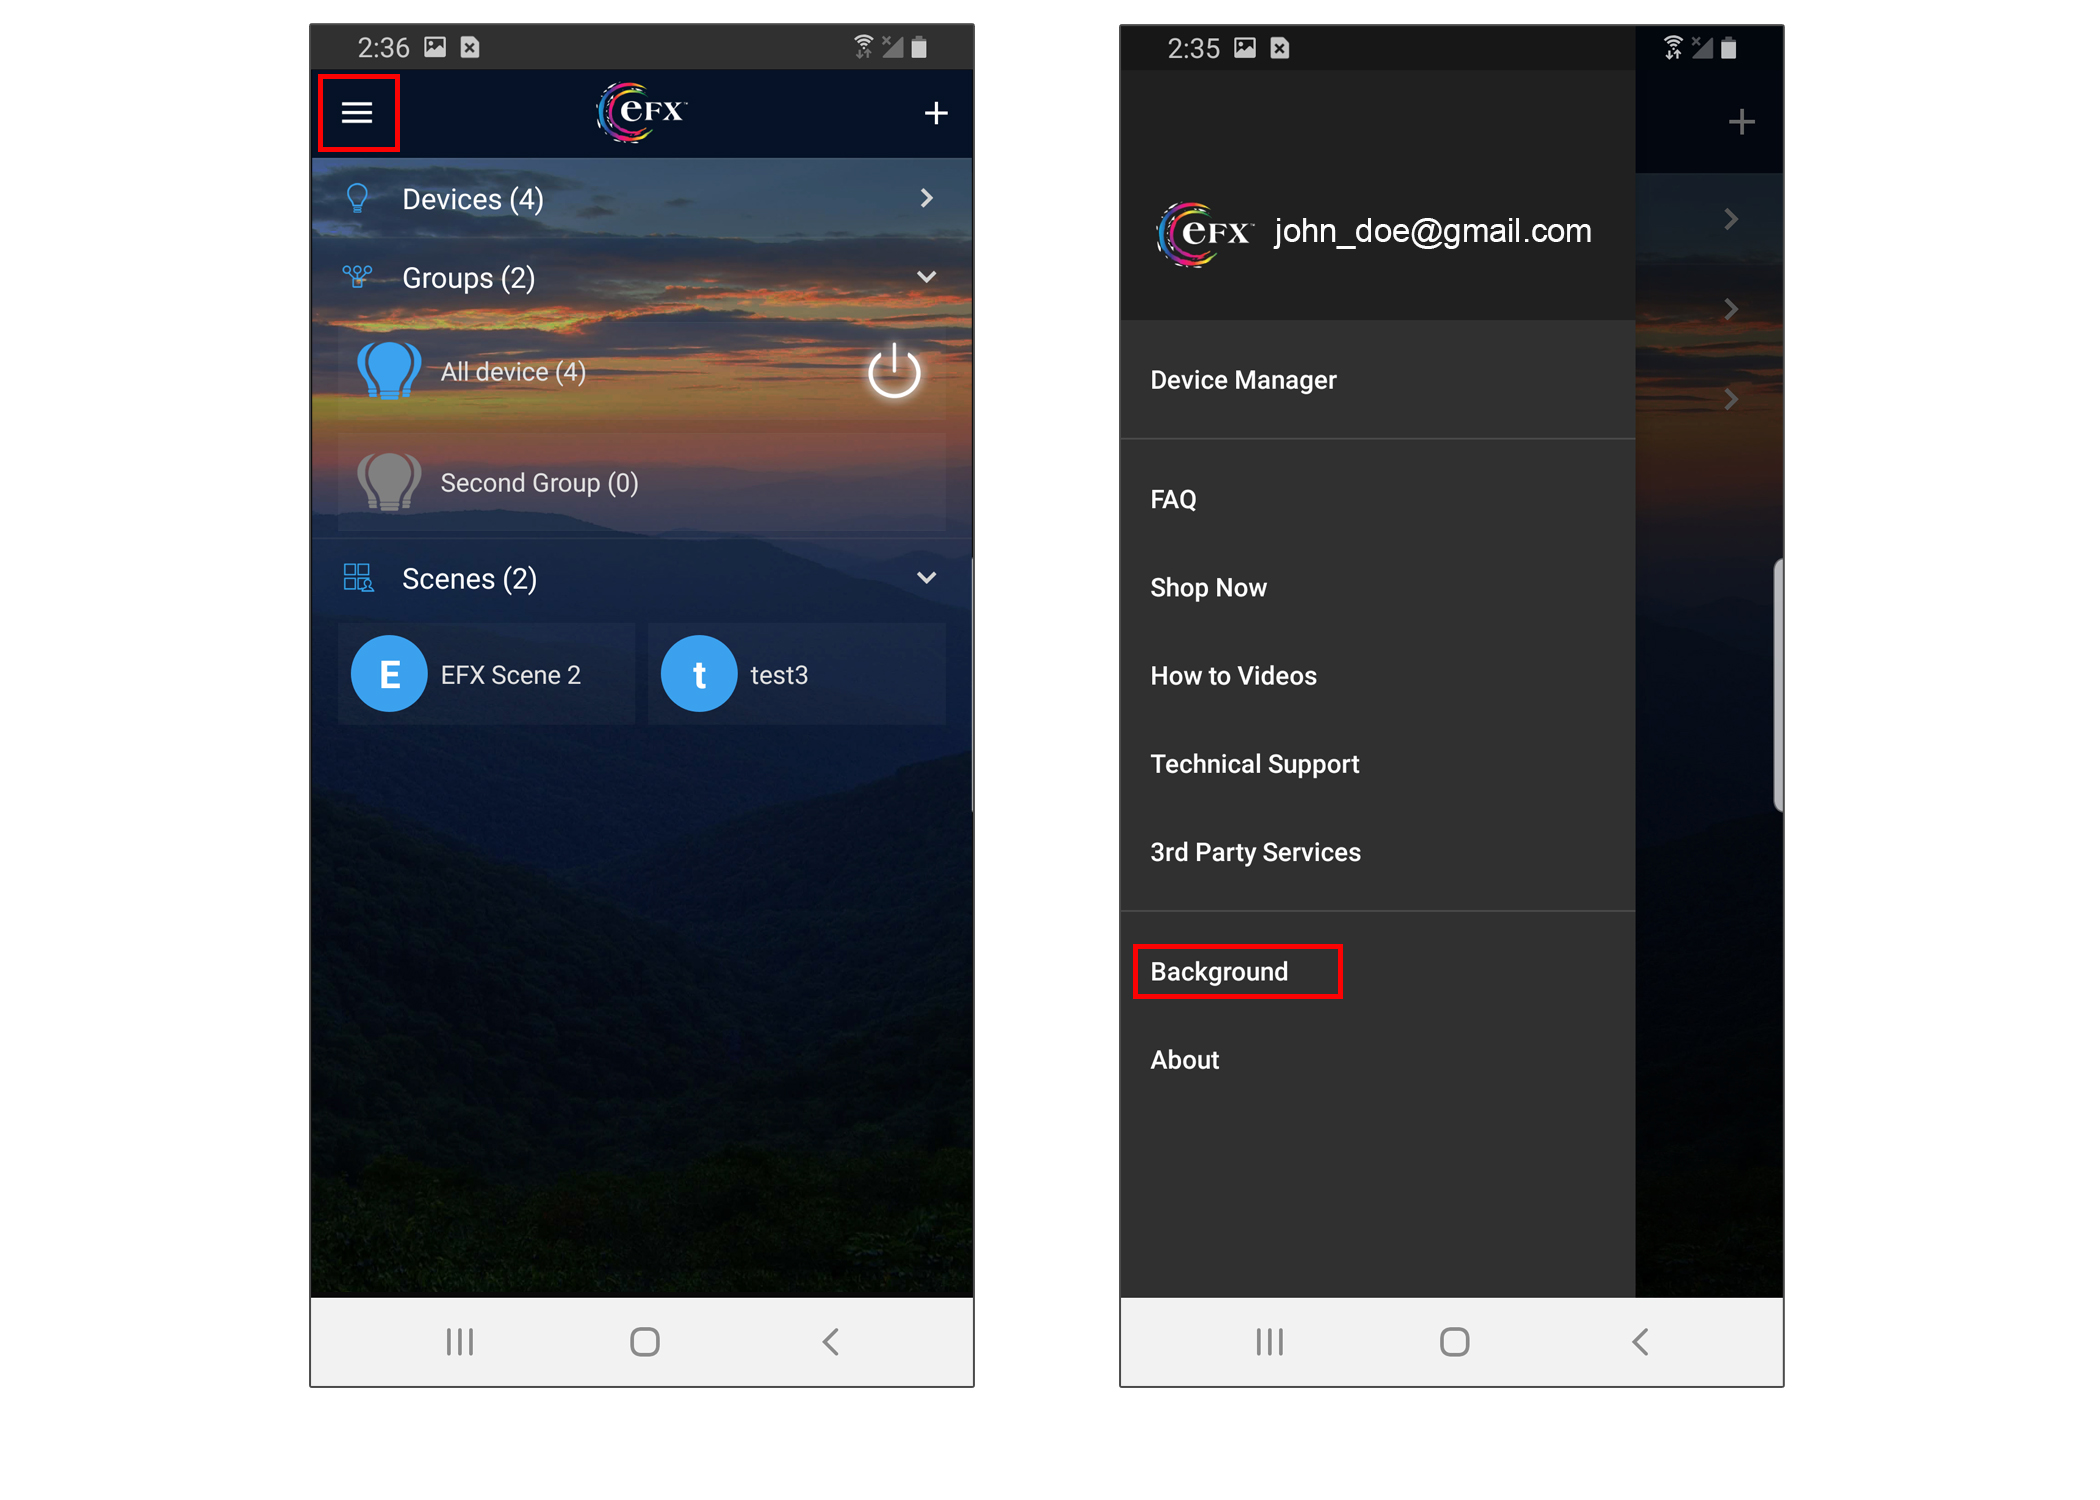
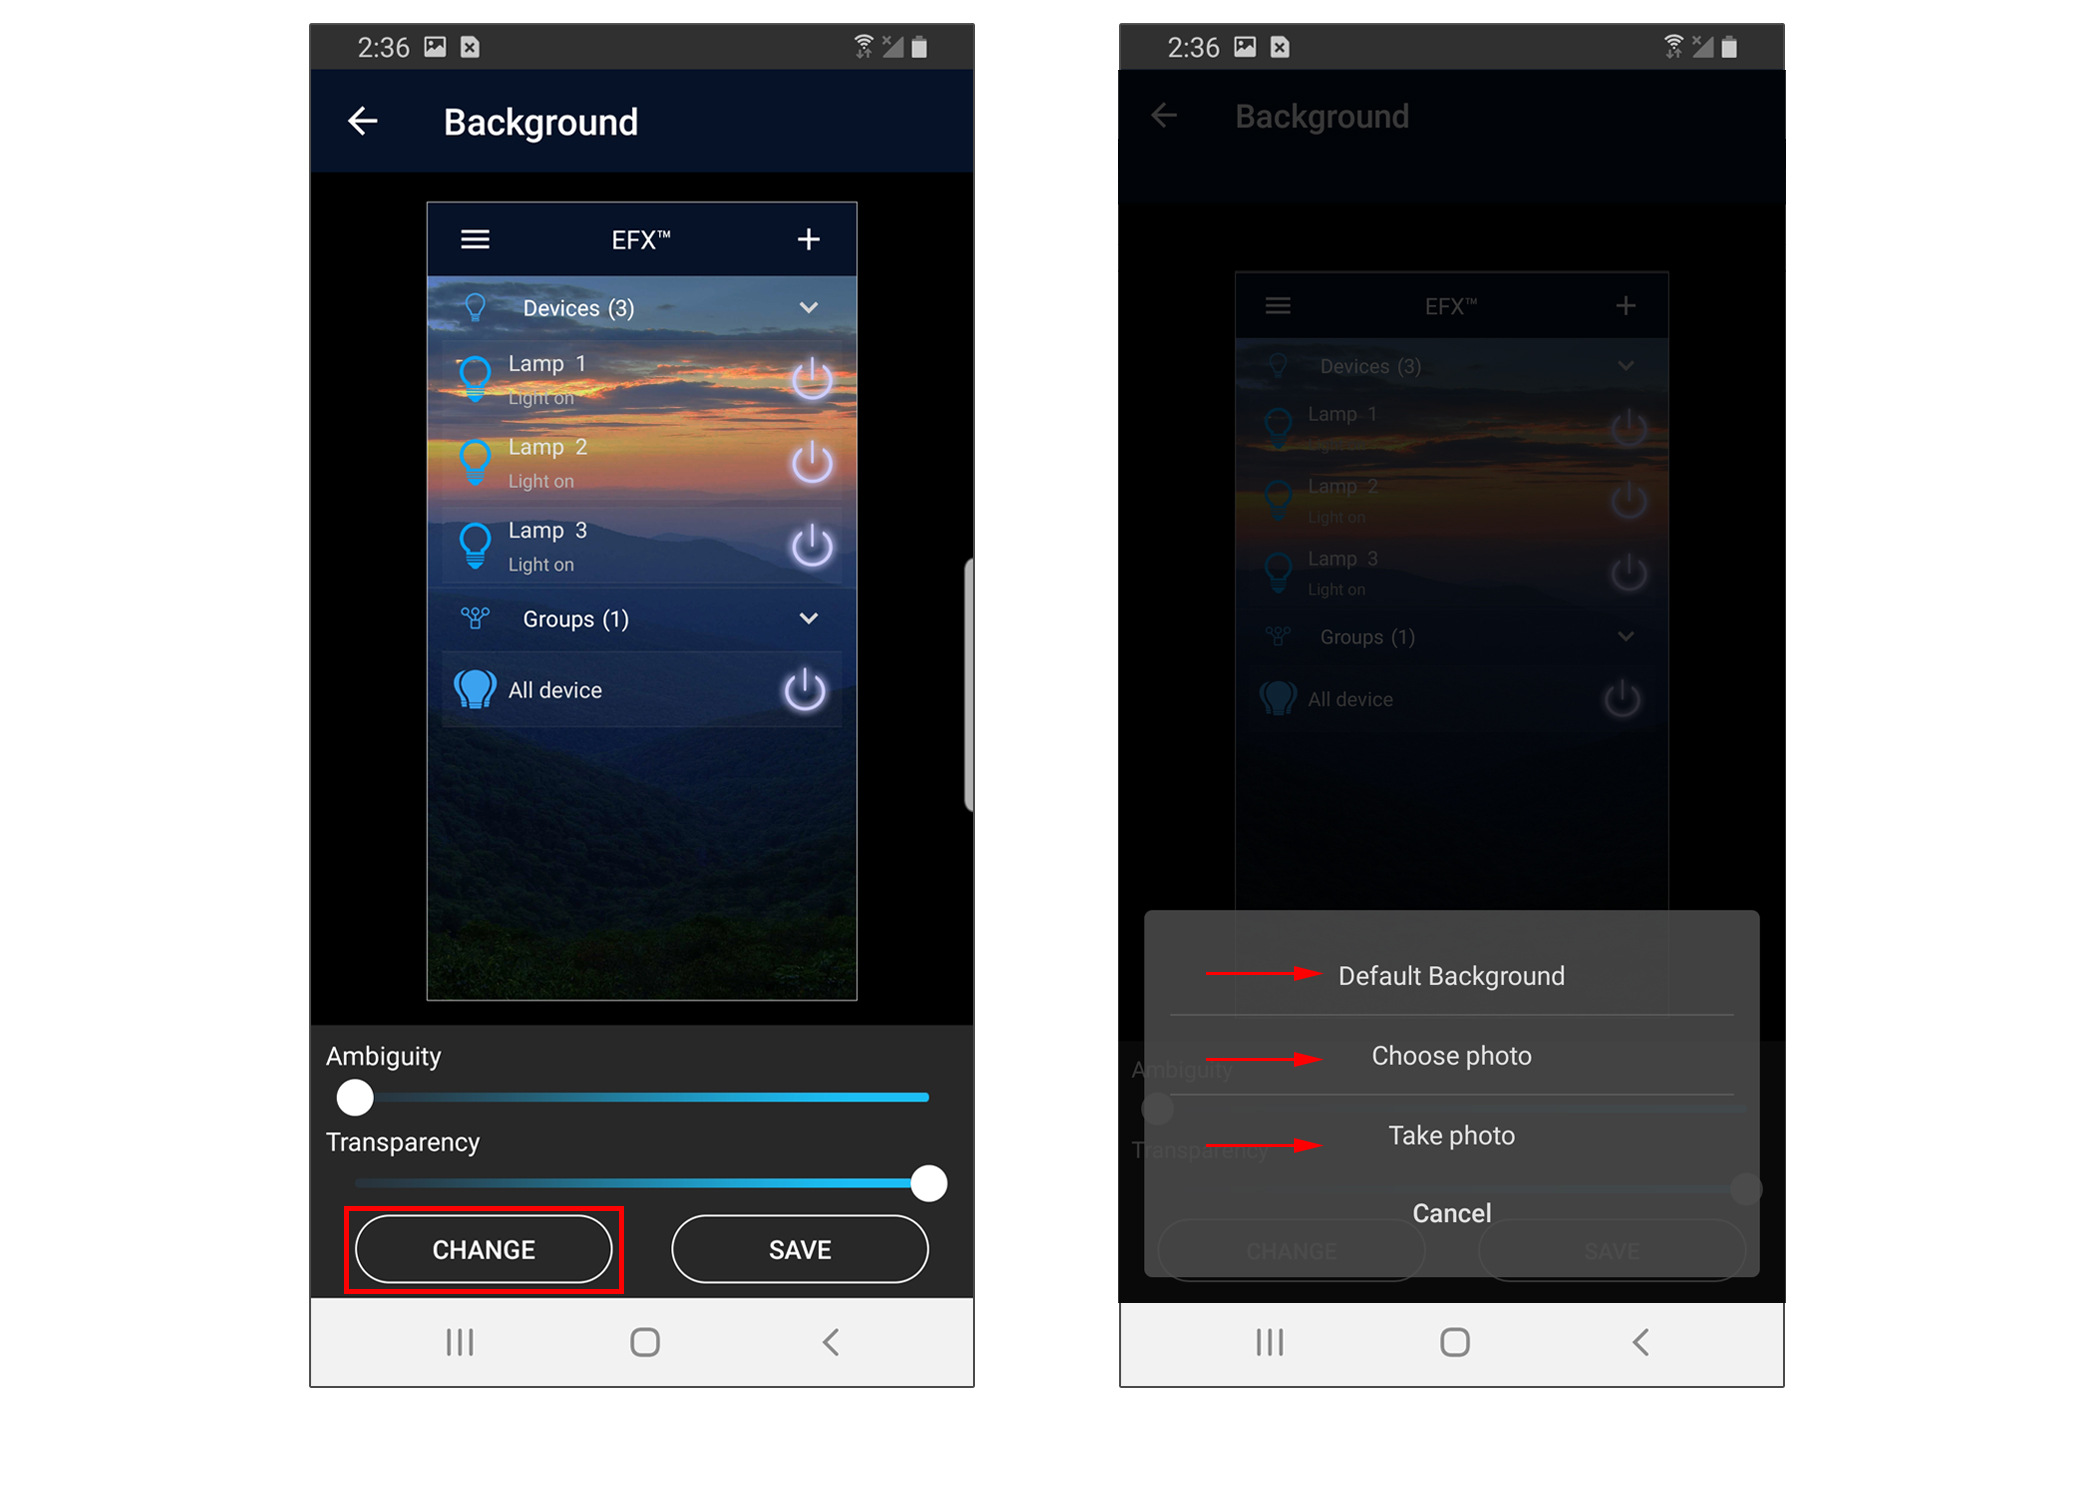
You can change the background for your EFXTM Device

  • The Background can be accessed by tapping on the hamburger icon on the top left corner of the EFXTM Main Menu
  • From your EFXTM Control Panel, you can access the Background settings.
  • Picture of background menu
  • You can control the Ambiguity and transparency by sliding the ball to the right or the left.
  • Press on the CHANGE button to change the background image.
  • You can use the Default background or change the image from your gallery on your phone or take a new photo.
  • Picture of background menu

  • Before resetting your EFXTM Device, please power off the EFXTM controller.
  • Picture of reseting efx device
  • To reset, unplug and plug your power supply into the EFXTM controller 4 times repeatedly leaving a brief moment in between each action.
  • Picture of reseting efx device
  • Once successfully reset, your EFXTM Device will continue to cycle and flash red, green, blue lights.
  • Picture of reseting efx device

NOTE: Upon a successful reset, the "LEDnetxxxxx" Wi-Fi network will reappear temporarily as a broadcasted signal.

  • Open your EFXTM app on your smartphone device.
  • Click on the gear icon in the upper left corner of the EFXTM app main screen.
  • Look for the "Sign in or Create Account" label and select it to continue.
  • Follow the app/system prompts to complete your account creation.
  • Once created, you will now have an EFXTM cloud account to use.

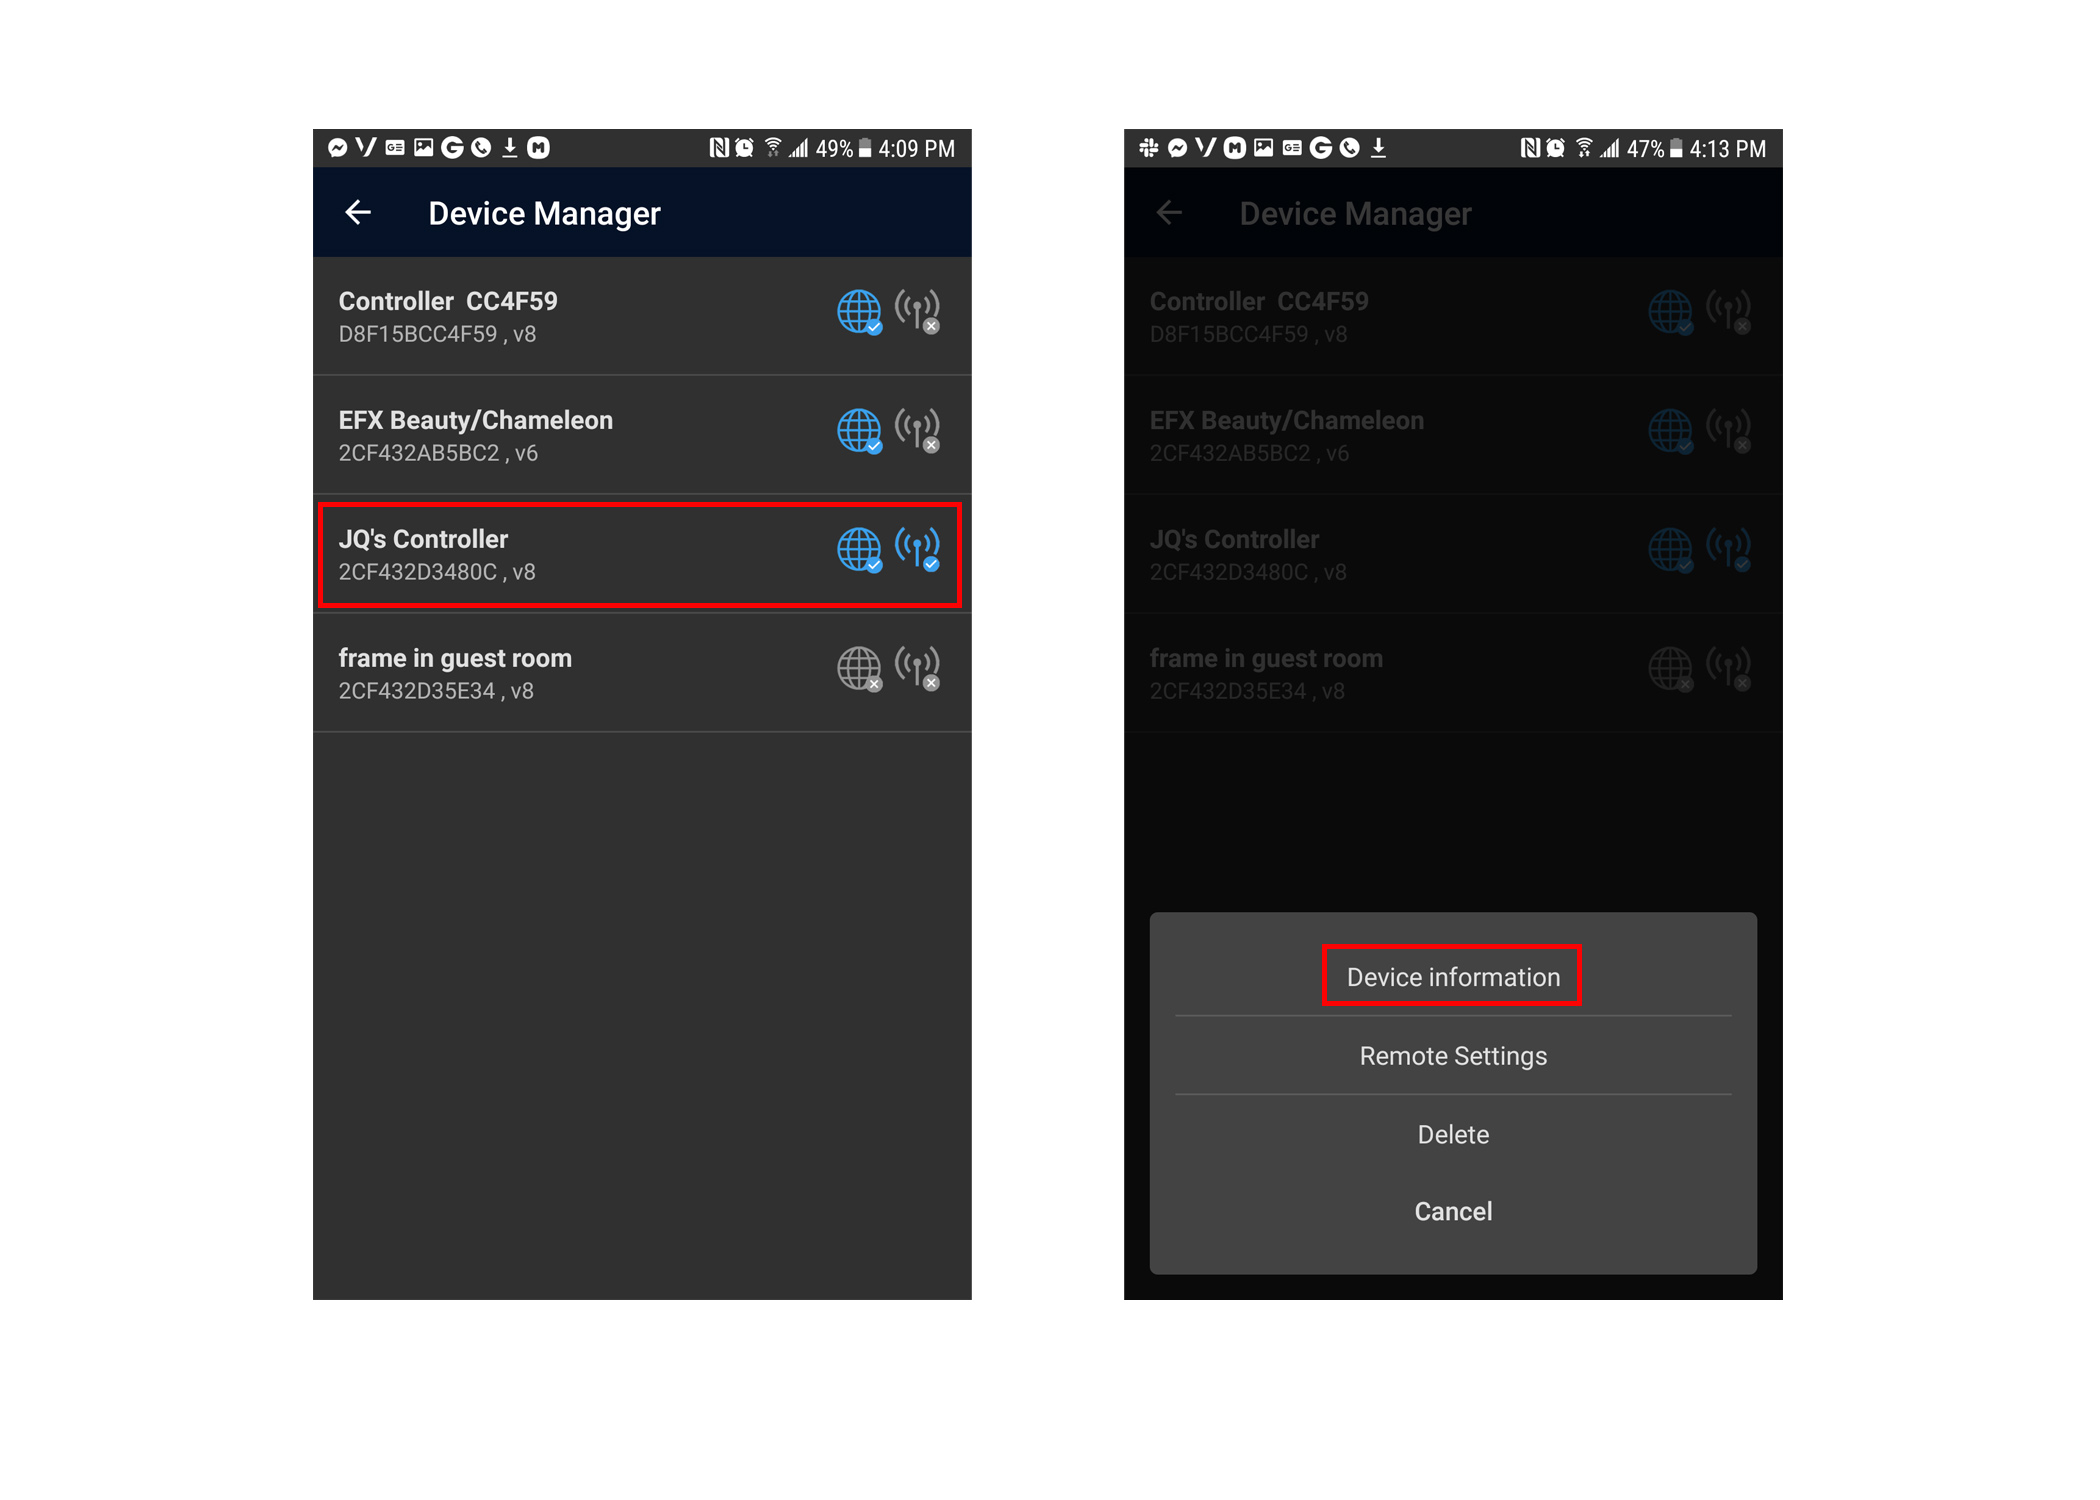
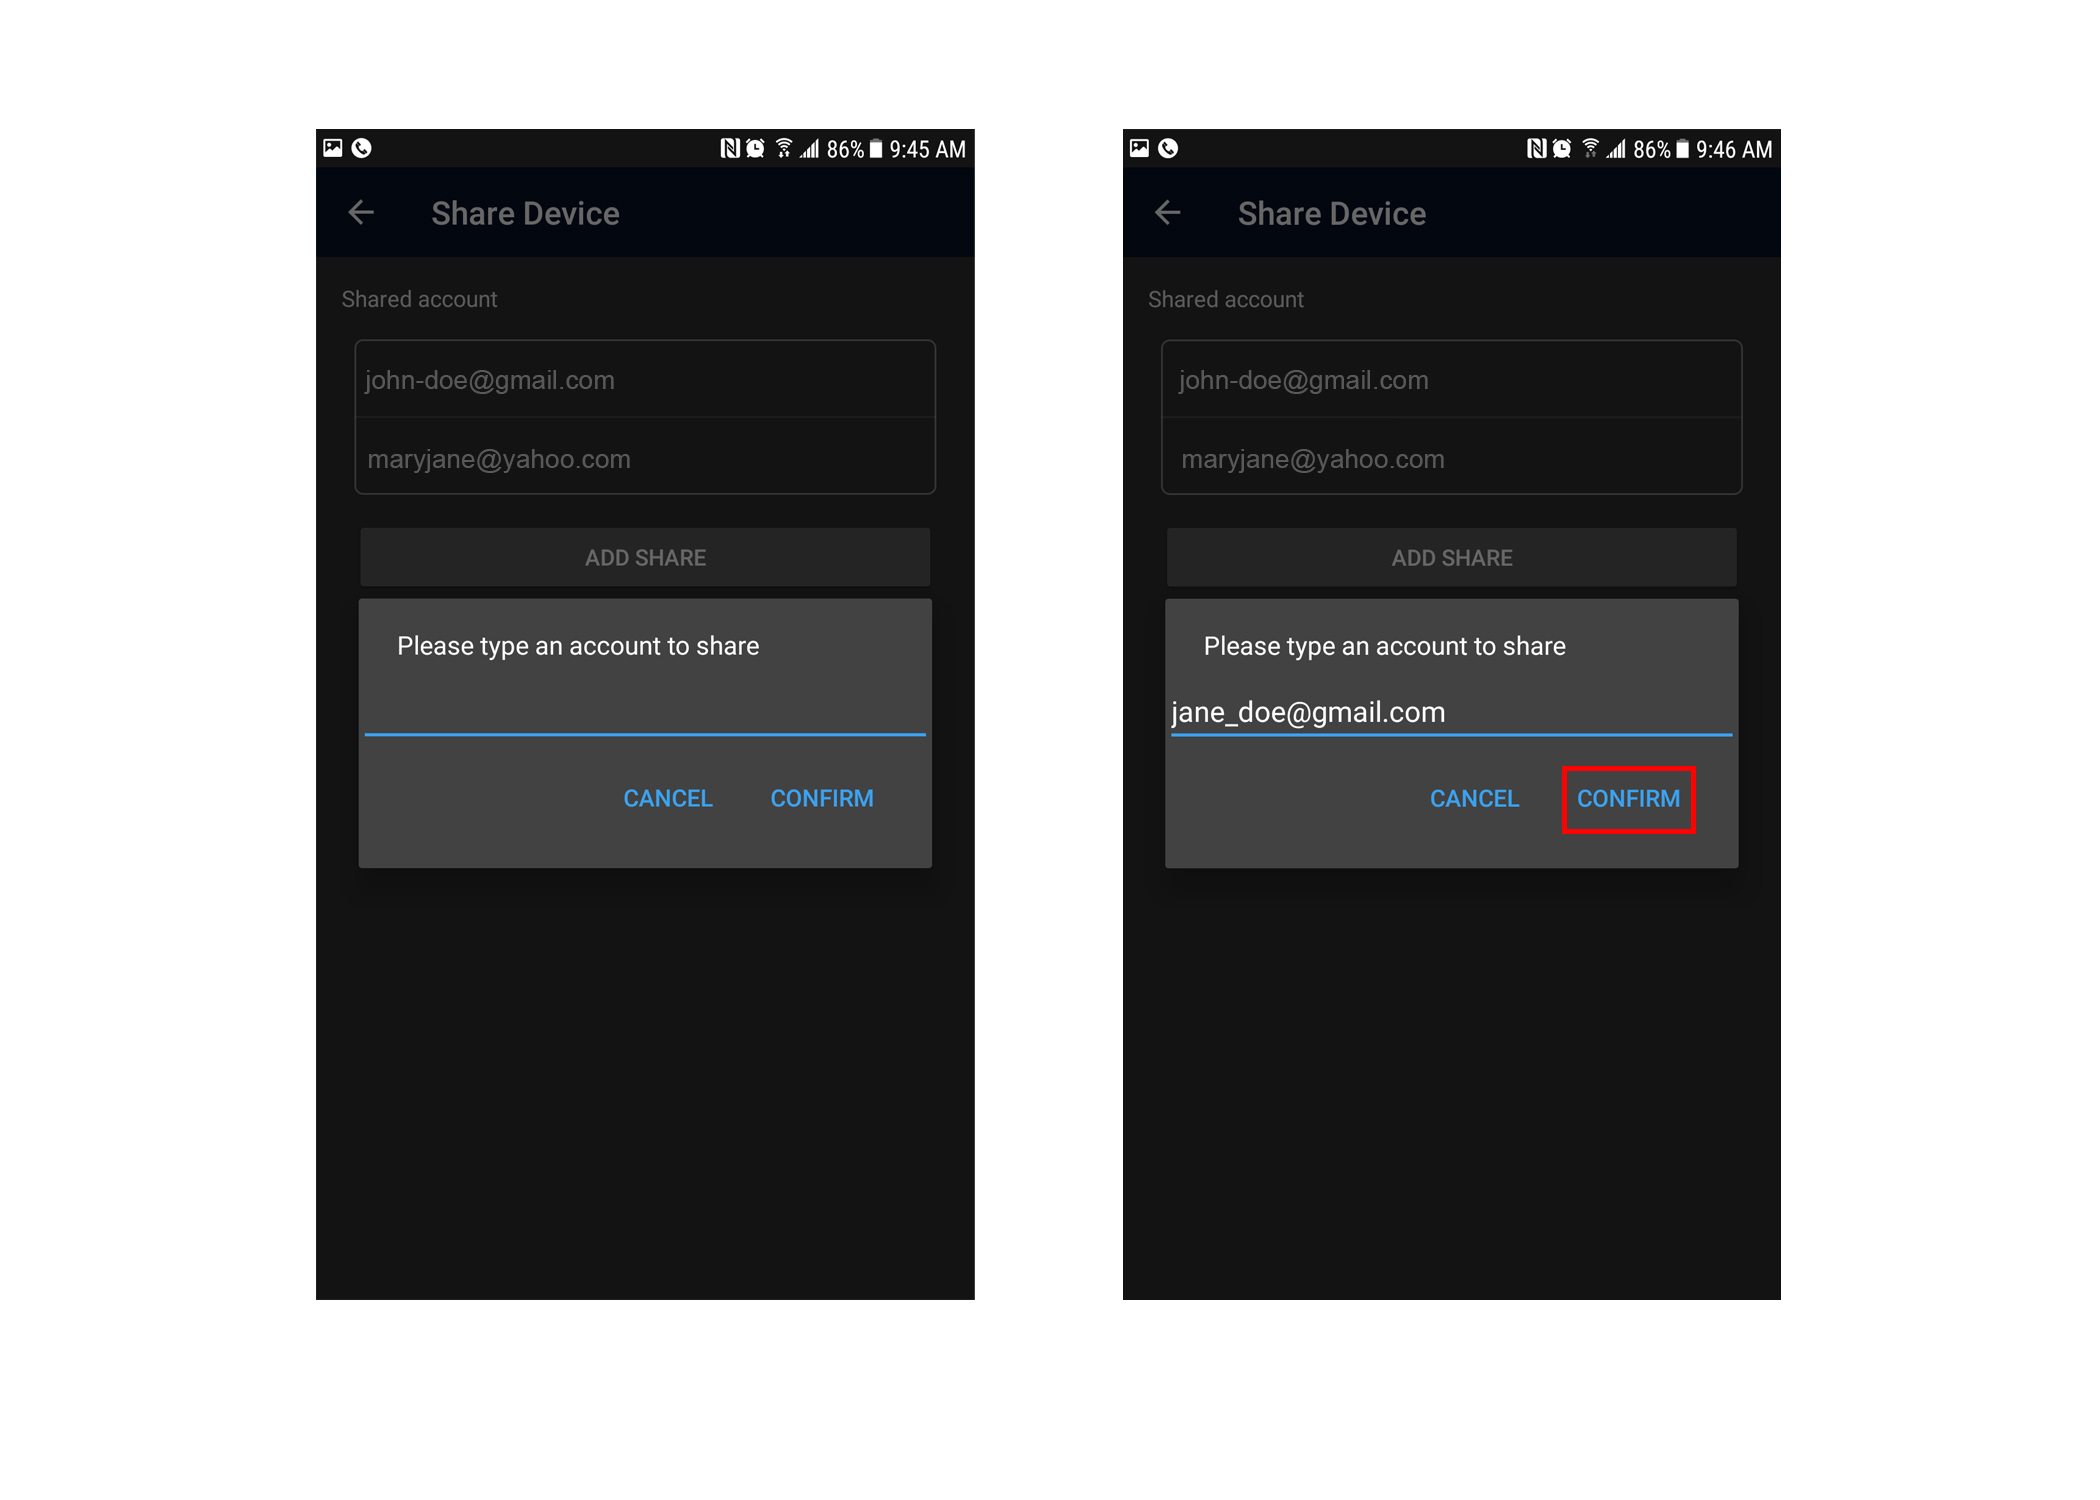
You can share your EFXTM Device with registered users (i.e. someone else who has the EFXTM App and Cloud account)

  1. Sharing a device is performed through the EFXTM Control Panel. To access the Control Panel, tap the hamburger icon on the top left corner from the Main Menu.
  2. Then select Device Manager.
  3. Picture of sharing a device
  4. Select the Device you want to share. Note that you can only share an EFXTM Device when both the Cloud Server and Local Server are accessible.
  5. Select "Device information".
  6. Picture of sharing a device
  7. Select "Share Device" to add the user you want to share your EFXTM device with.
  8. Press on "ADD SHARE".
  9. Picture of sharing a device
  10. Enter the registered user's email and press on "Confirm". Note that if the user's email is not registered, a warning will show saying this user is not registered.
  11. Picture of sharing a device
  12. You're done! Now that user you just added can access your EFXTM Device, provided that person is running the EFXTM App and has access to our Cloud Server.

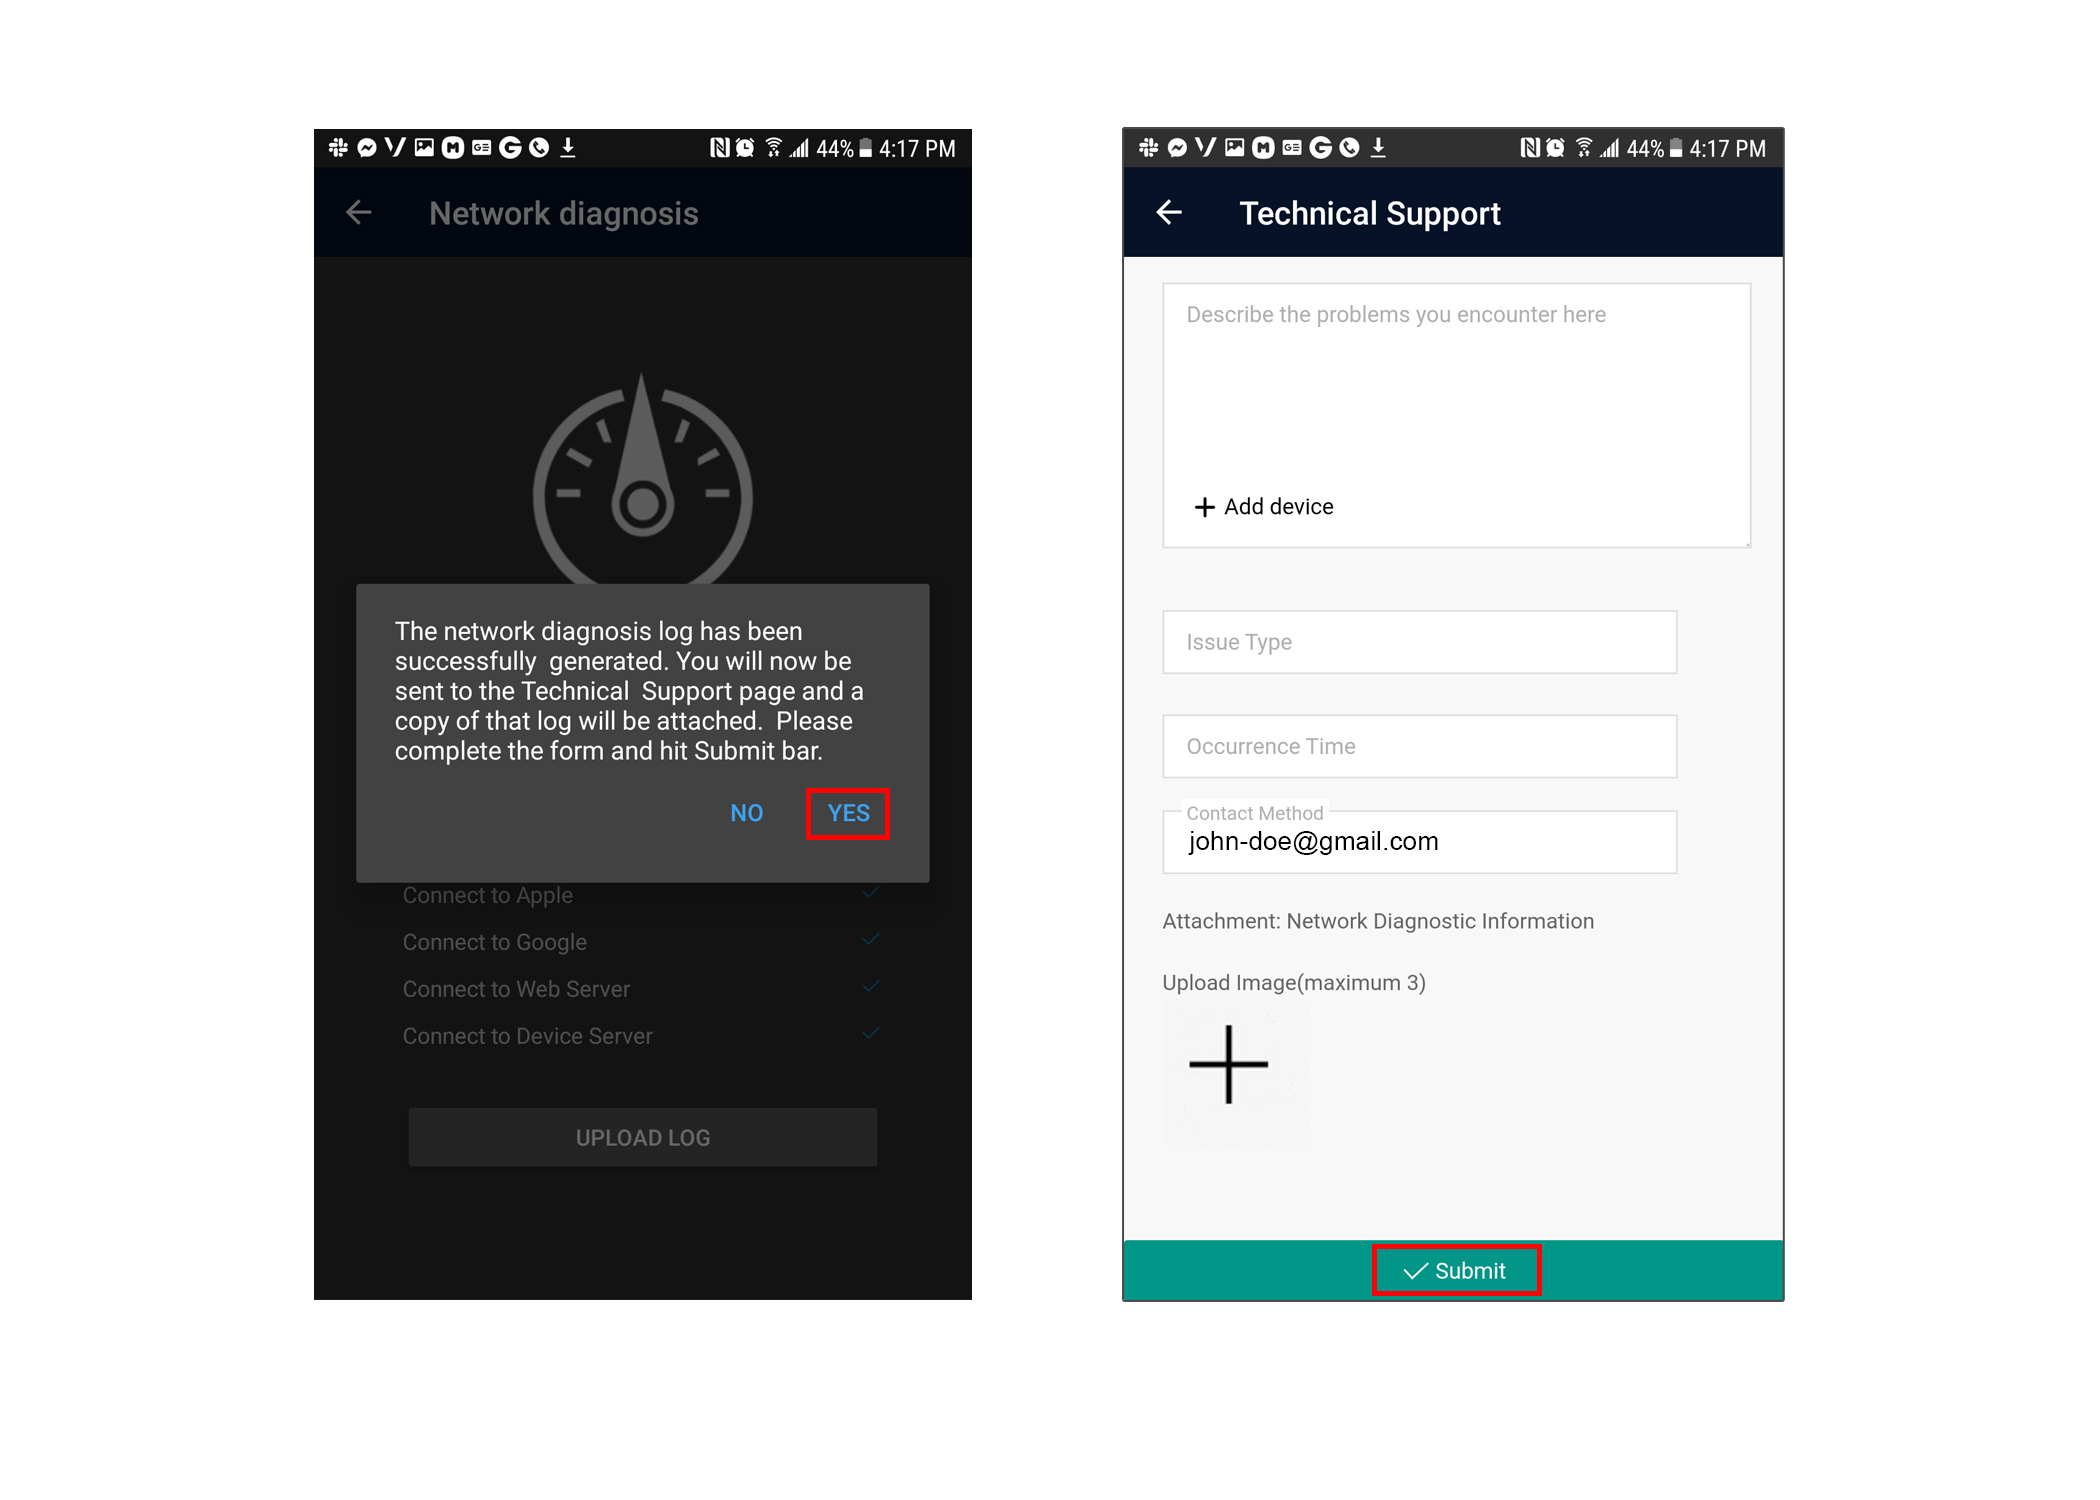
The Diagnostic Tool was developed so that our technical team could better troubleshoot connection issues between the EFXTM Device(s), your local router, our EFXTM App, and our Cloud Servers. Please realize that ability of the EFXTM App to communicate with your EFXTM Device(s), located anywhere in the world, relies on the internet and the ability to make all these different connections within a few seconds.


Often, the inability to communicate with your EFXTM device remotely is due to the device not being powered, not connected to the router, or the internet service provider (ISP) from either your smartphone or your router – being too slow. The Diagnostic Tool takes about 5 to 10 minutes to run and tests the speed of all the different connections that need to be made.

This diagnostic information is then saved in a log file that gets attached to a Technical Support form that you submit from our App. Please note that the EFXTM Diagnostic Tool only can be used when the EFXTM App and Device and on the same network (i.e. both connected to the same router).

  1. Select the hamburger icon in the top left corner of the EFXTM App's home screen.
  2. Select "Device Manager" and to have access to the Device you want to run a diagnostic on.
  3. Picture of Diagnostic Tool
  4. Select the Device you want to run a diagnostic on. Note that you can only run a diagnostic on EFXTM Devices where both the Cloud Server and Local Server are both on.
  5. Select Remote Settings to access the Network Diagnosis tool.
  6. Picture of Diagnostic Tool
  7. Select the Network Diagnosis button and then the “Start Diagnosis” button.
  8. After the Diagnosis is completed, select “Upload Log” button.
  9. Picture of Diagnostic Tool
  10. After the diagnosis report is ran, it will automatically attach to a Technical Support form. Note that we do not provide you access to this technical form, and it is for our technicians use only. Fill out the Technical Support form and hit the Submit Button.
  11. Picture of Diagnostic Tool


FAQ on Connecting to 3rd Party Services


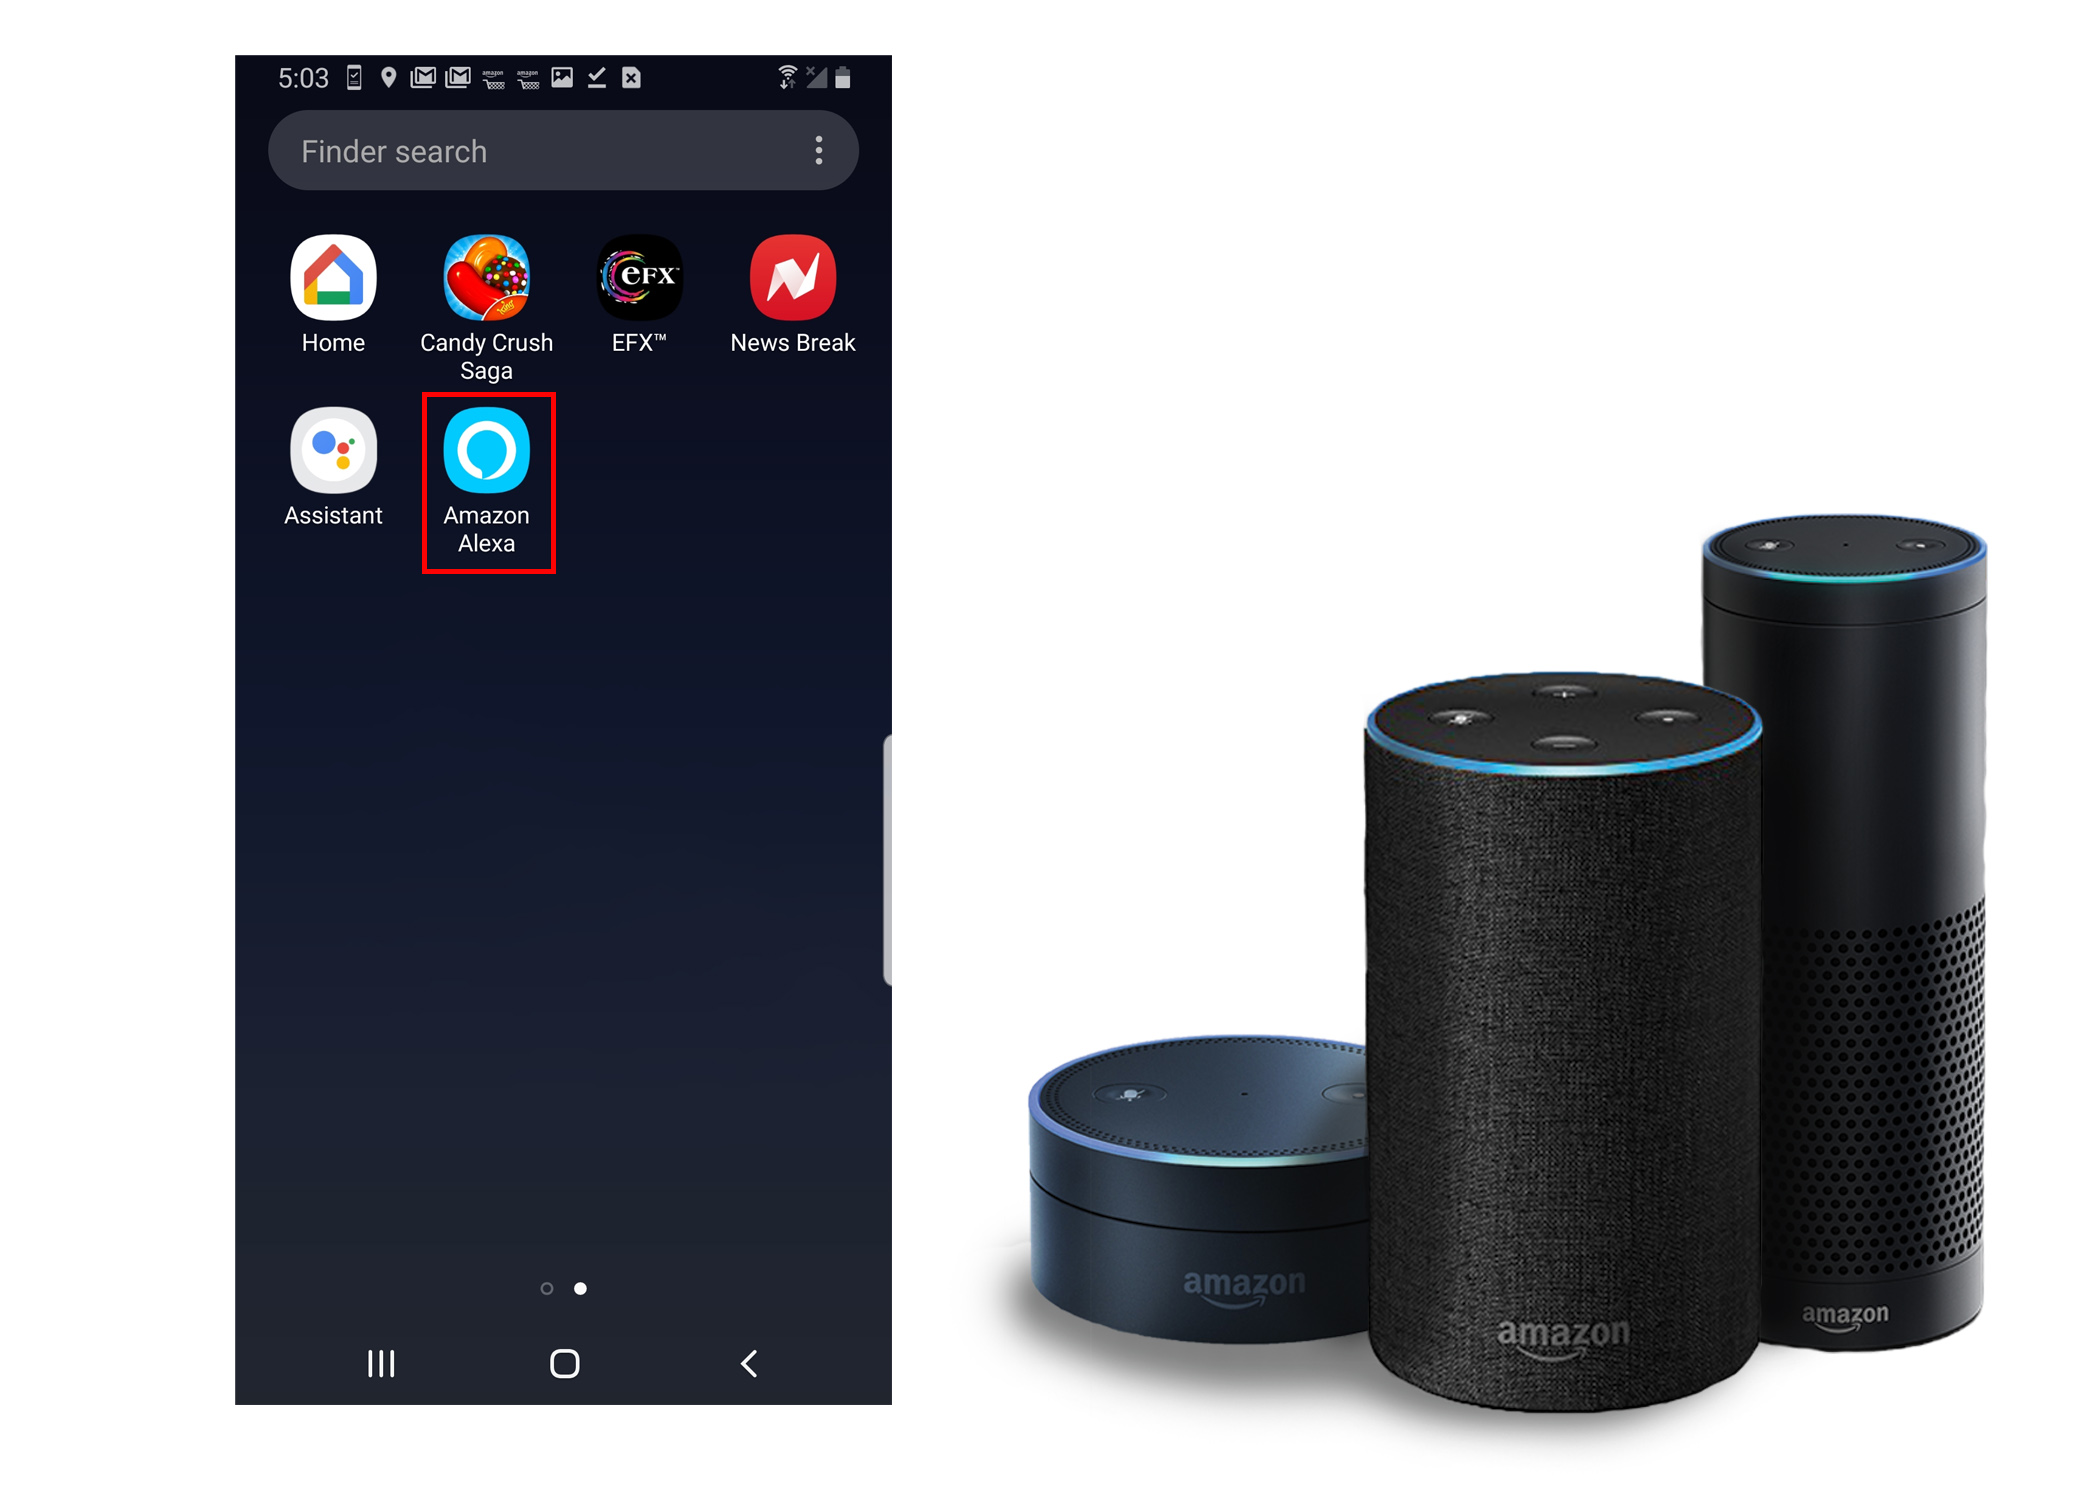
Please note that at the time this documentation was created, these are the steps in connecting an Amazon Bluetooth speaker (e.g. Alexa, Echo, Echo Dot) to your EFXTM Device(s). Amazon may change their Amazon Alexa App and the menus might change or look different.

  1. Make sure you have an EFXTM Cloud Account and at least one EFX™ Device connected to it.
  2. Download and open the Amazon Alexa app.
  3. Picture of Amazon Alexa app
  4. Click on the hamburger icon located in the top left corner.
  5. Navigate to the "Skills & Games" and select it.
  6. Picture of Amazon Alexa app
  7. Click on the search icon.
  8. Enter "magic home wifi".
  9. Picture of Amazon Alexa app
  10. Select the Magic Home icon.
  11. Click on the ENABLE TO USE button.
  12. Picture of Amazon Alexa app
  13. Enter your EFXTM Cloud user id and password.
  14. Picture of Amazon Alexa app
  15. Once you see the "successfully linked" message, the EFXTM Devices and Scenes should all now be available for voice commands. You can navigate back to Alexa's DEVICES menu and verify that all the EFXTM Devices and Scenes are now connected to Alexa.
  16. Picture of Amazon Alexa app

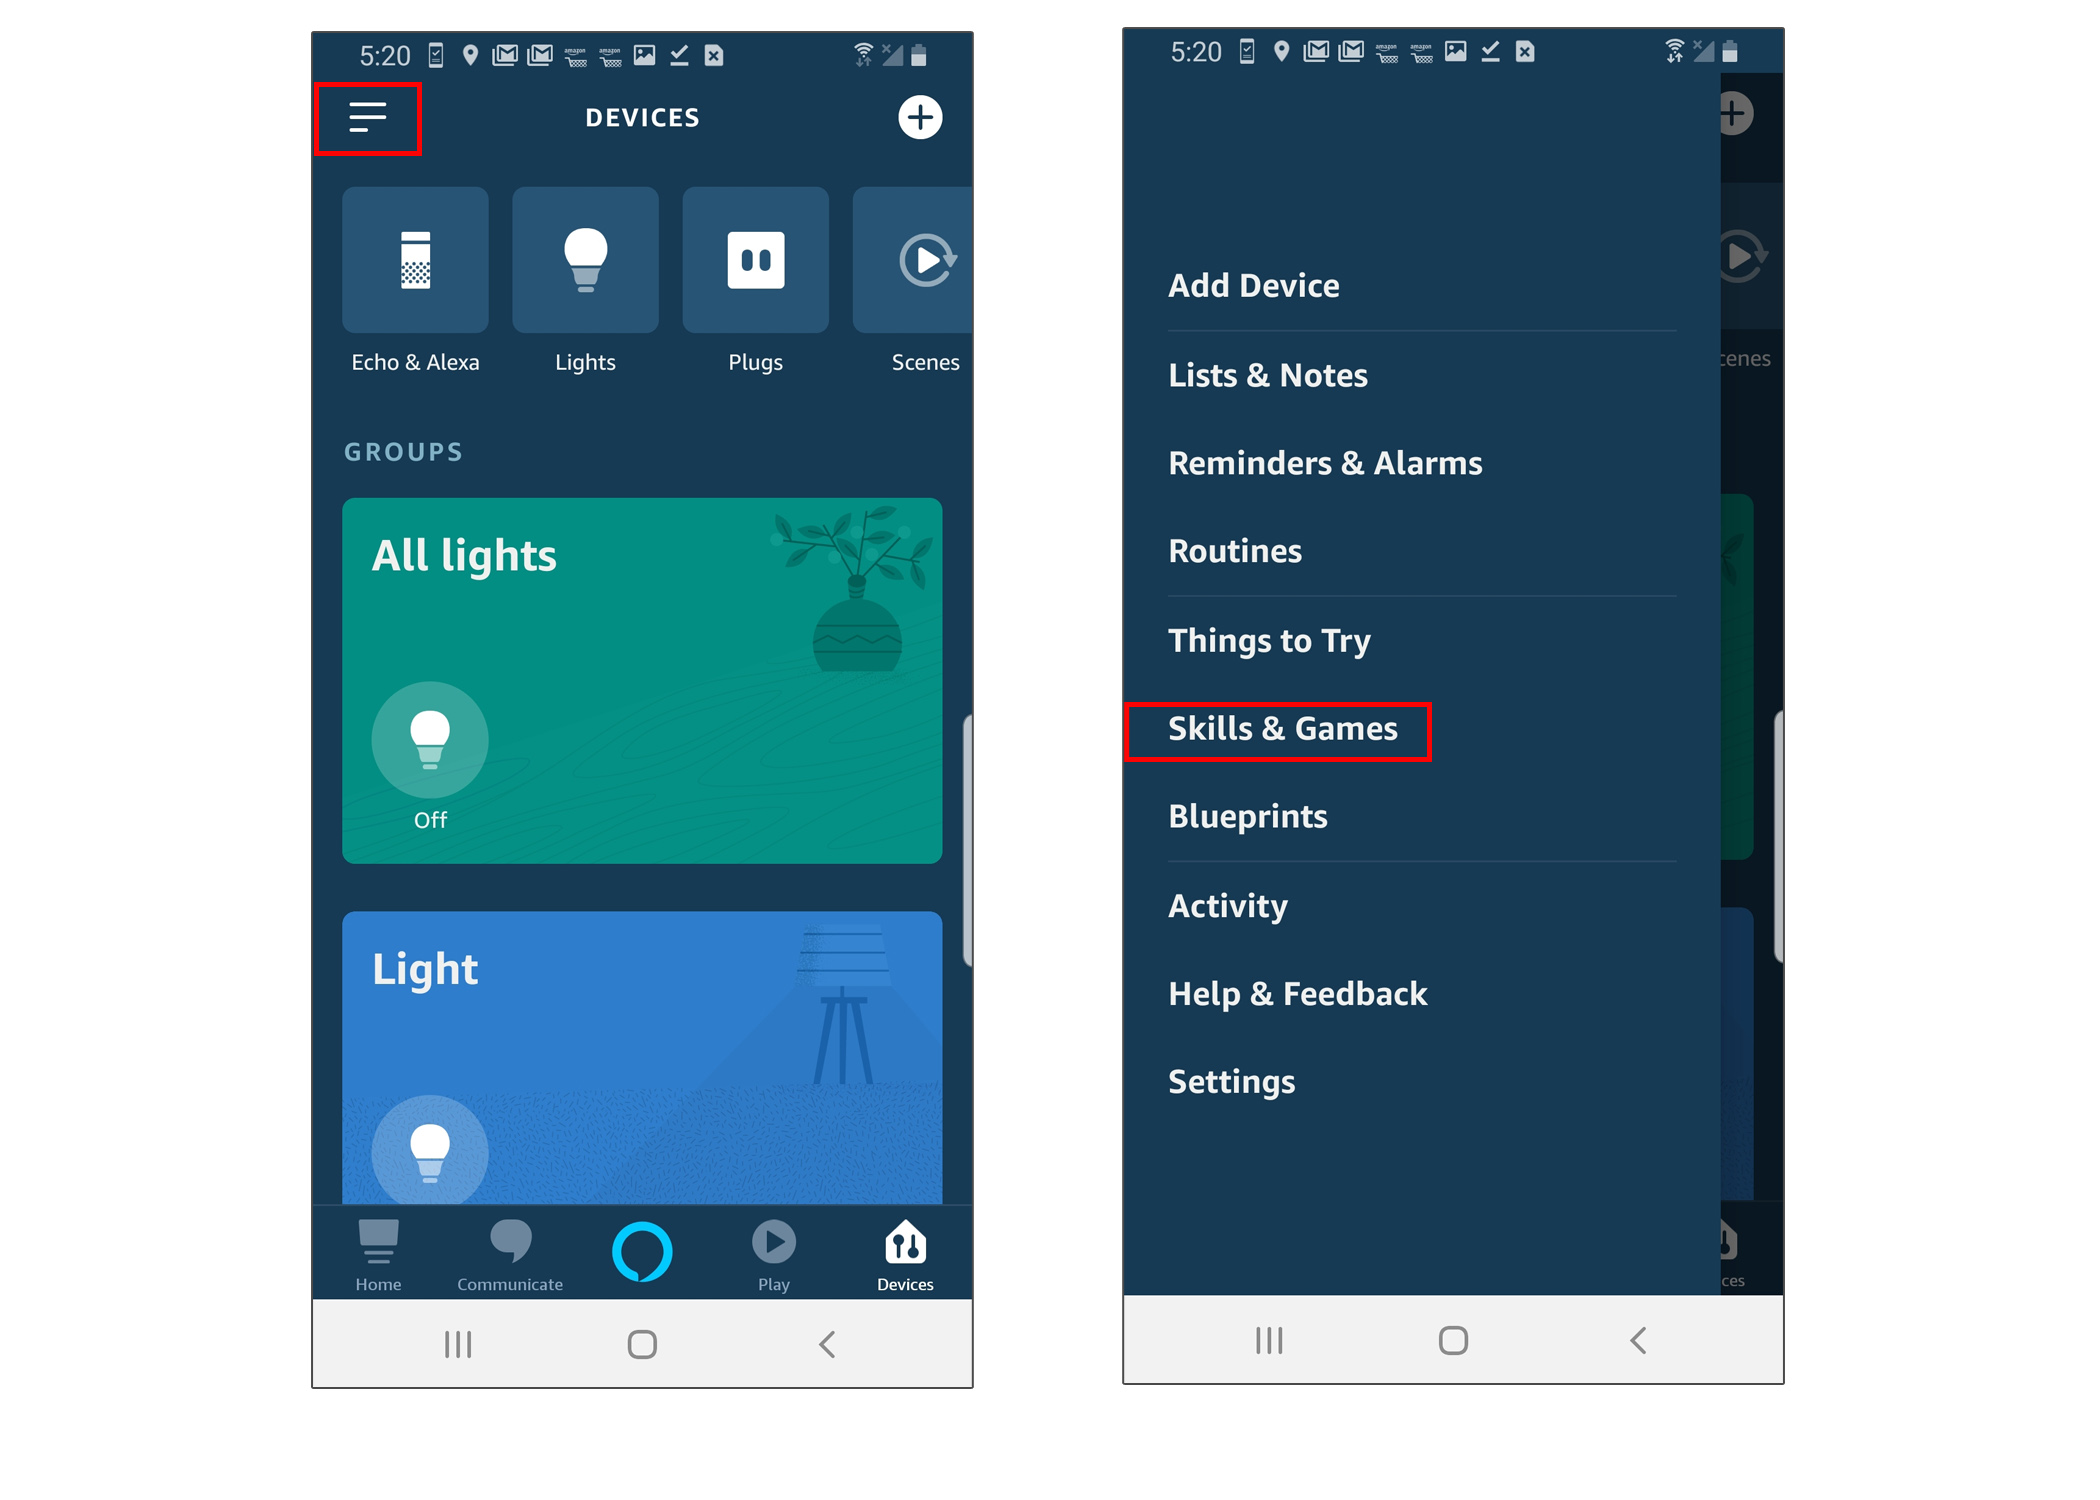
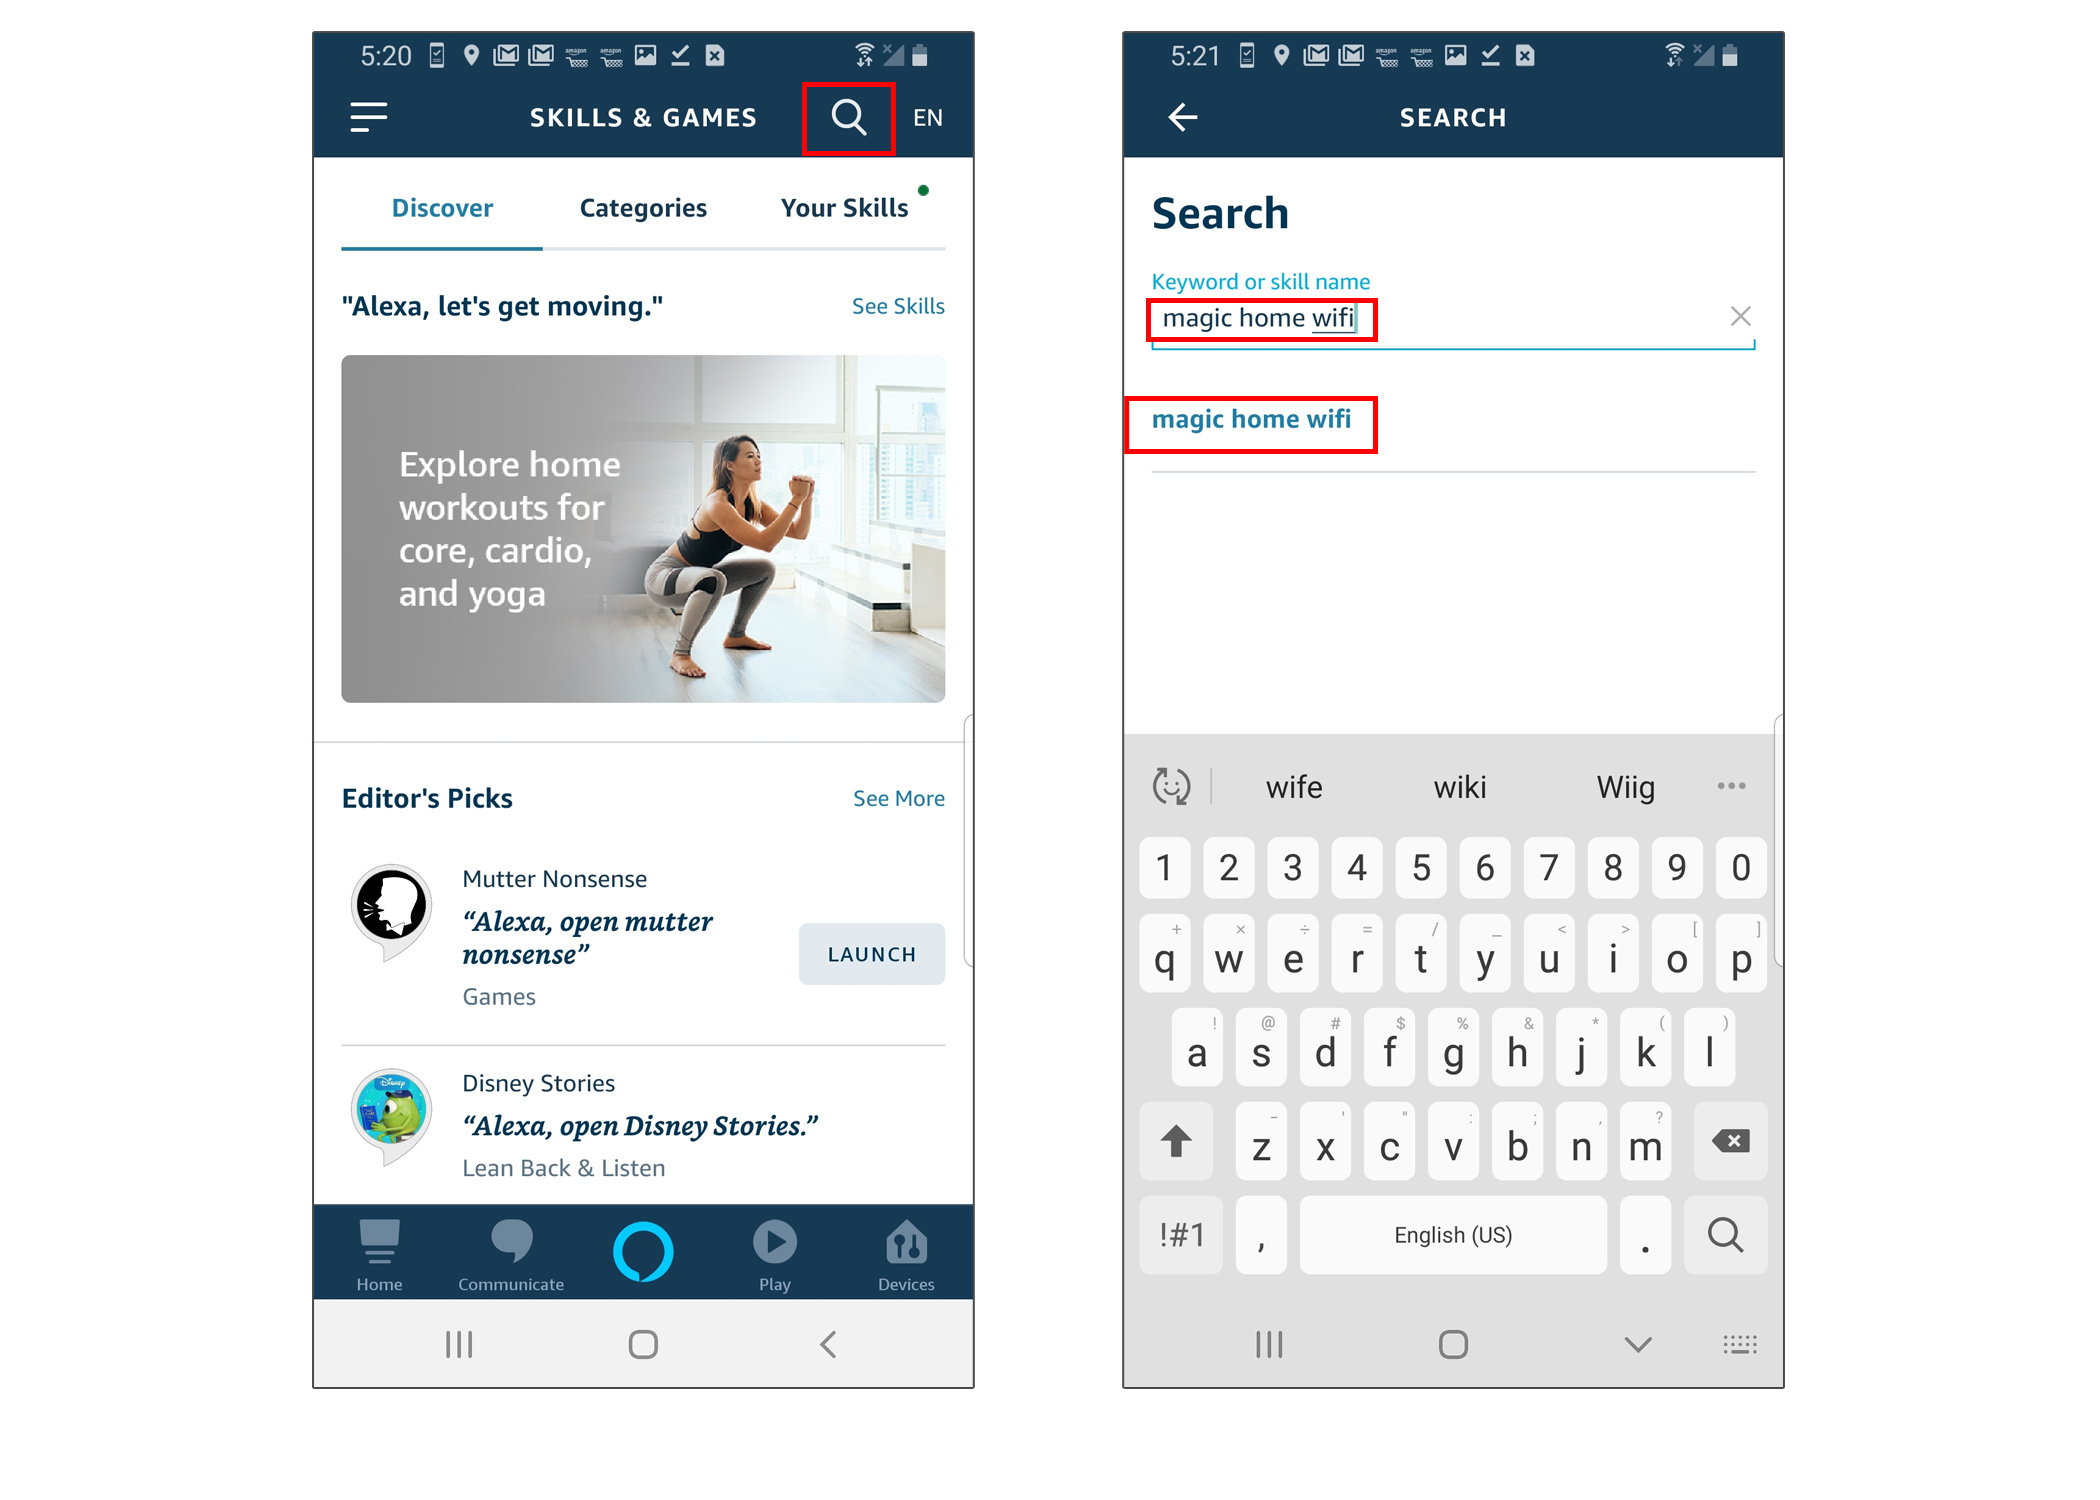
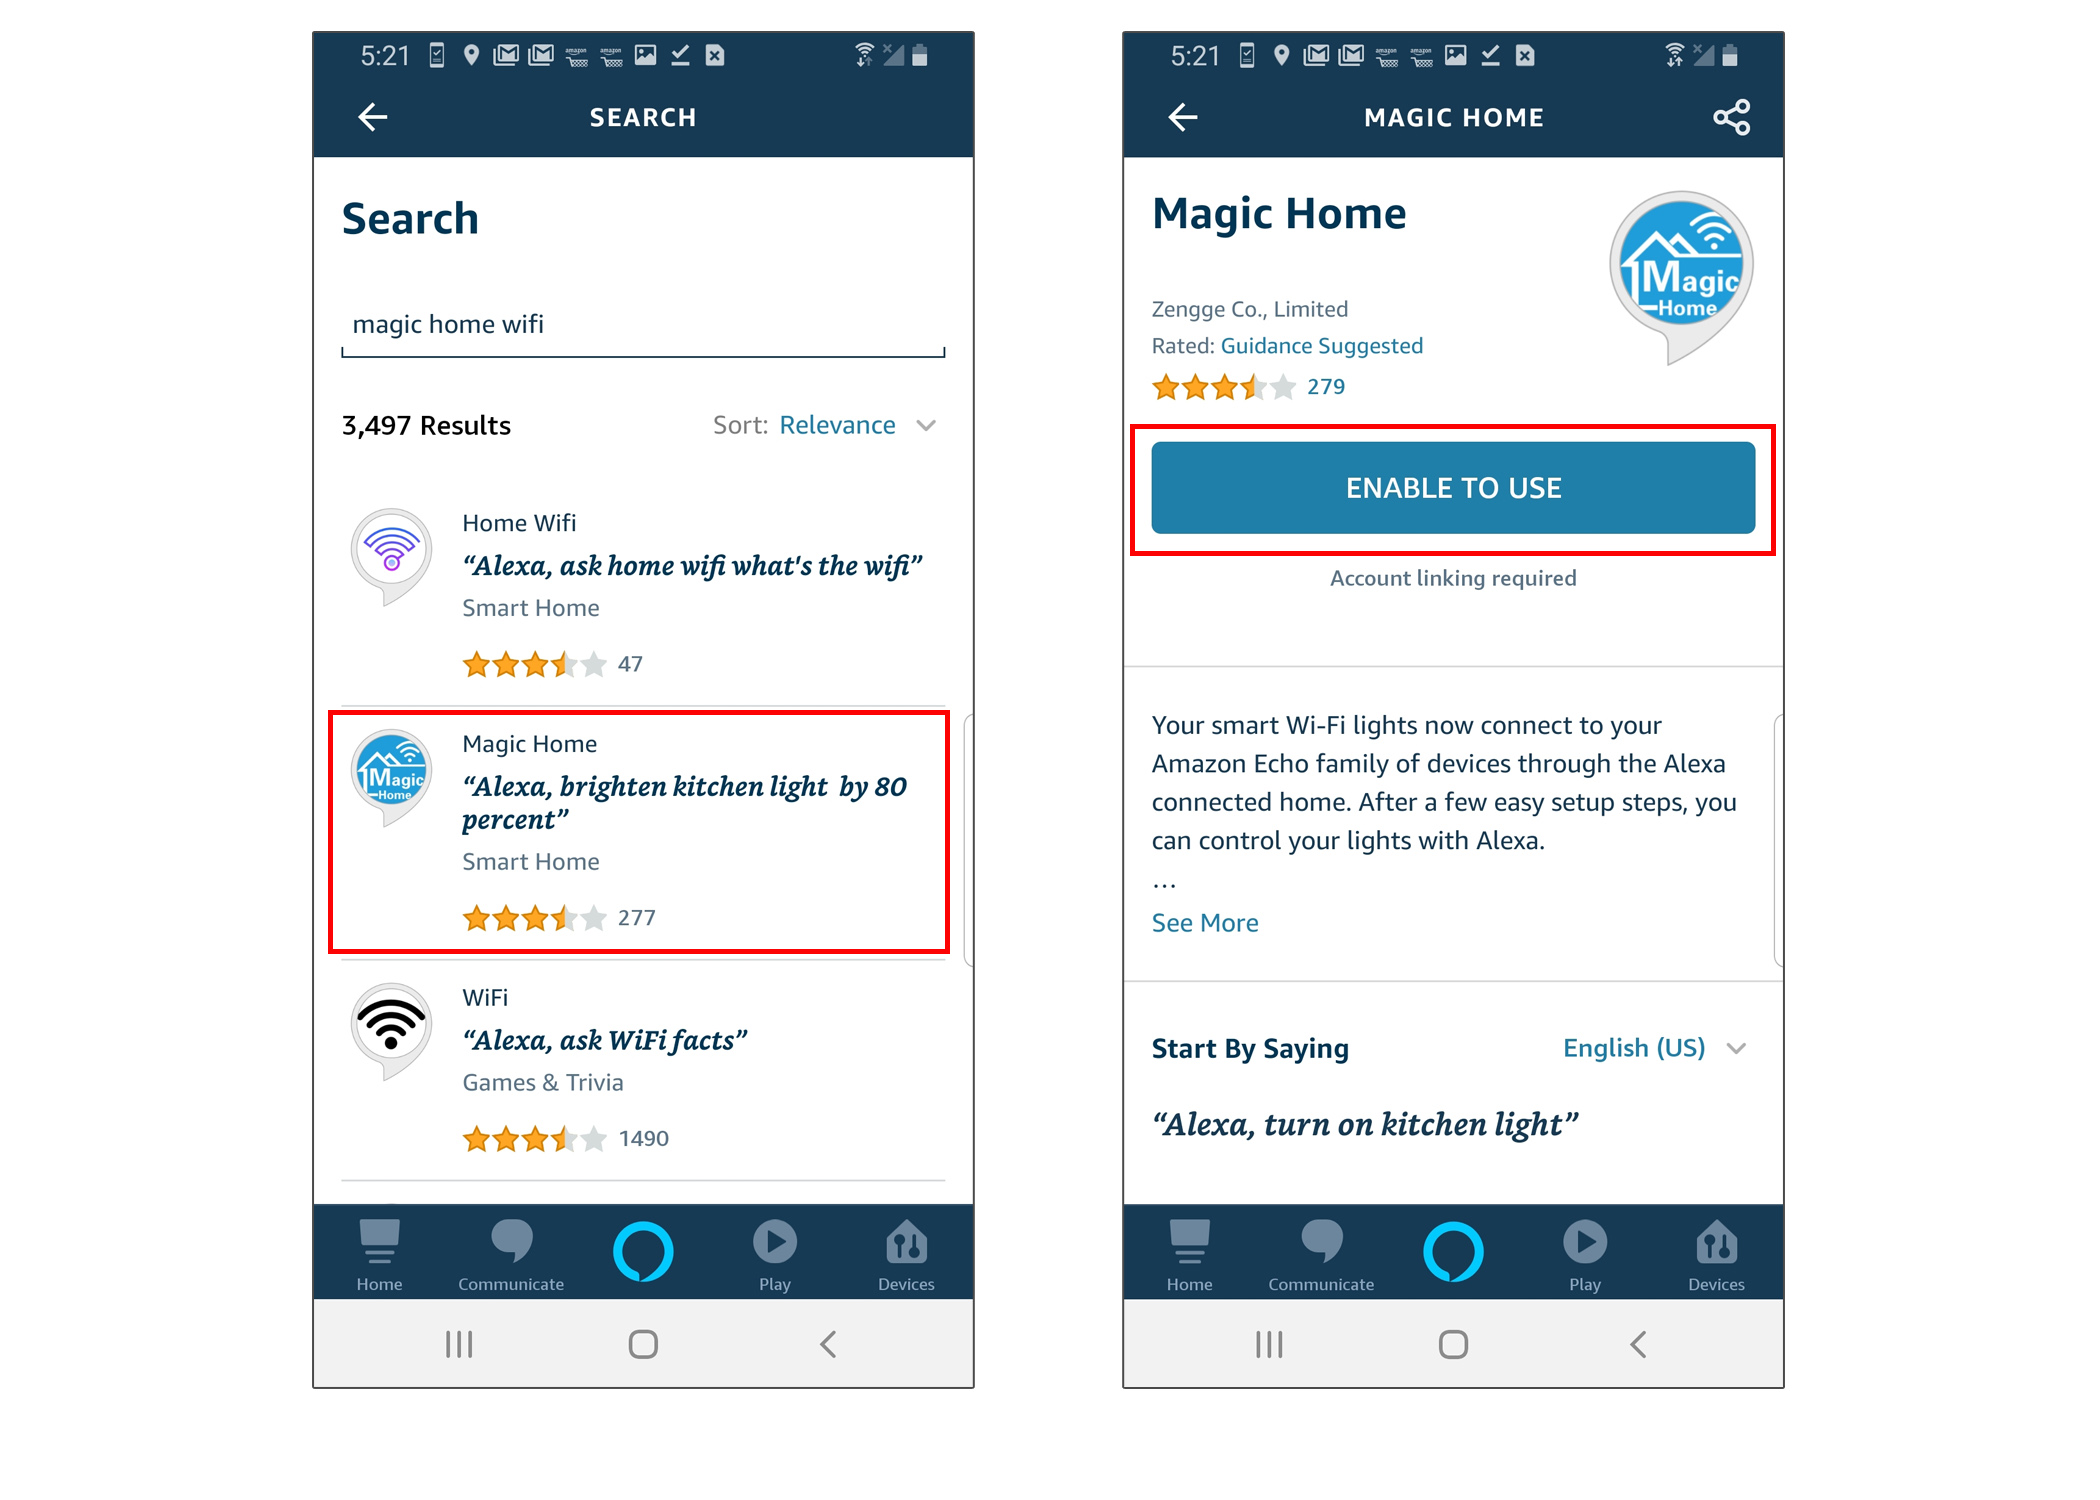
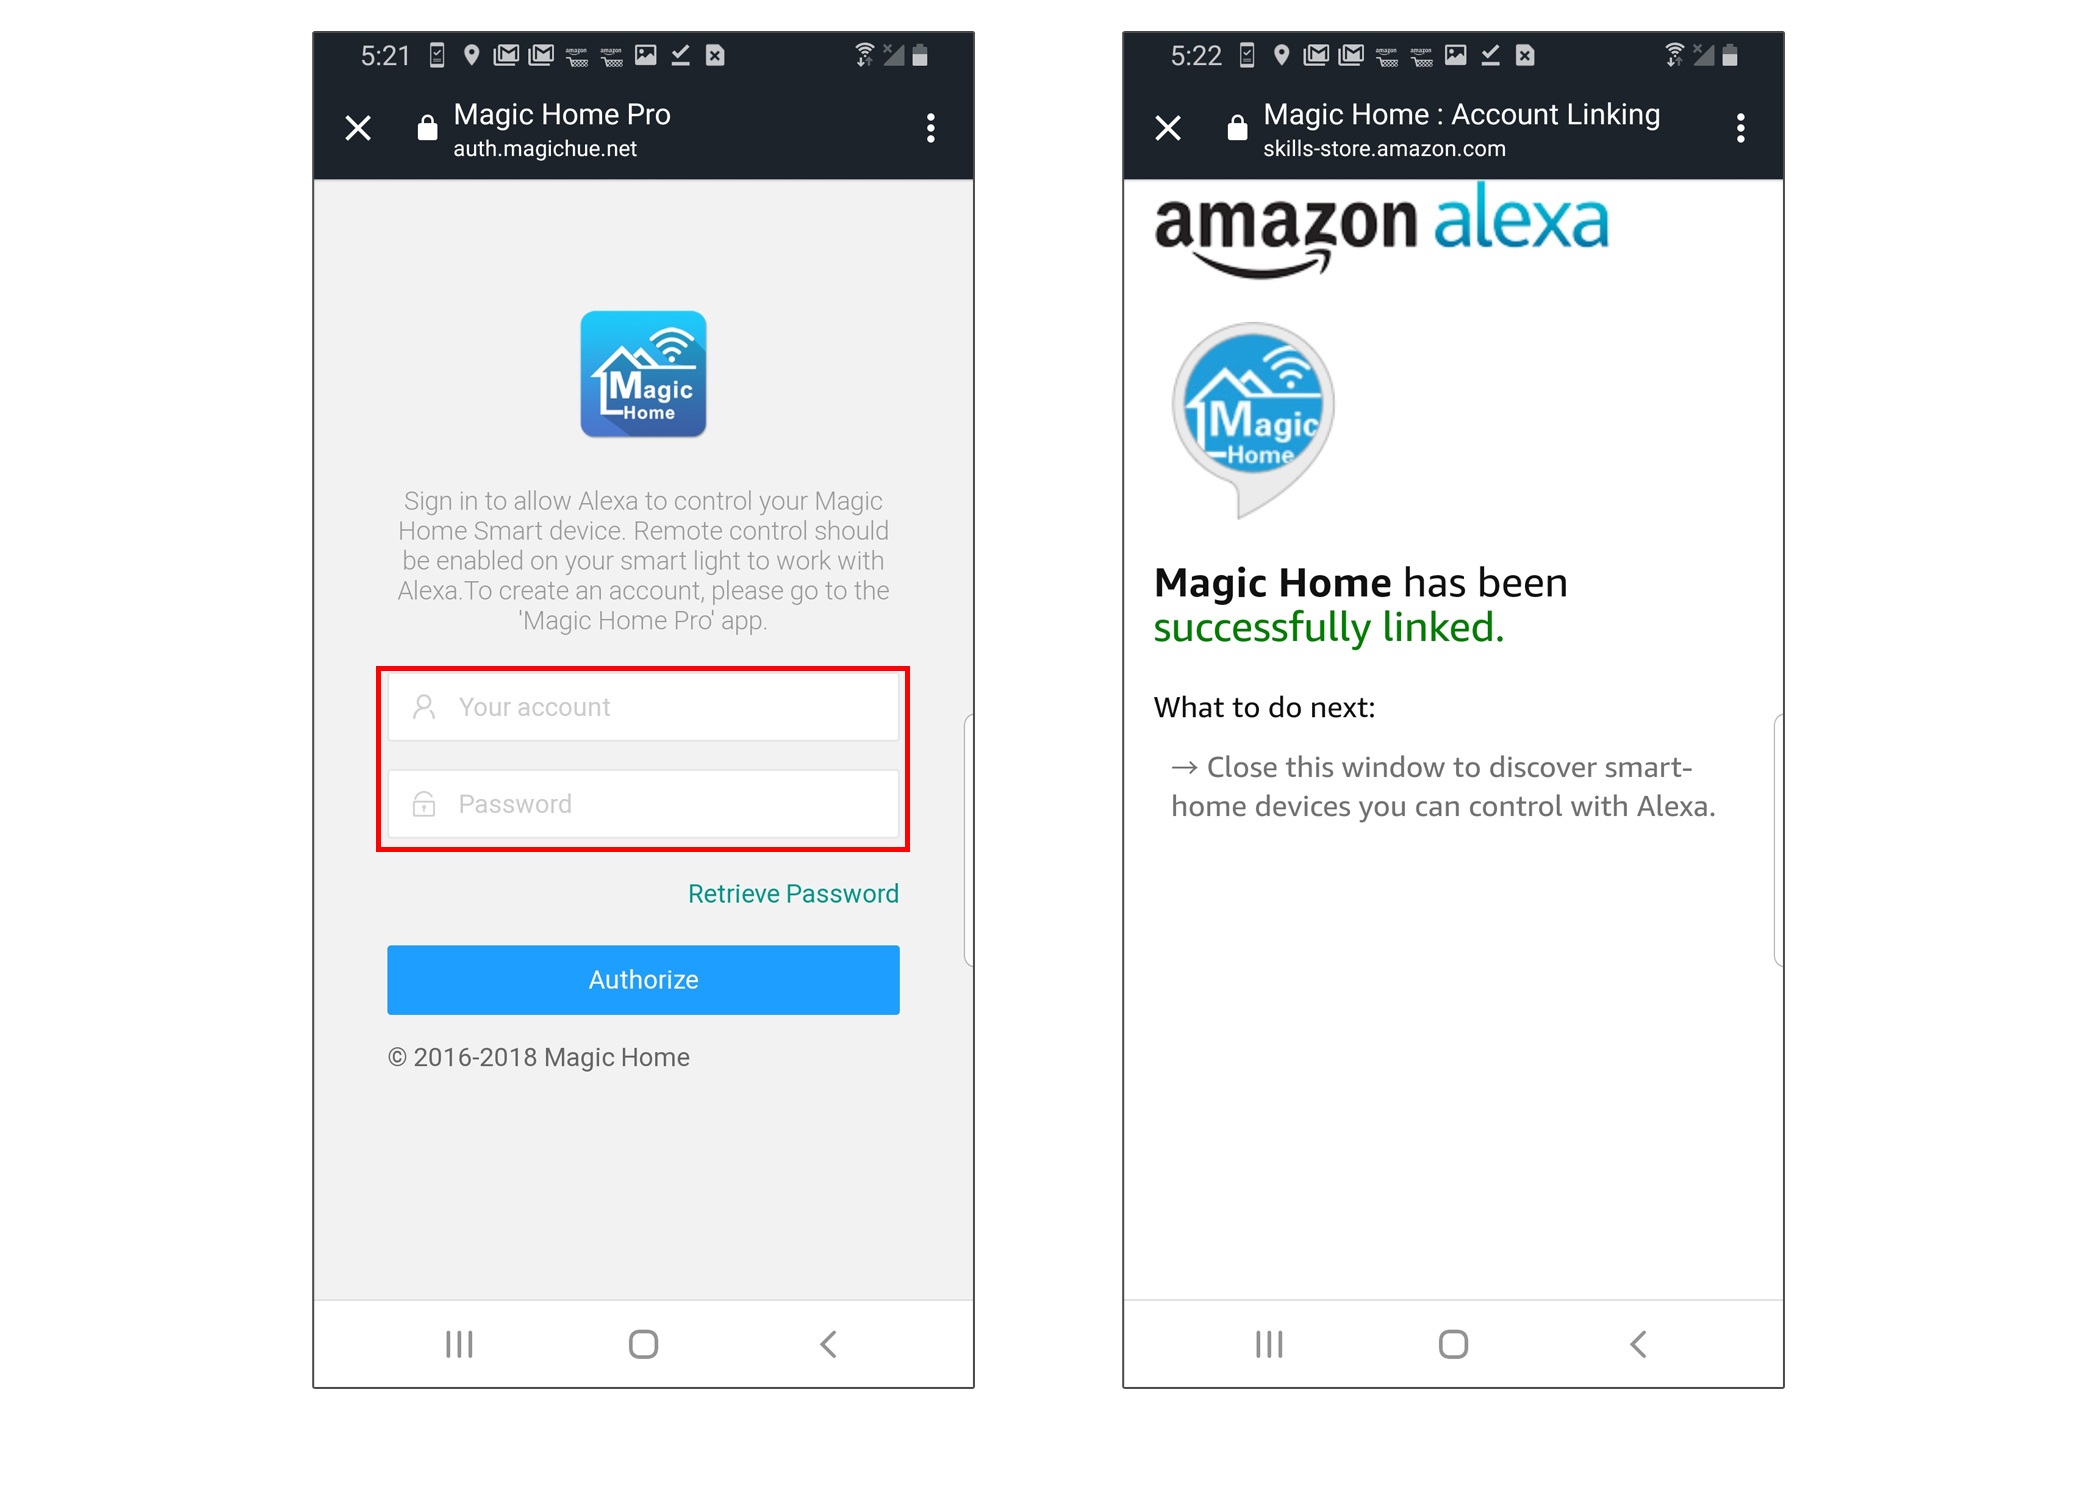
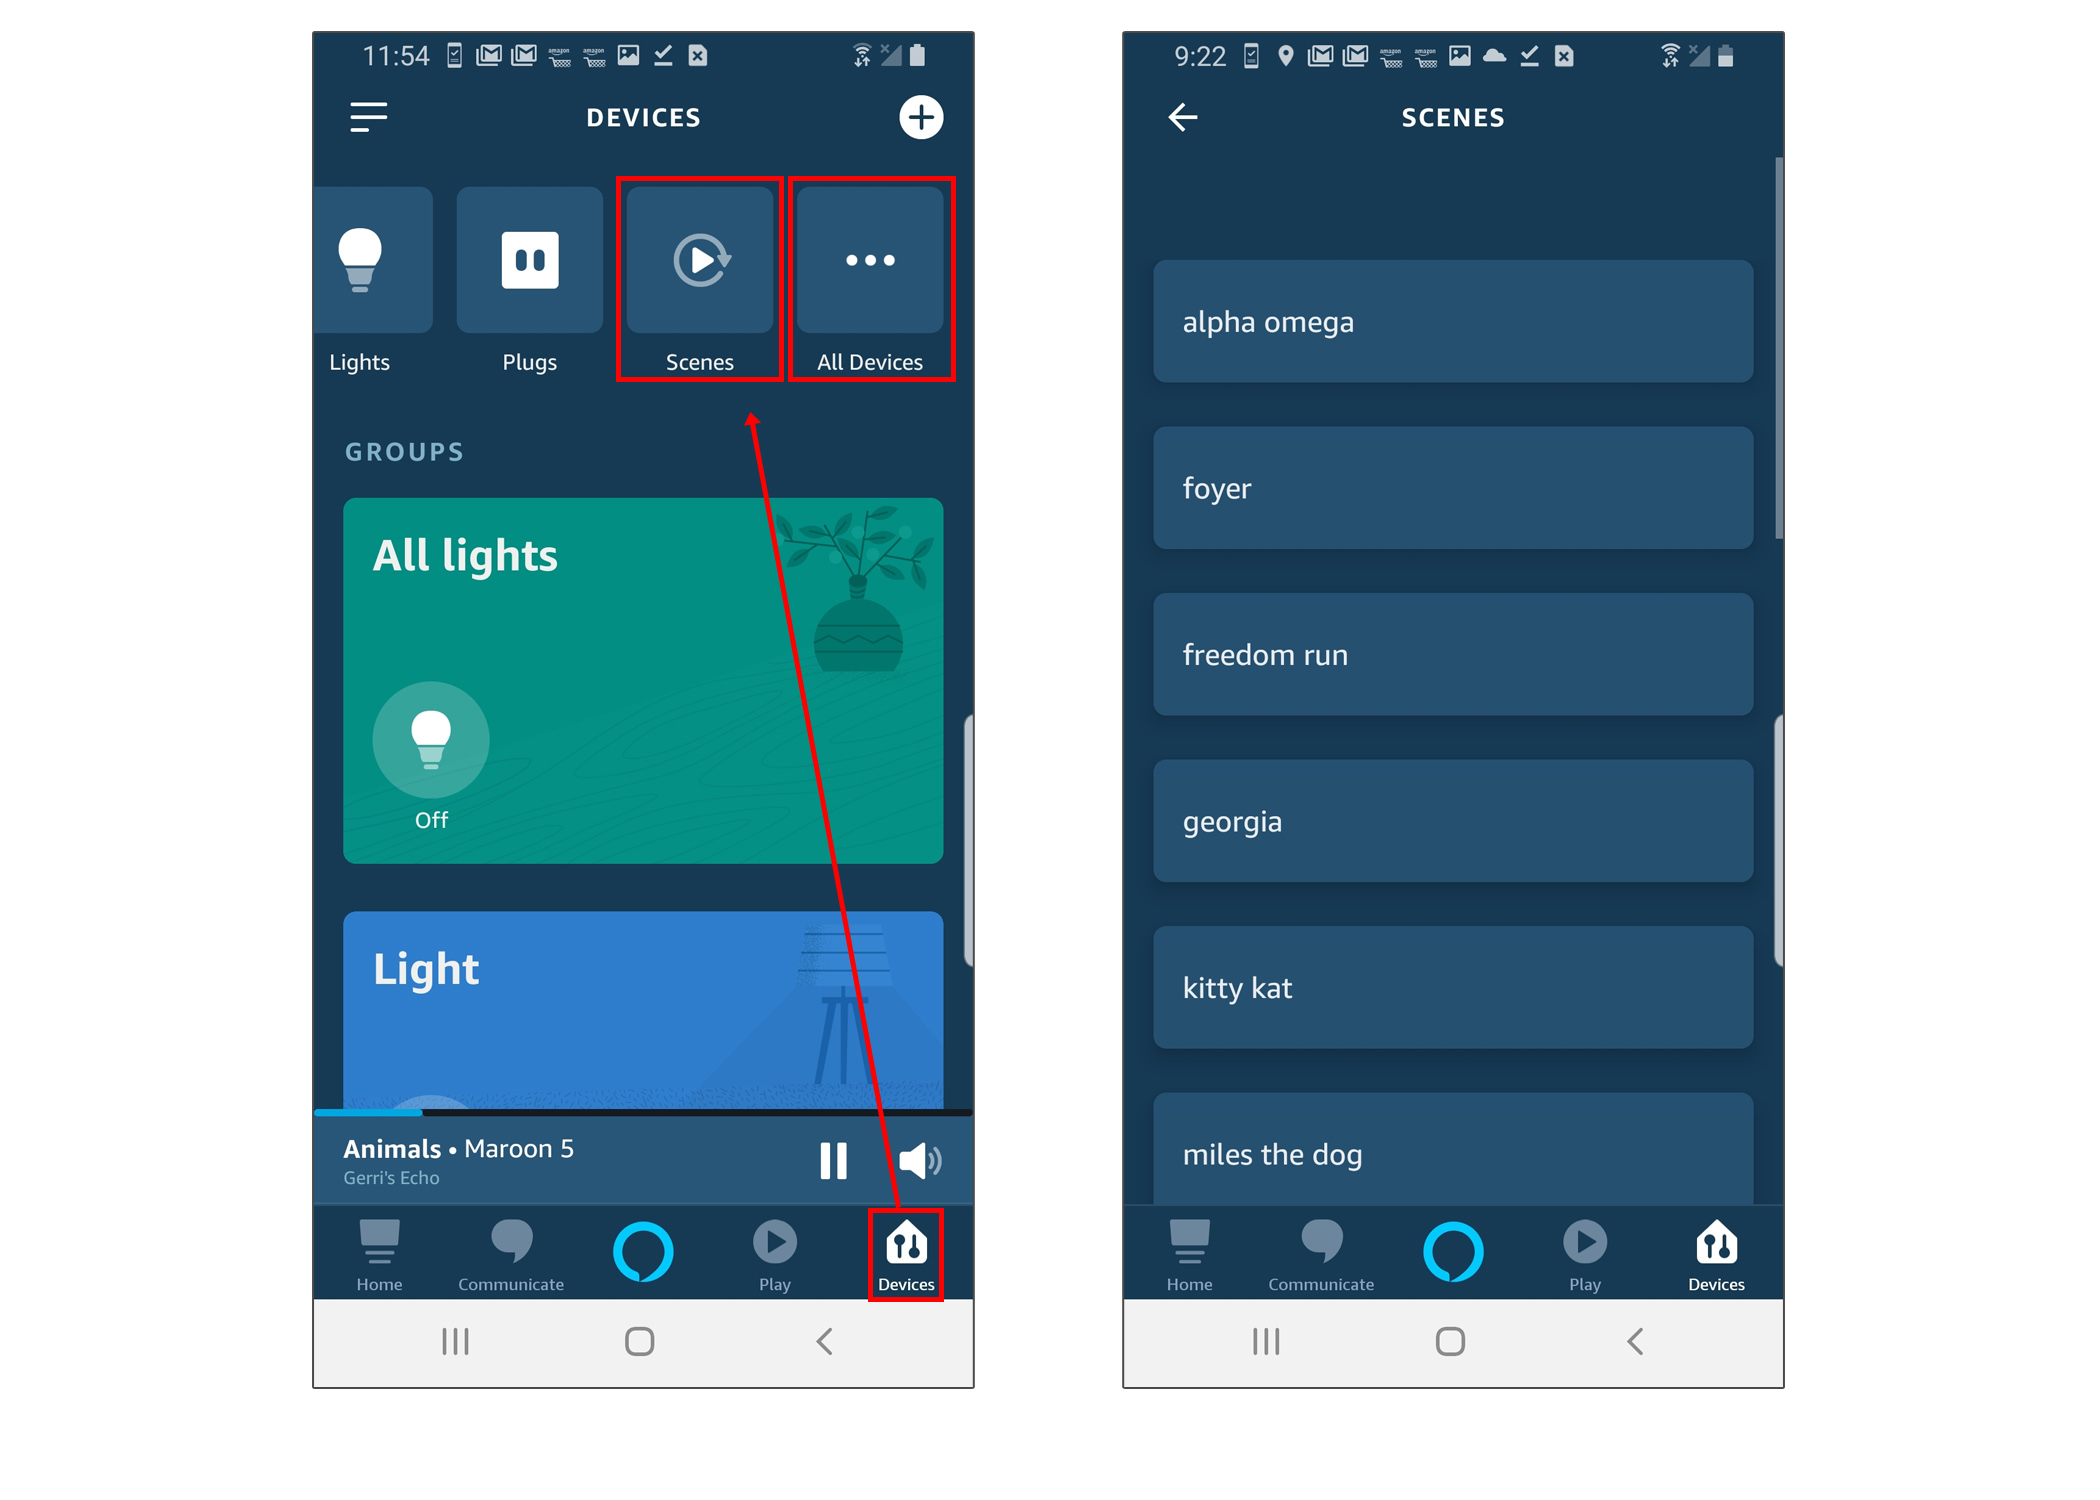
You should now see any Scenes you had previously created with the EFXTM App. You now should be able to give voice commands to directly control your EFXTM Devices and Scenes.


Supported Commands:

Say "Alexa", then...

  • Set [Device] to [0-100% brightness]
  • Turn [Device] on/off
  • Dim/Brighten [Device]
  • Set the [Device] to [Red]
  • Change the [Device] to the color blue

Changing Colors on your Lights

Color Options for Alexa Control of your EFXTM Device

  • Blue
  • Crimson
  • Cyan
  • Fuchsia
  • Gold
  • Green
  • Lavender
  • Lime
  • Magenta
  • Orange
  • Purple
  • Red
  • Salmon
  • Sky Blue
  • Teal
  • Turquoise
  • Violet
  • Yellow

If you plan to use voice command, we recommend that you name or rename your EFXTM Devices and Scenes with a minimum of two or three syllables to make it easier for Alexa to understand.

Note: [Scene Name] = EFXTM Device Name and [Scene Name] = EFXTM Scene Name.

As well as voice recognition software has improved over the years, Alexa still has trouble with some words; In the event Alexa doesn't follow your voice commands, try renaming your EFXTM Device or Scene.

Picture of connecting Google home

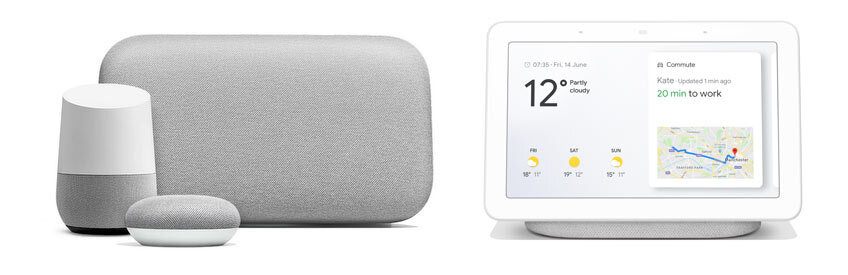
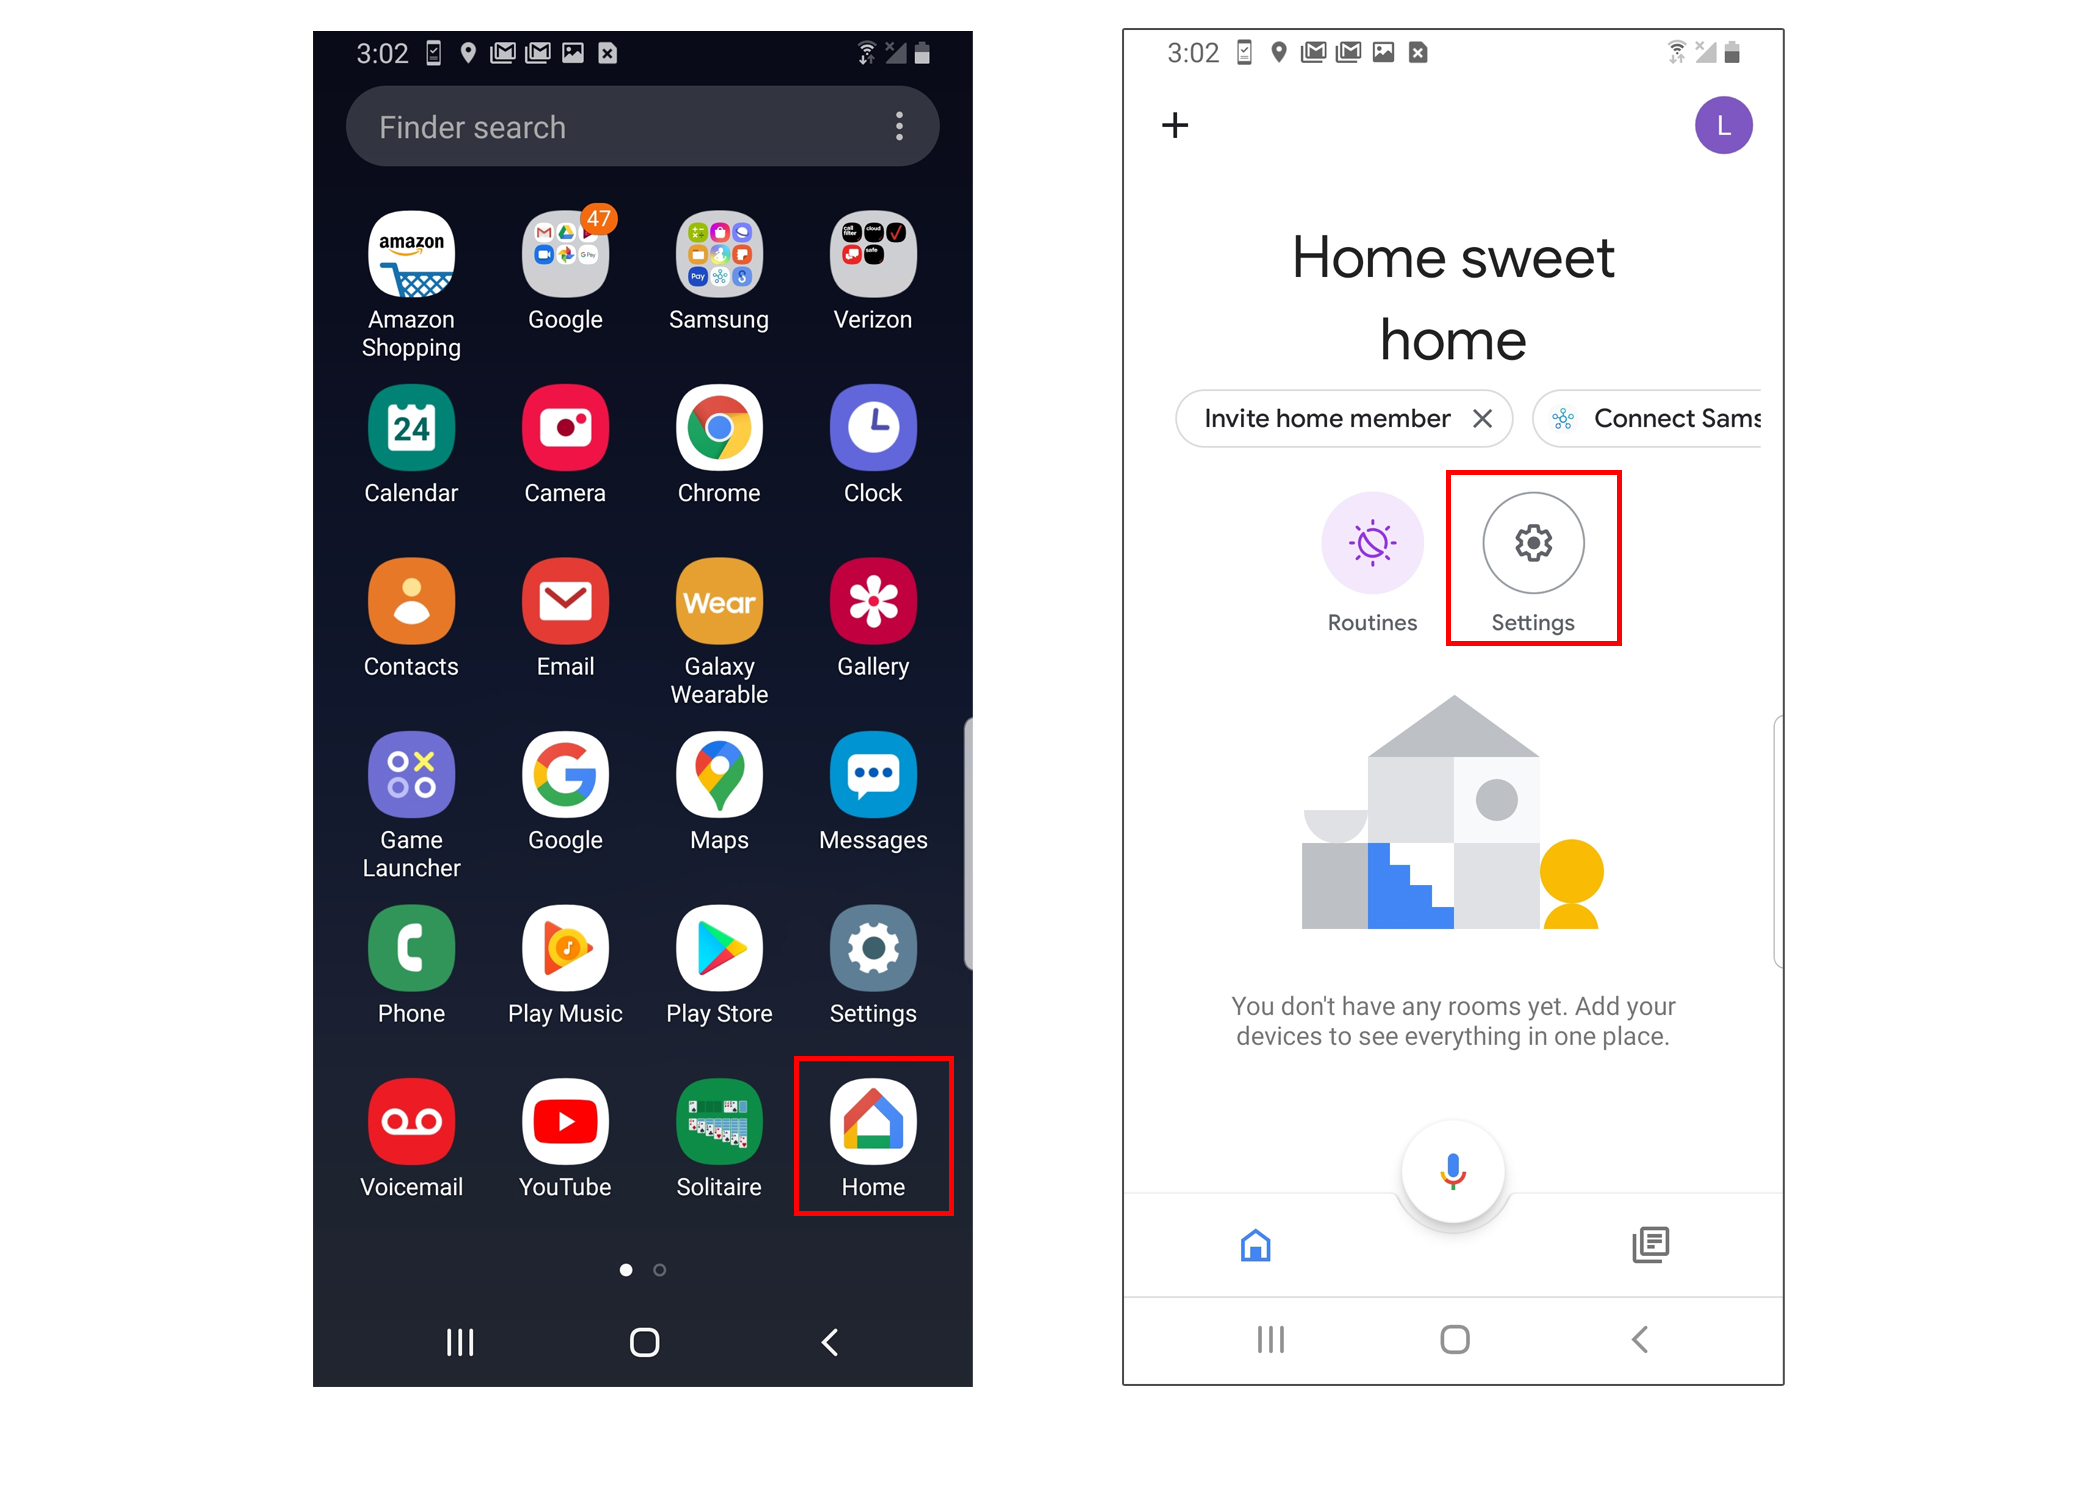
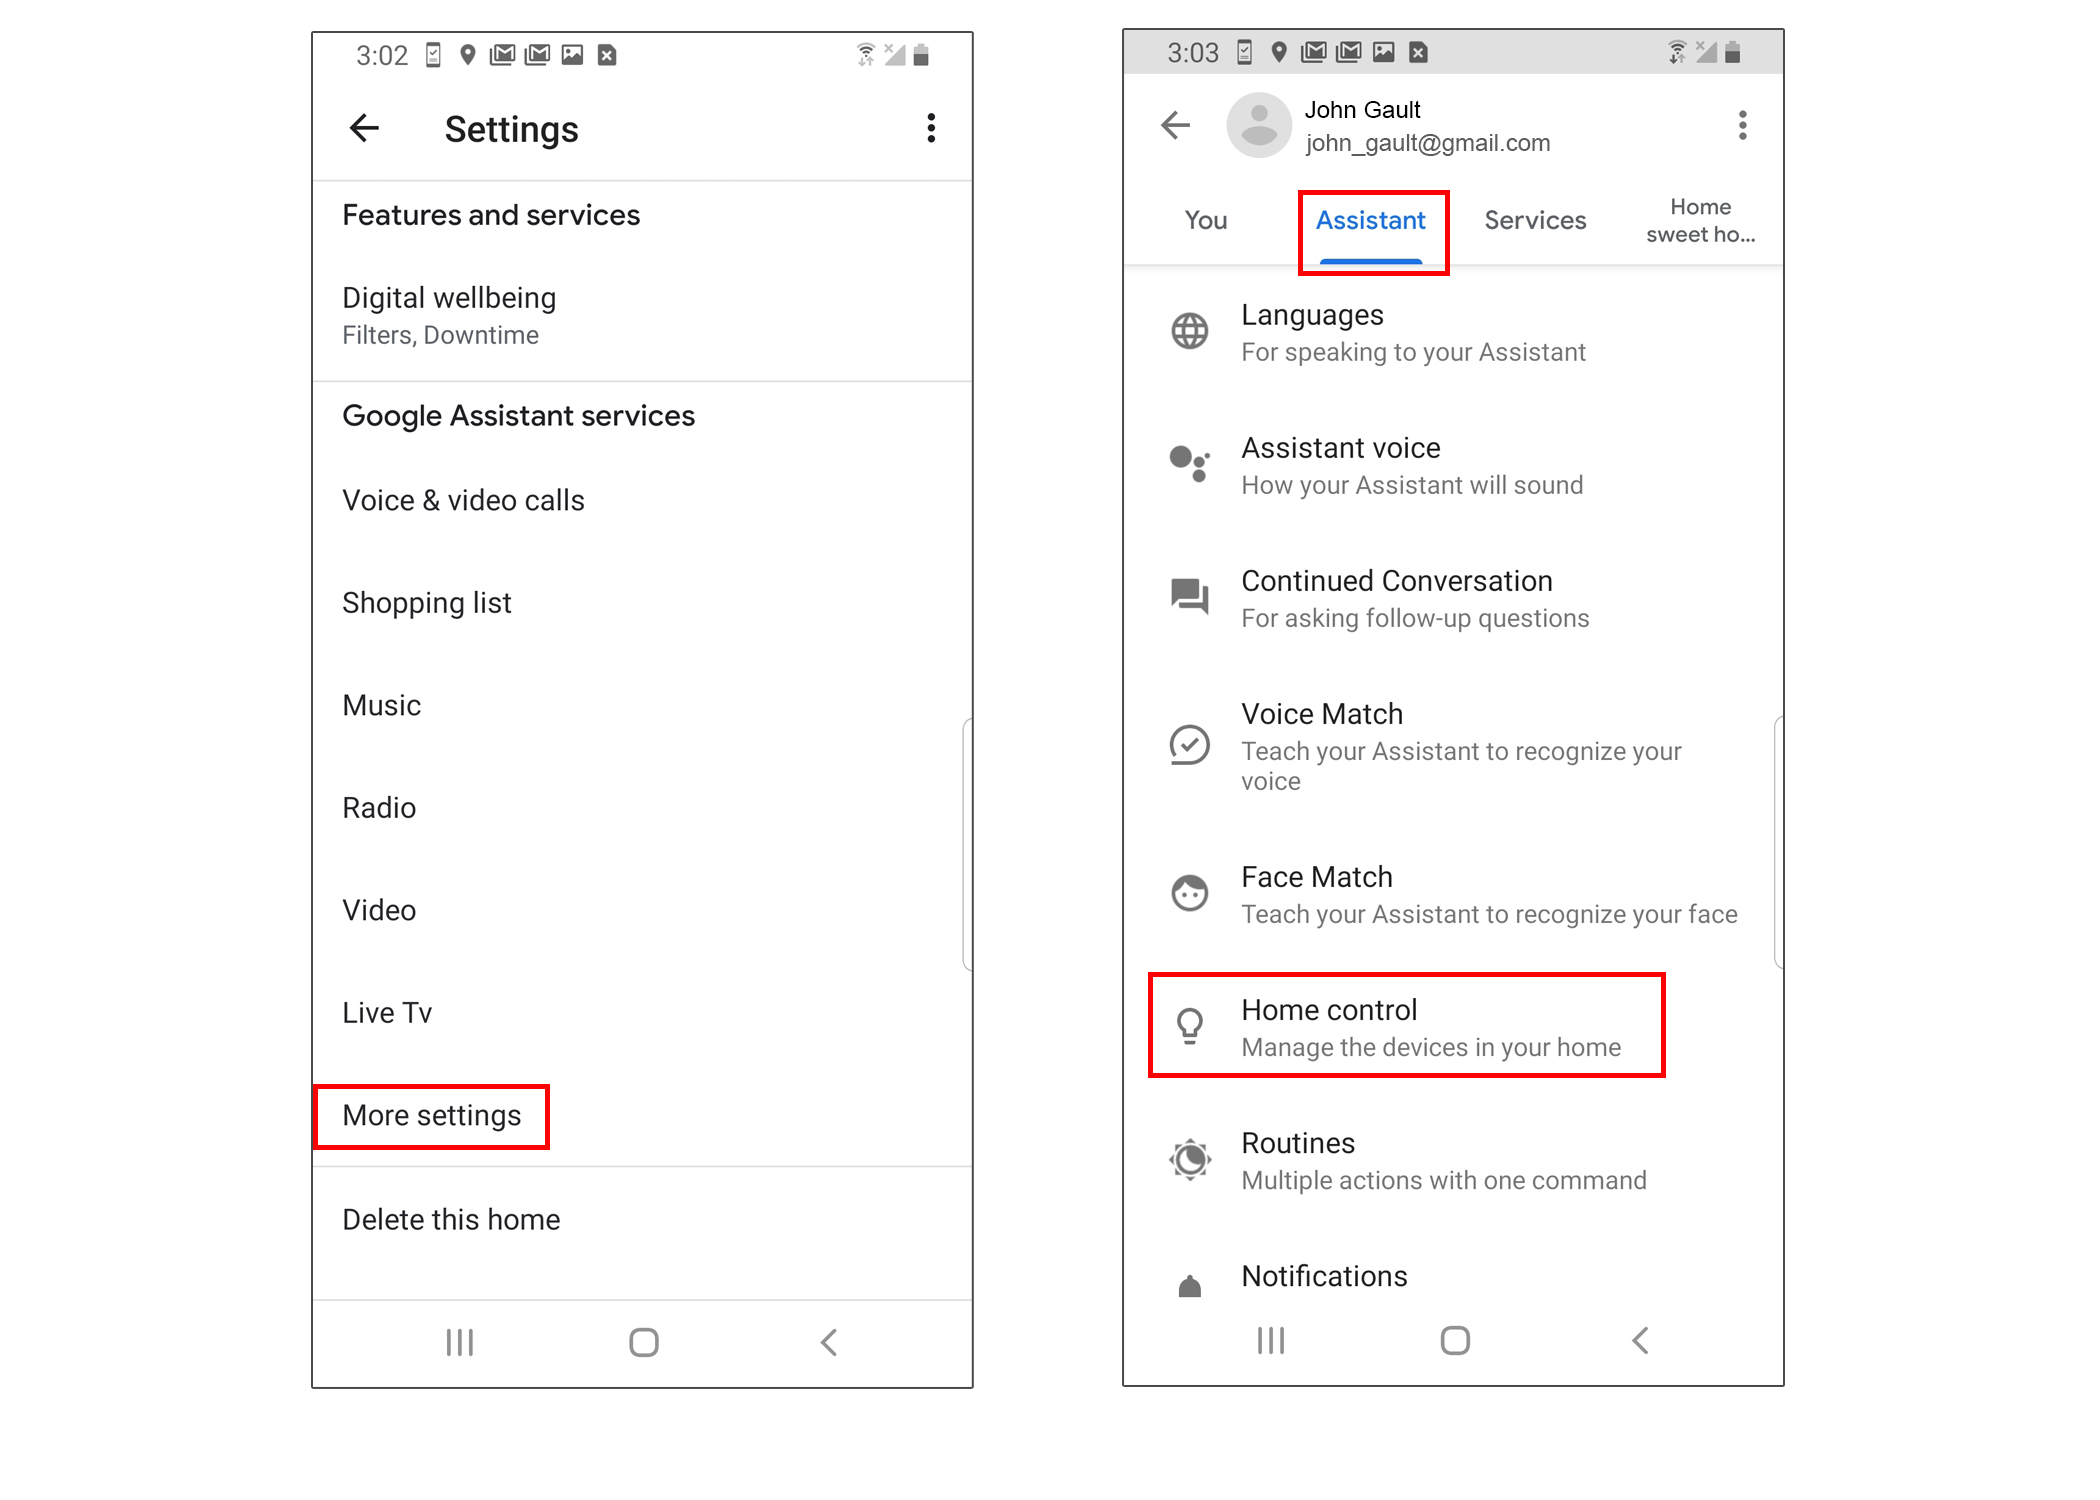
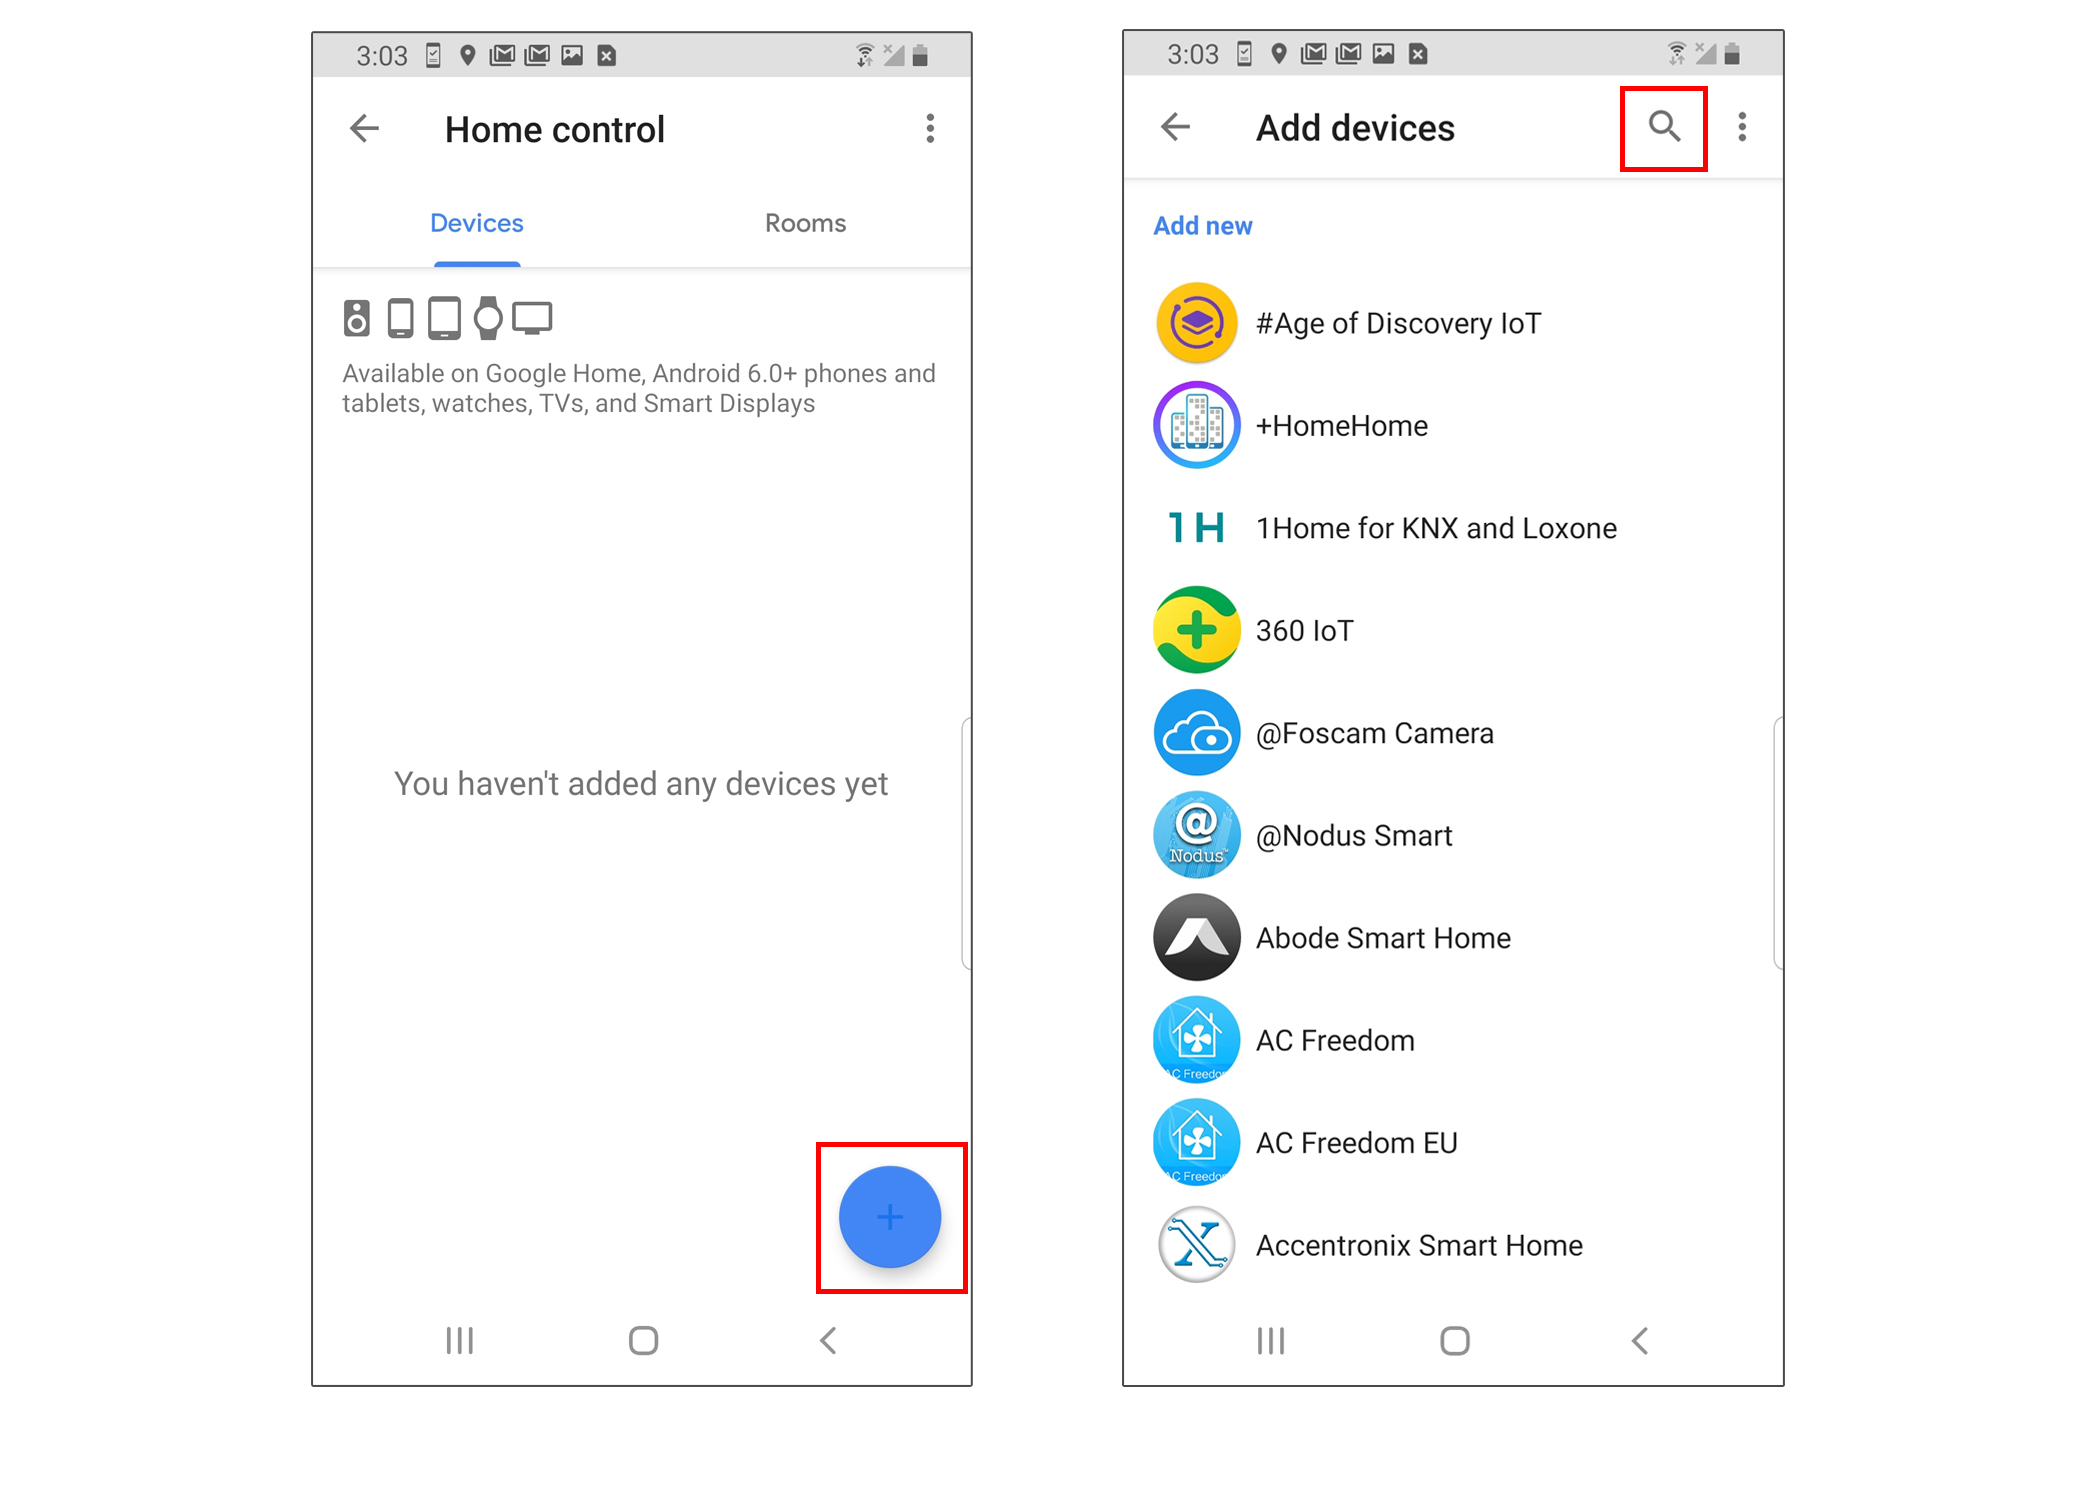
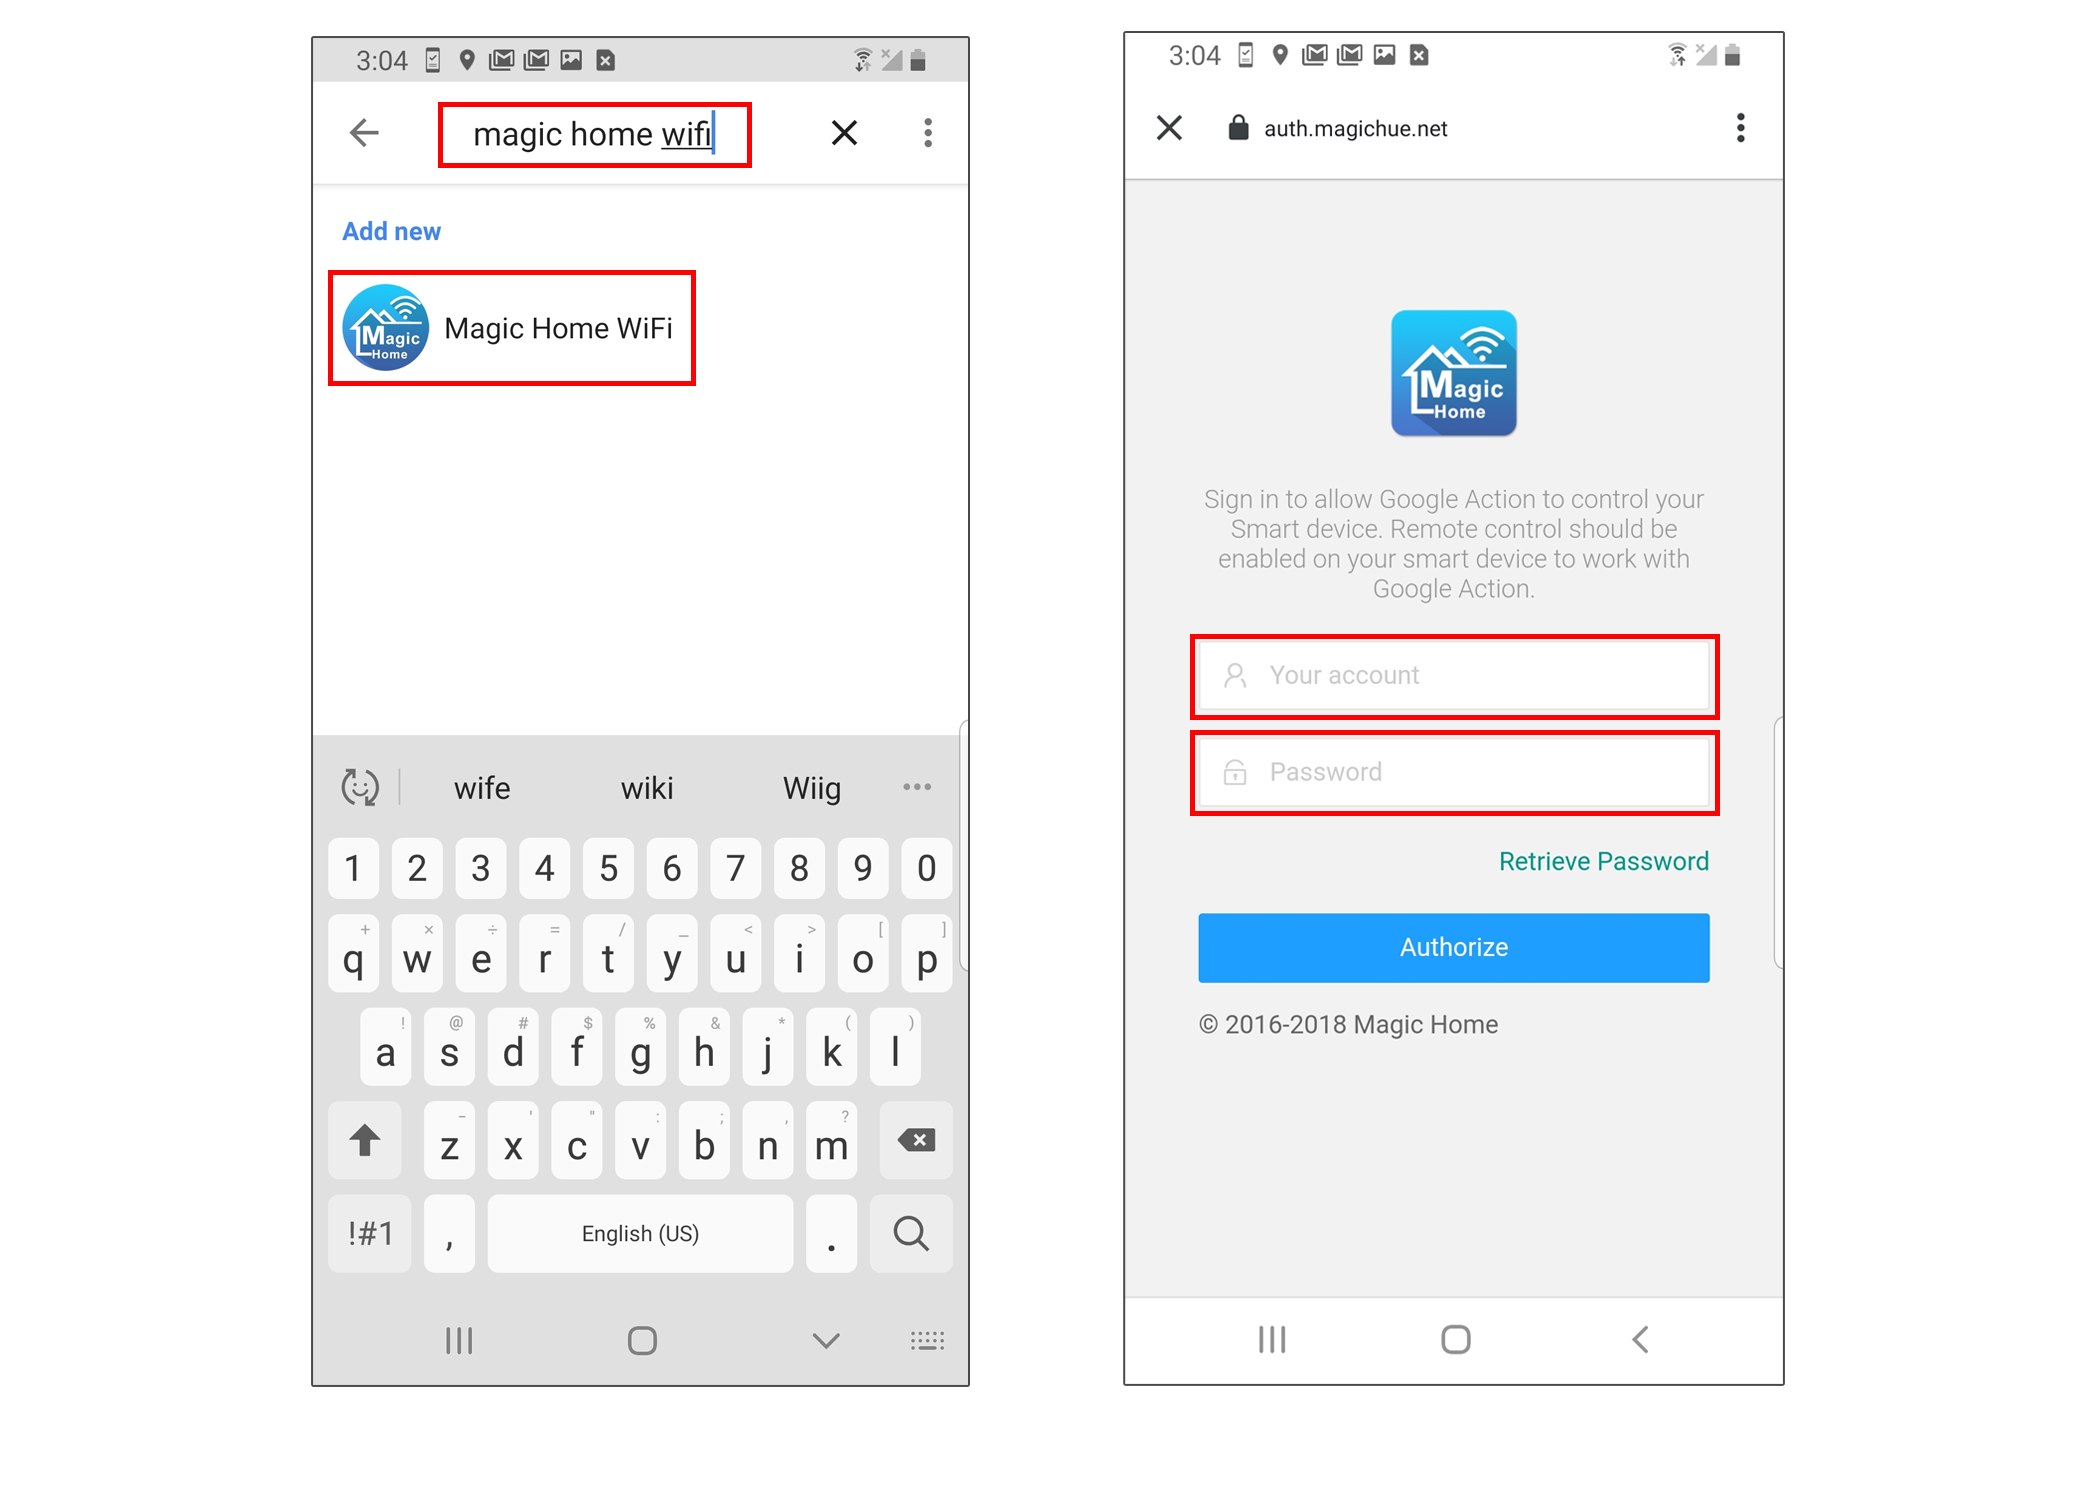
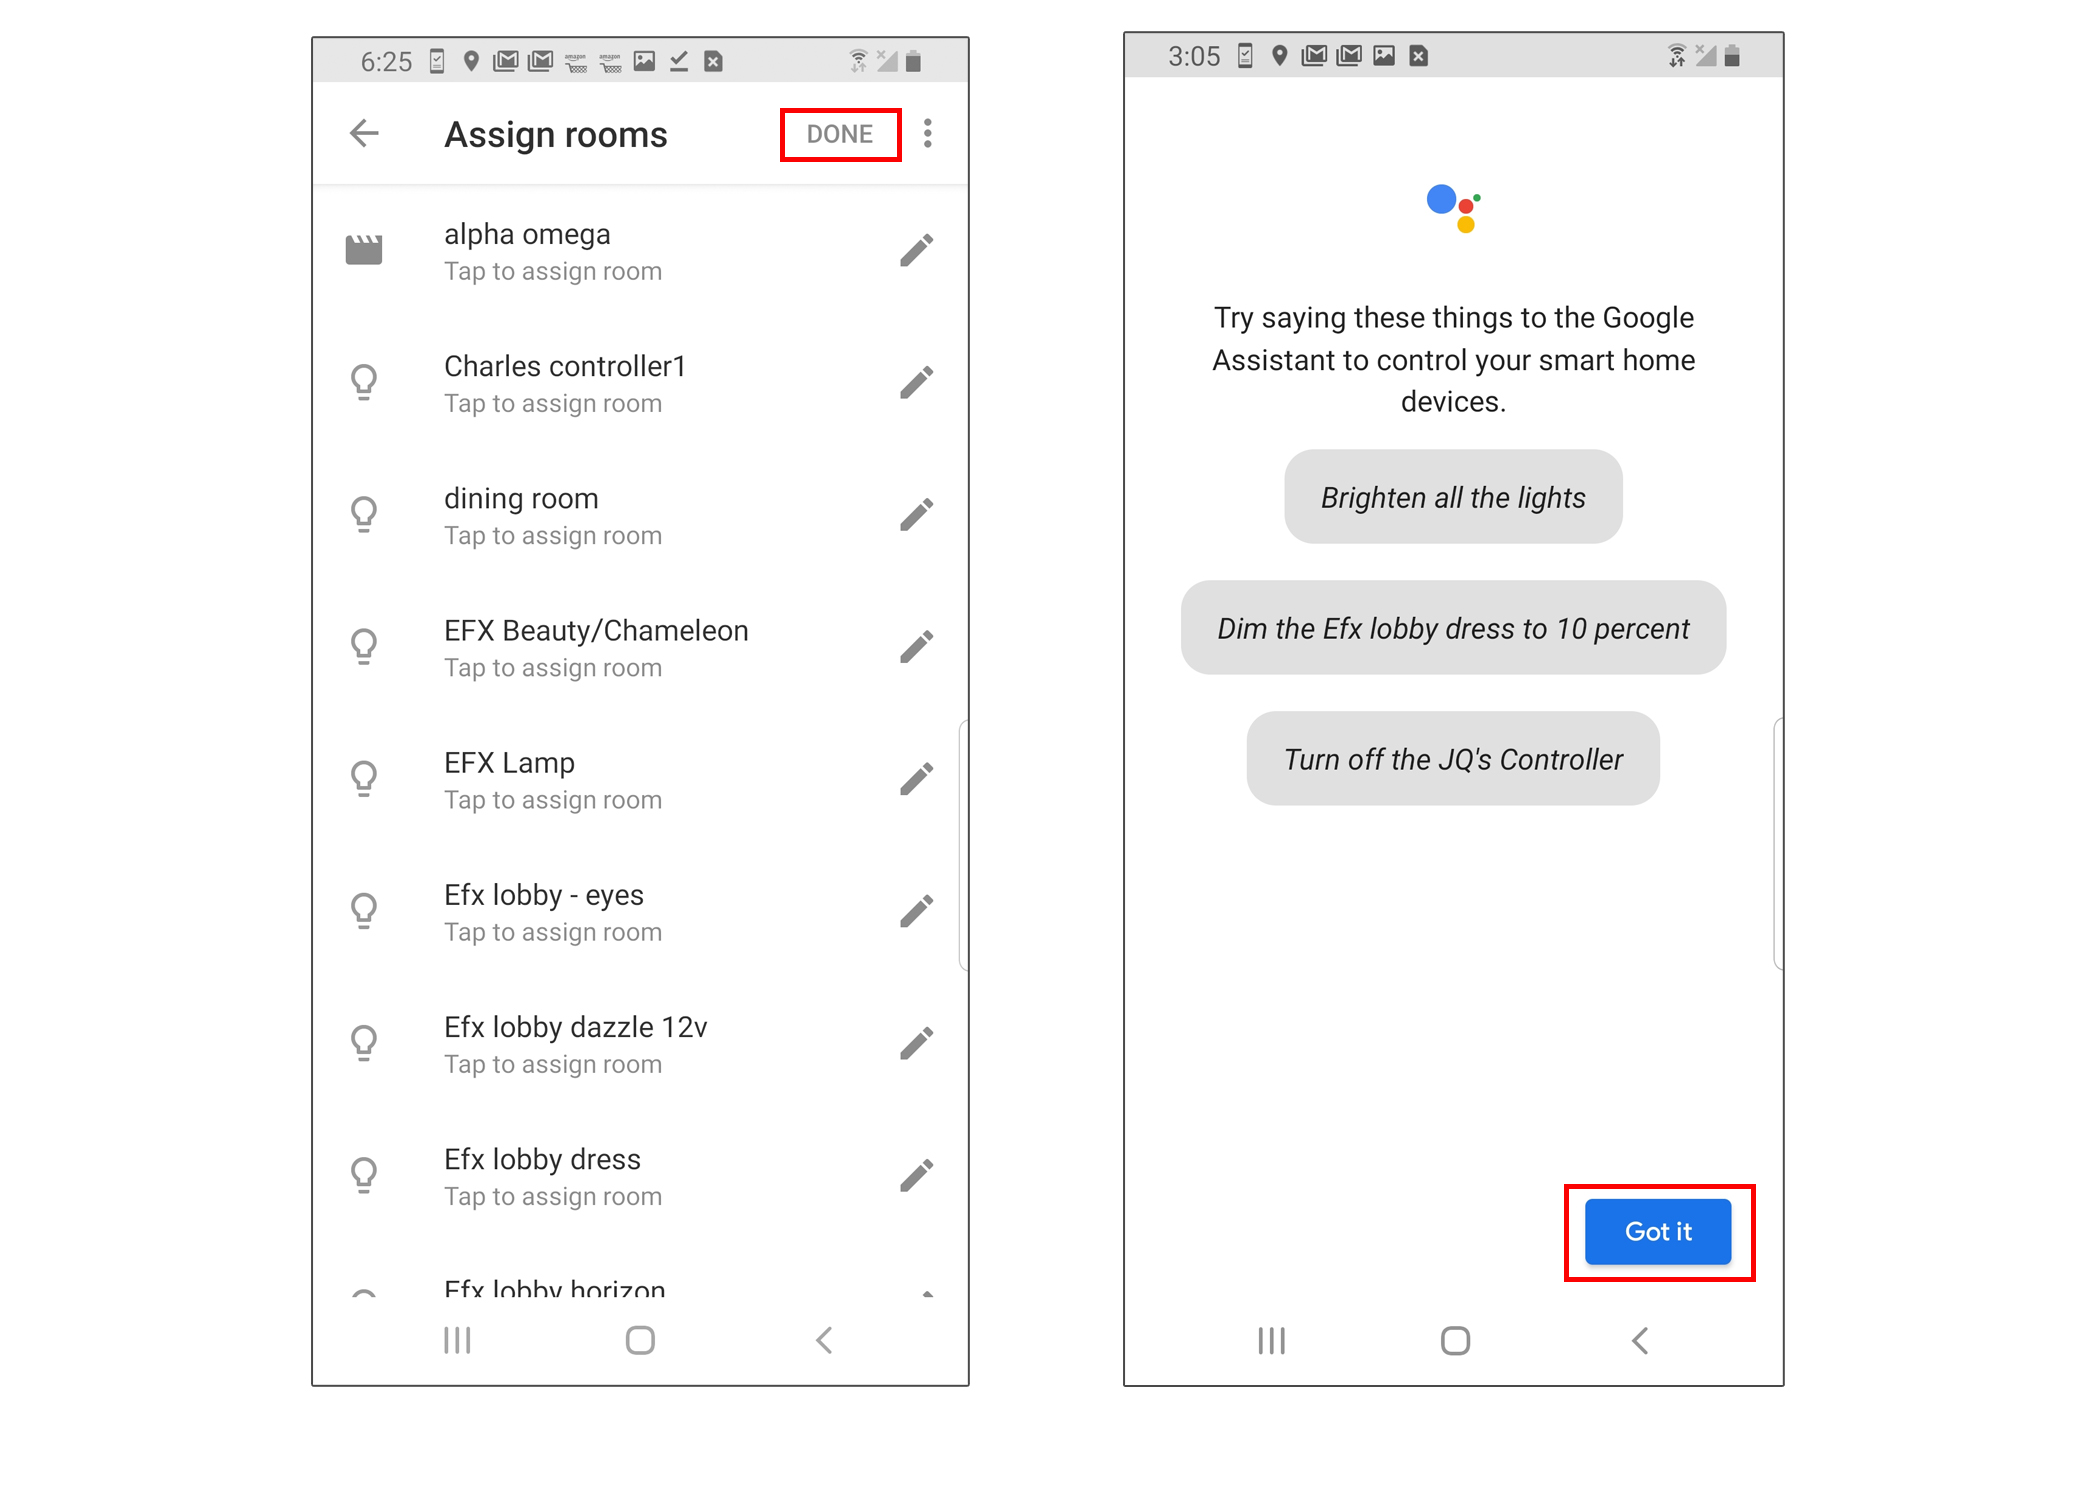
At the time this documentation was written, EFXTM Devices can be integrated with these Google products: Google Home, Home Mini, Home Max, and Nest Hub. Once integrated, you can give voice commands to control EFXTM Devices. Note that you will need the Google Home App to connect these devices to your Wi-Fi network and to the internet. You will also need the Google Home App to set-up a connection to your EFXTM Device. You will only have to do this once.

  1. Make sure you have a user id & password set up on the EFXTM Cloud and at least one EFXTM Device connected.
  2. Start Google Home App.
  3. Click on the Settings. Note your home page may look different.
  4. Picture of connecting Google home
  5. Click on More settings.
  6. Click on the Assistant tab and then the Home control.
  7. Picture of connecting Google home
  8. Click to Add a Device.
  9. Click Search icon.
  10. Picture of connecting Google home
  11. Type in “magic home wifi” After you see Magic Home icon appear, click on it to select it.
  12. Enter your EFXTM Cloud Account username and password.
  13. Picture of connecting Google home
  14. After connecting to the EFXTM Cloud, all your EFXTM Devices and Scenes will be downloaded. Then hit the DONE button.
  15. You now can give voice commands to control your EFXTM Devices.
  16. Picture of connecting Google home

Supported Commands:

Say "Ok Google" or "Hey Google", then...

  • Turn on [device]
  • Dim [device]
  • Brighten [device]
  • Set [device] to [50%]
  • Dim/Brighten [device] by [50%]
  • Turn [device] [color]
  • Turn on/off all the lights
  • Is [device] on?
note: [device] = EFXTM Device Name.

Changing colors on your lights

Color Options for Google Home control of your smart device:

  • Blue
  • Crimson
  • Cyan
  • Fuchsia
  • Gold
  • Green
  • Lavender
  • Lime
  • Magenta
  • Orange
  • Purple
  • Red
  • Salmon
  • Sky Blue
  • Teal
  • Turquoise
  • Violet
  • Yellow

For Scenes

You can activate scenes by following voice commands:

Hey Google activate [scene]

Hey Google turn on [scene]
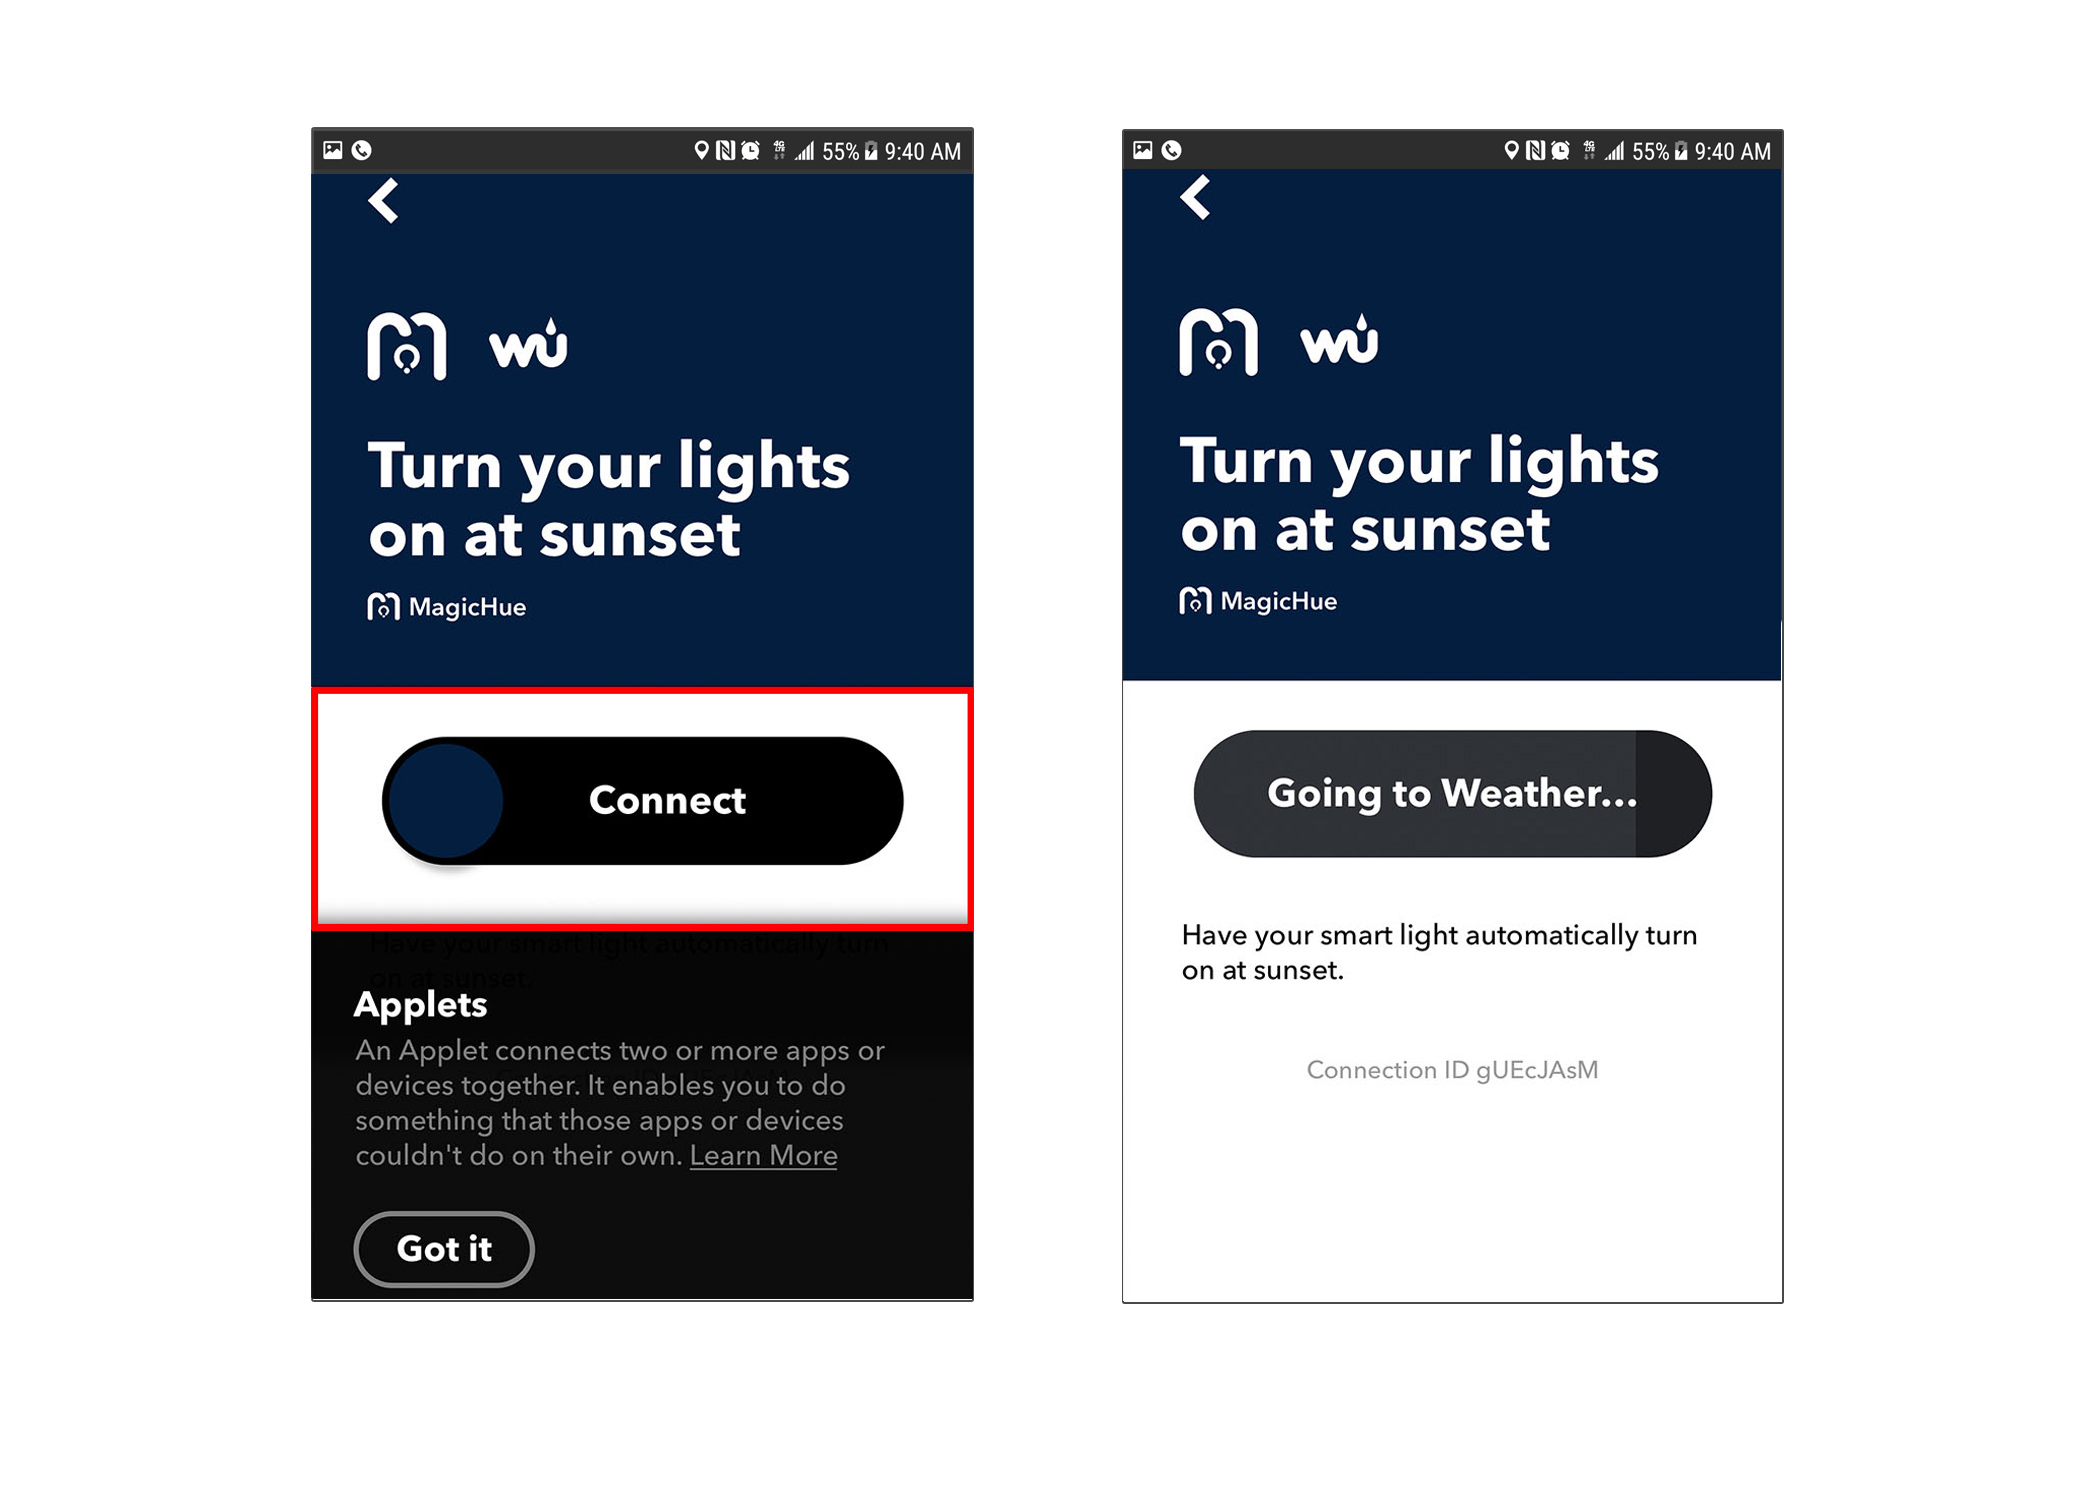
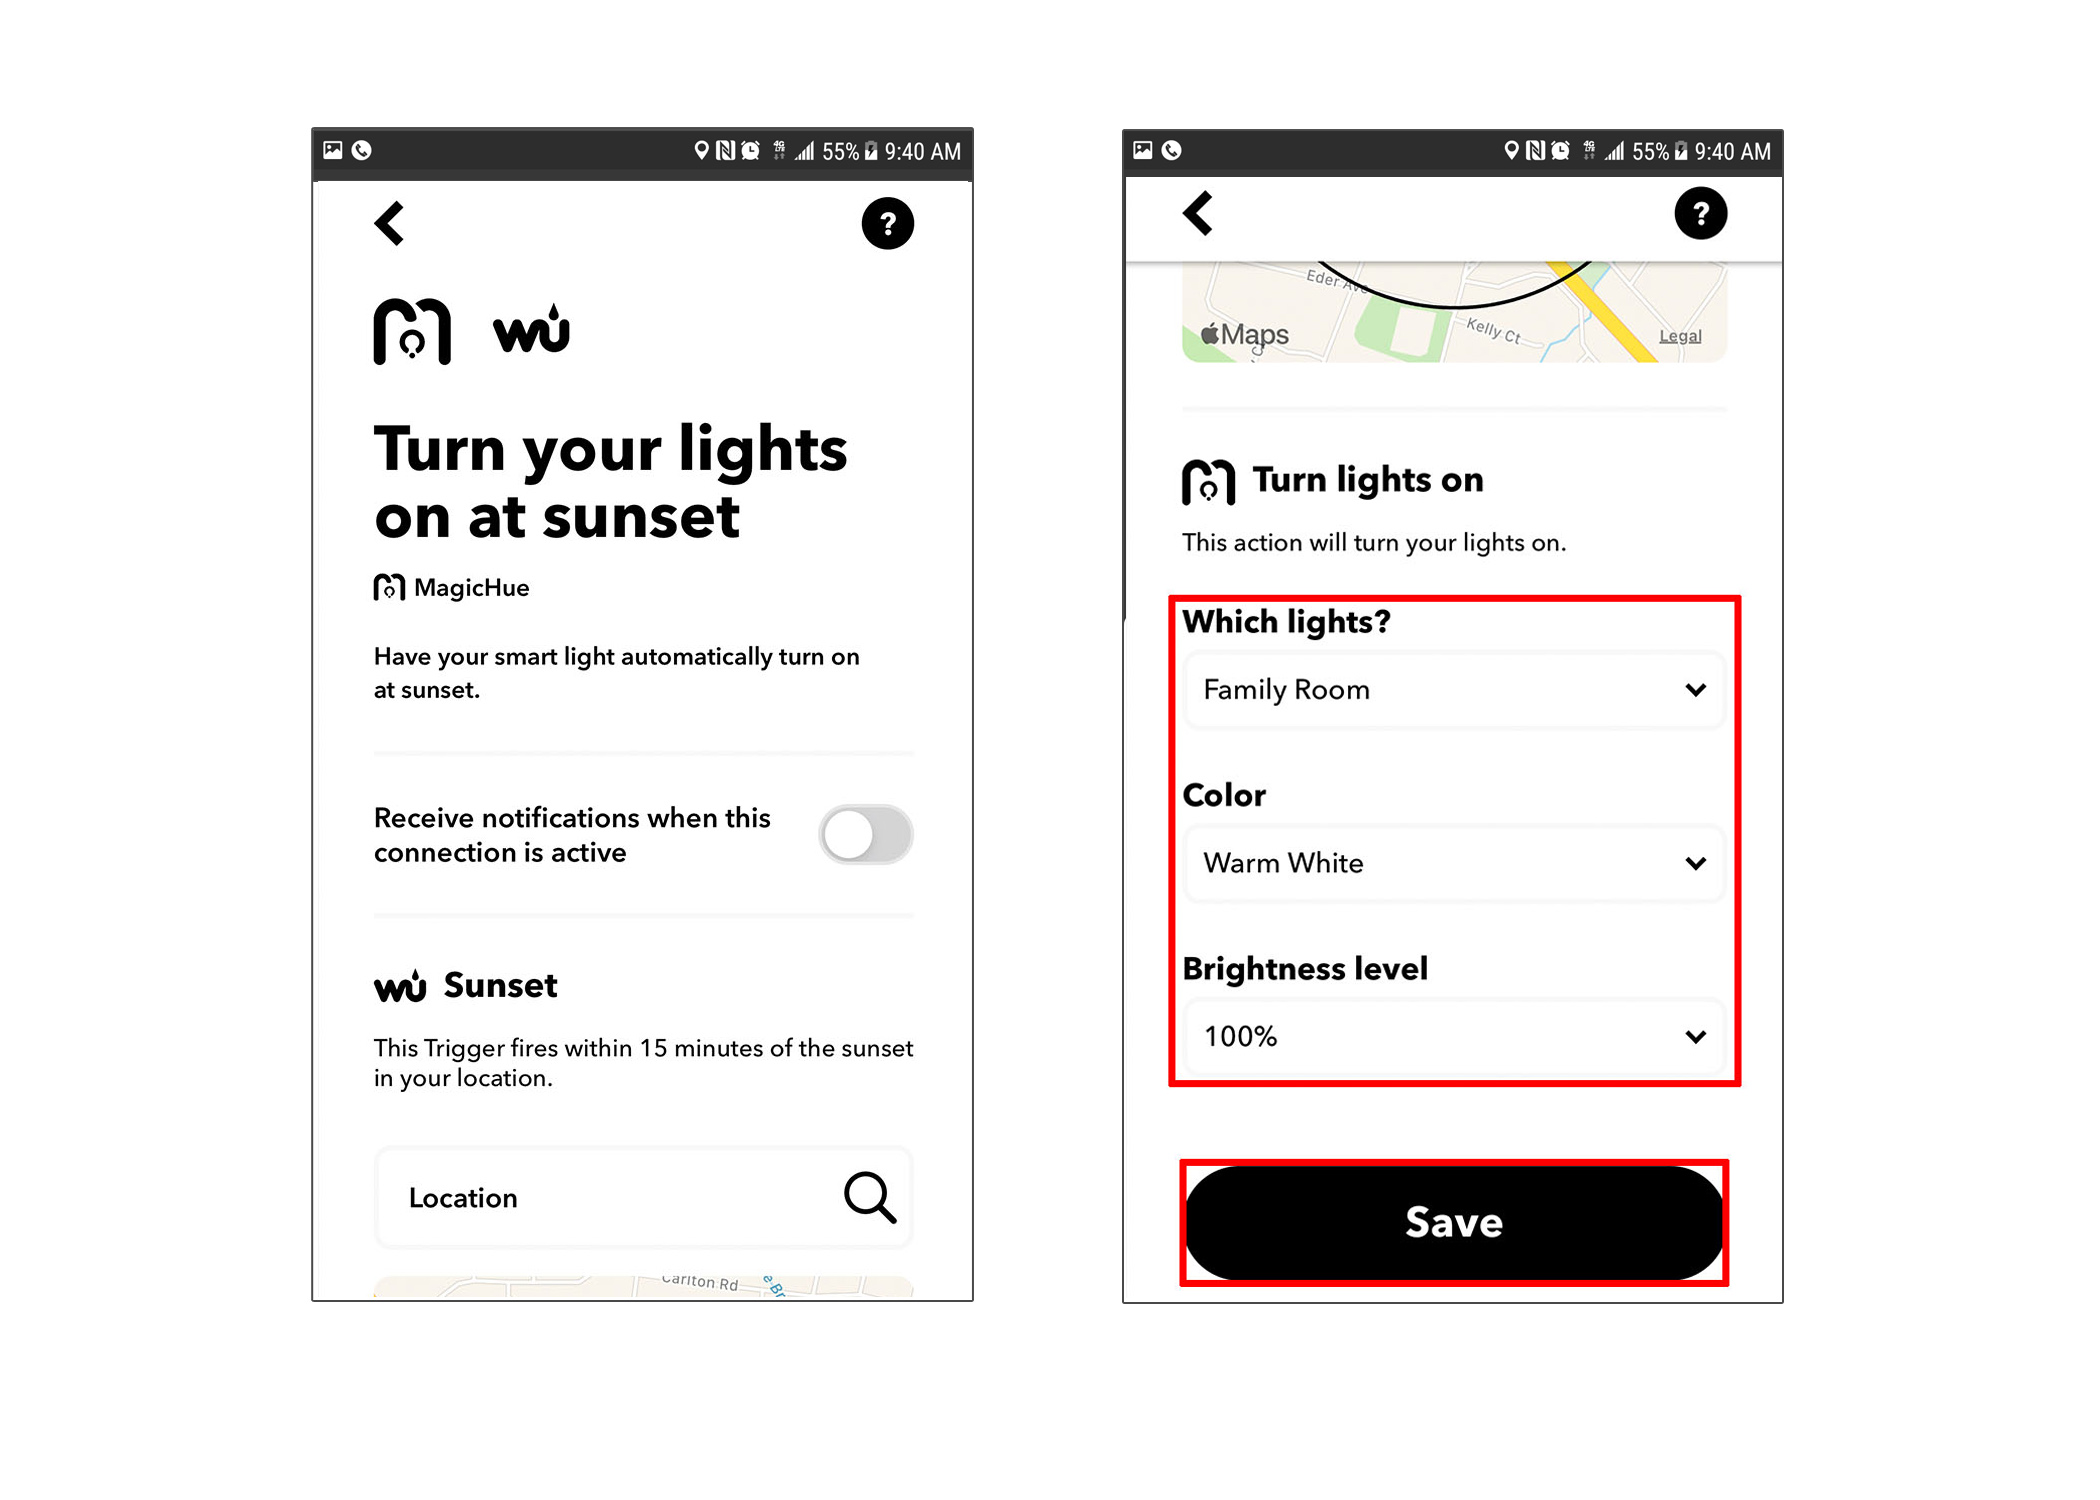
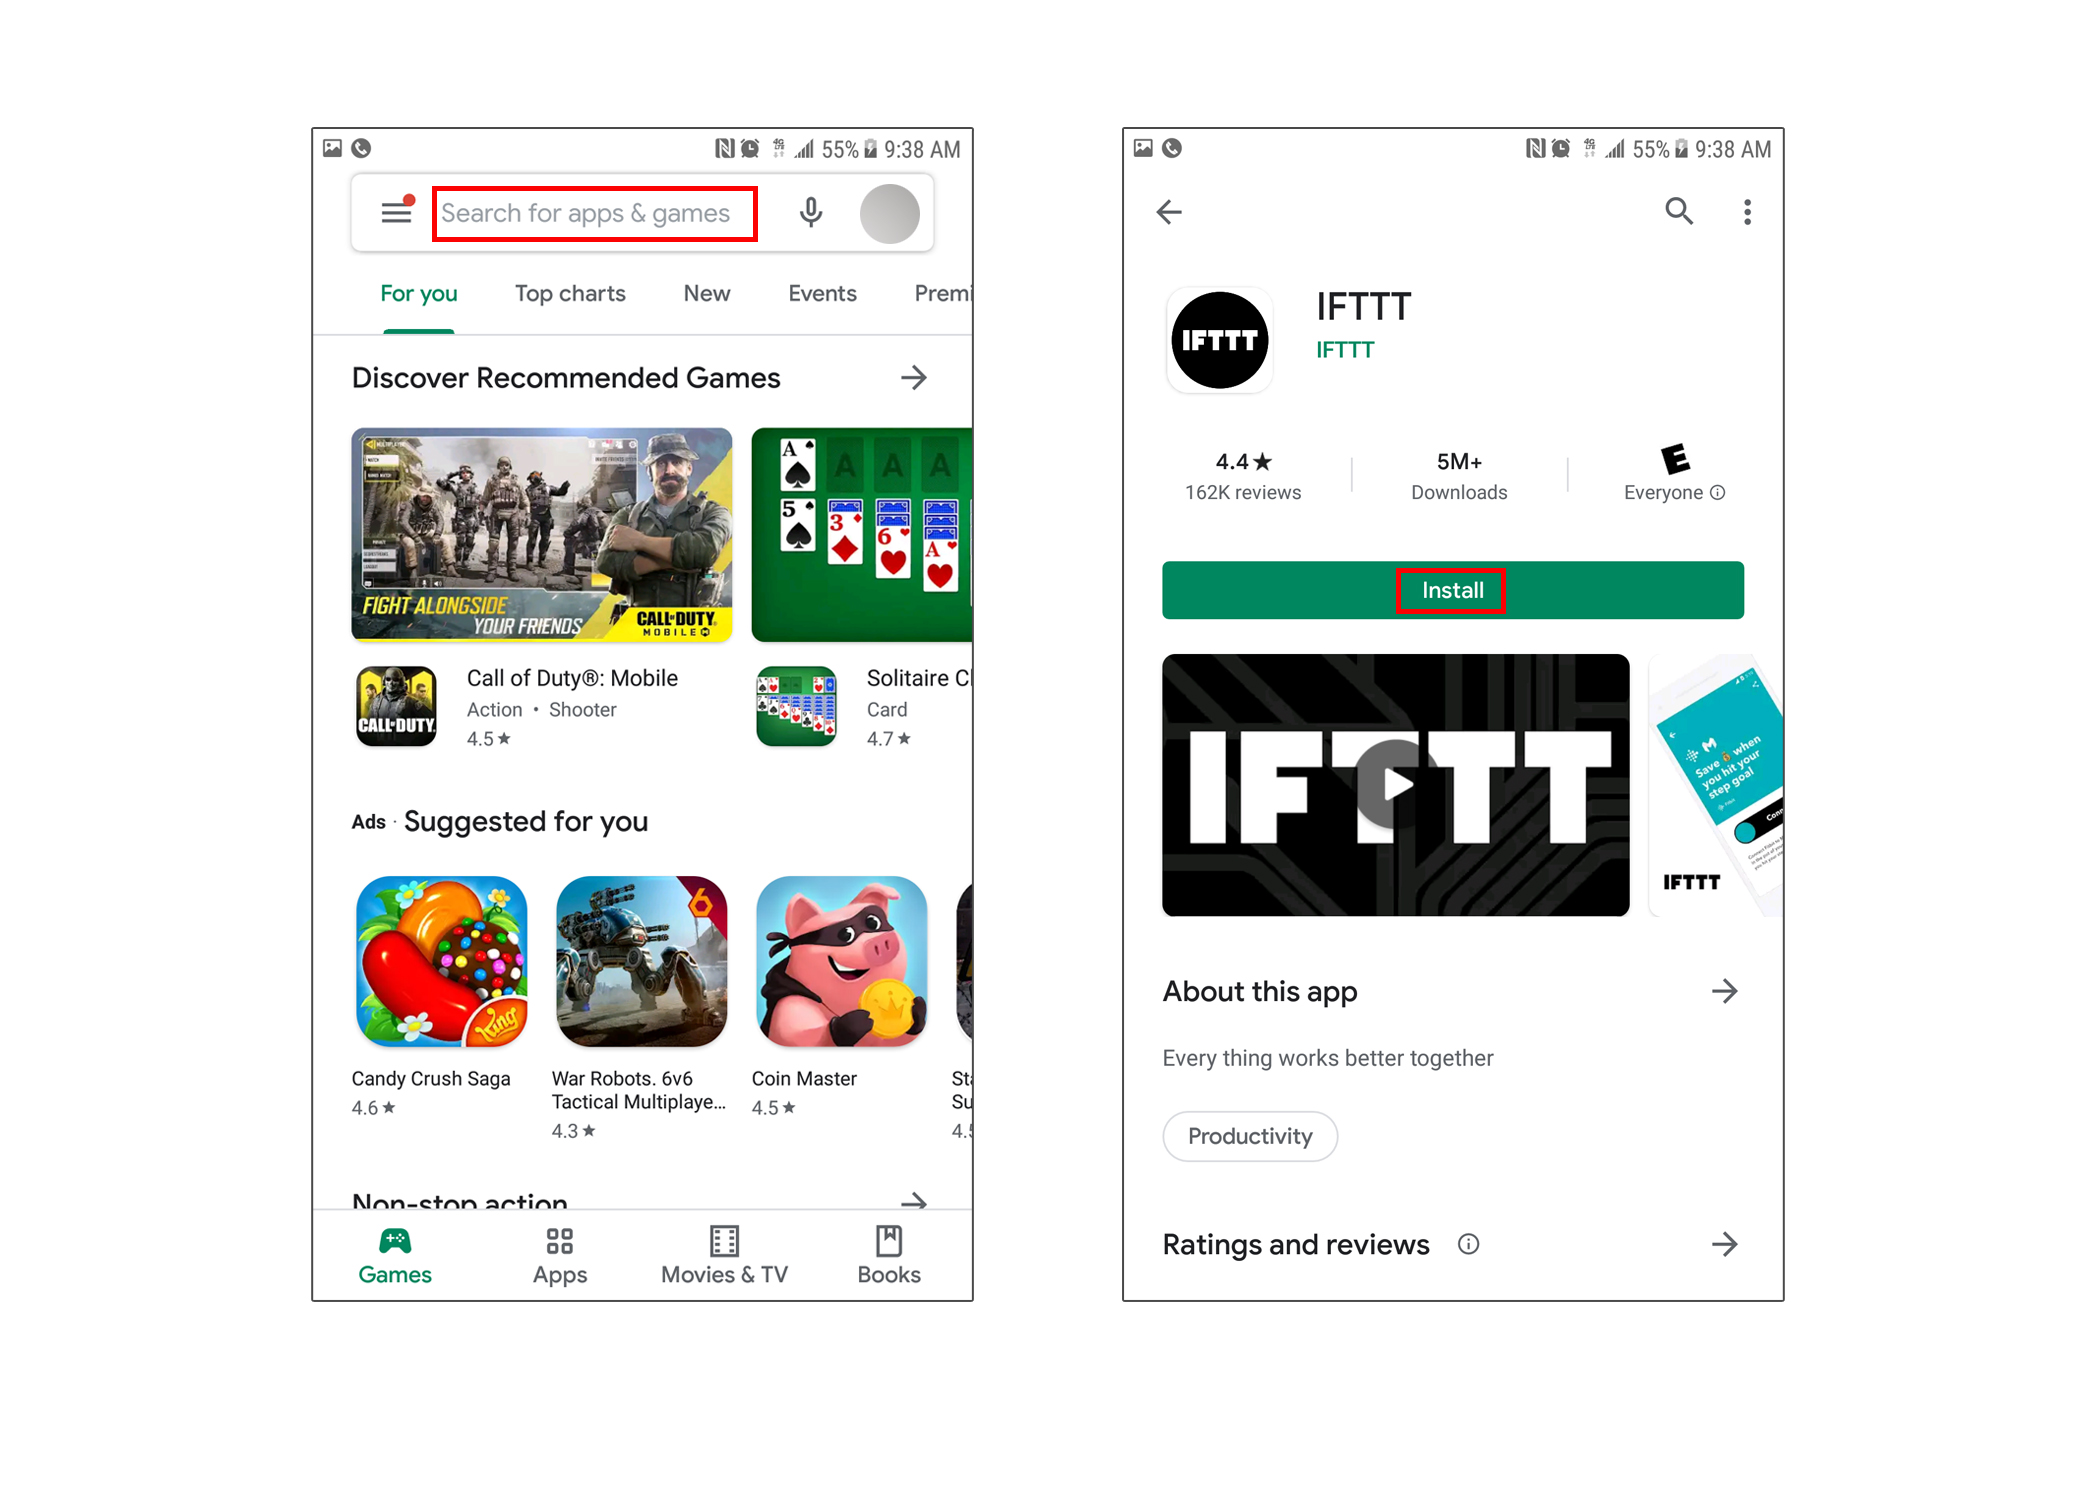
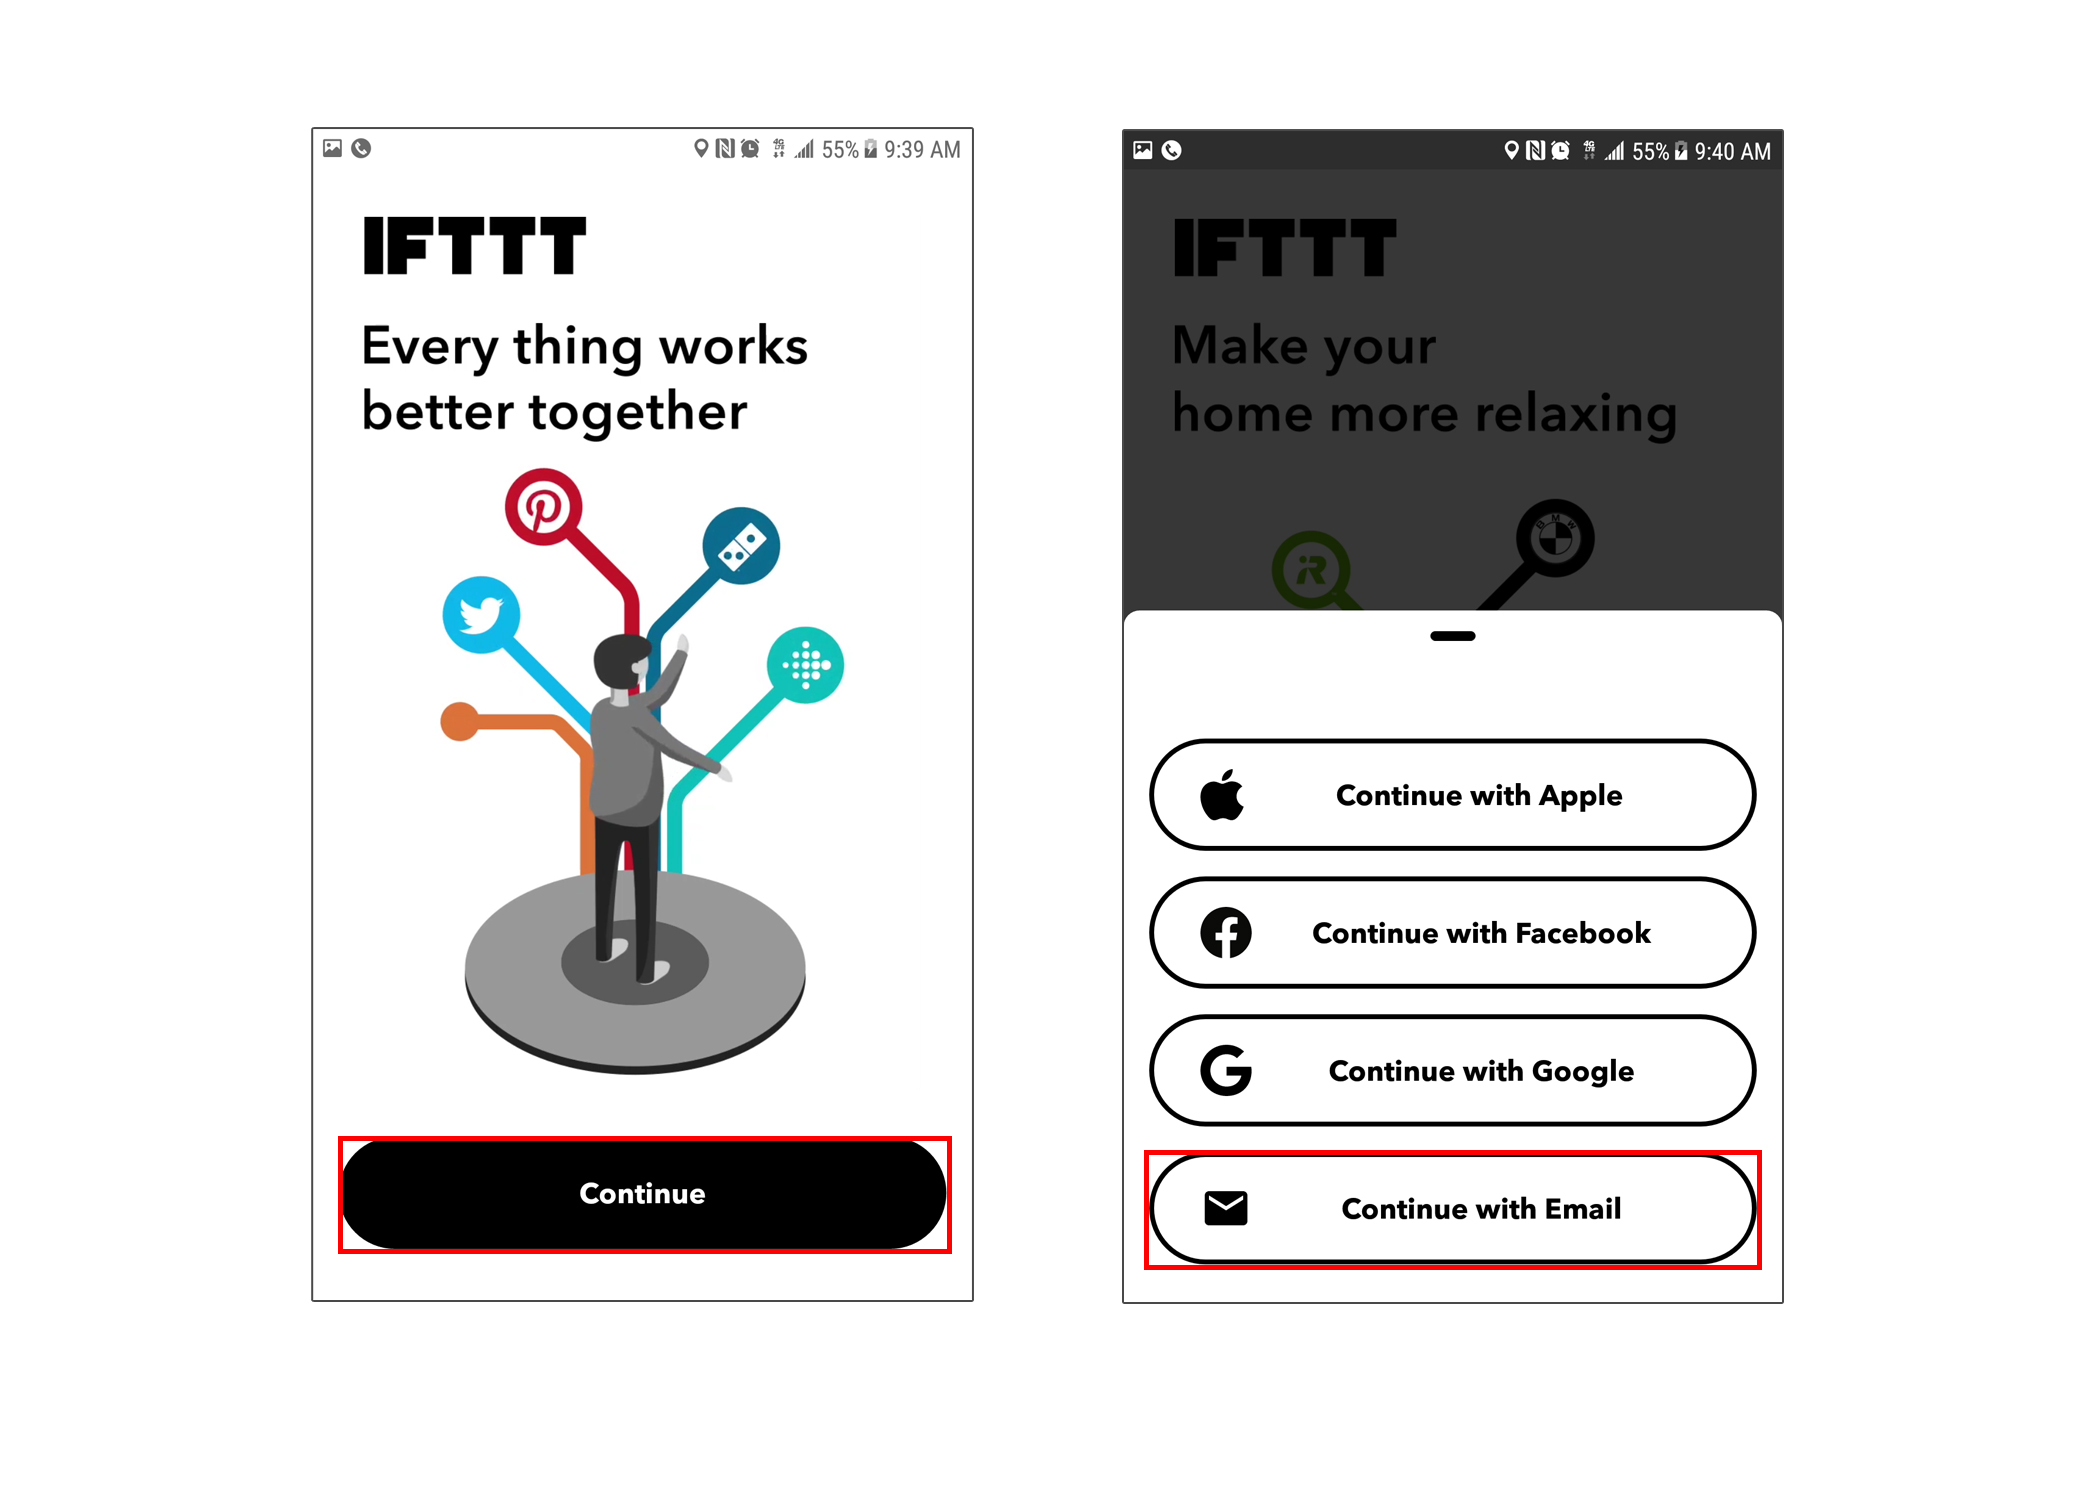
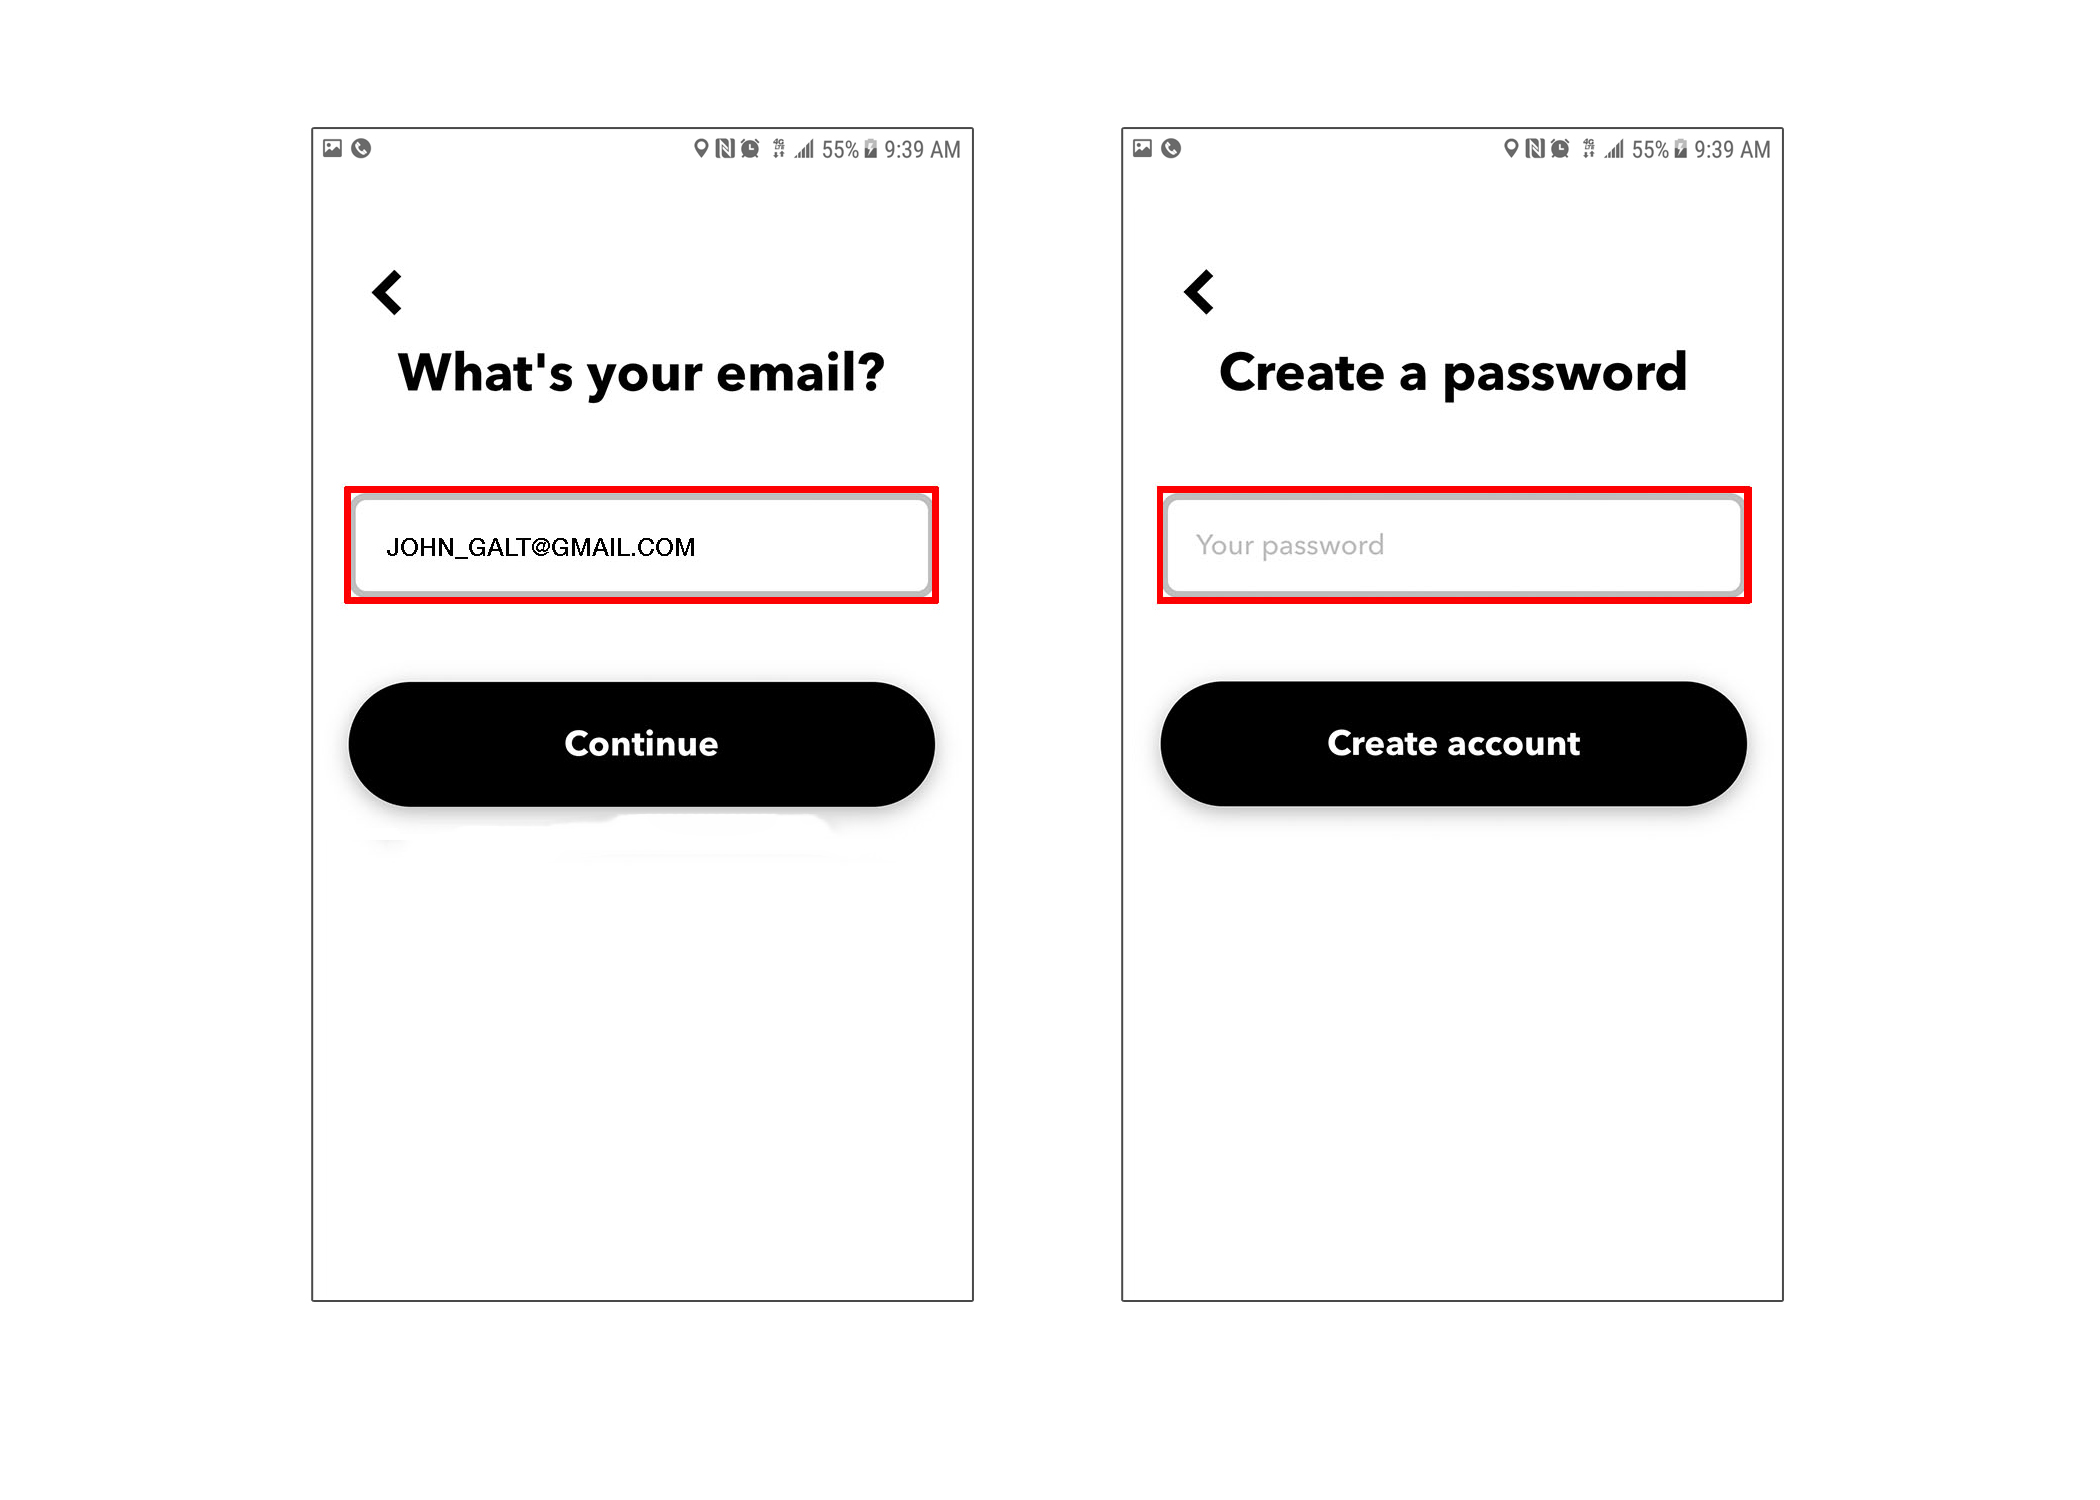
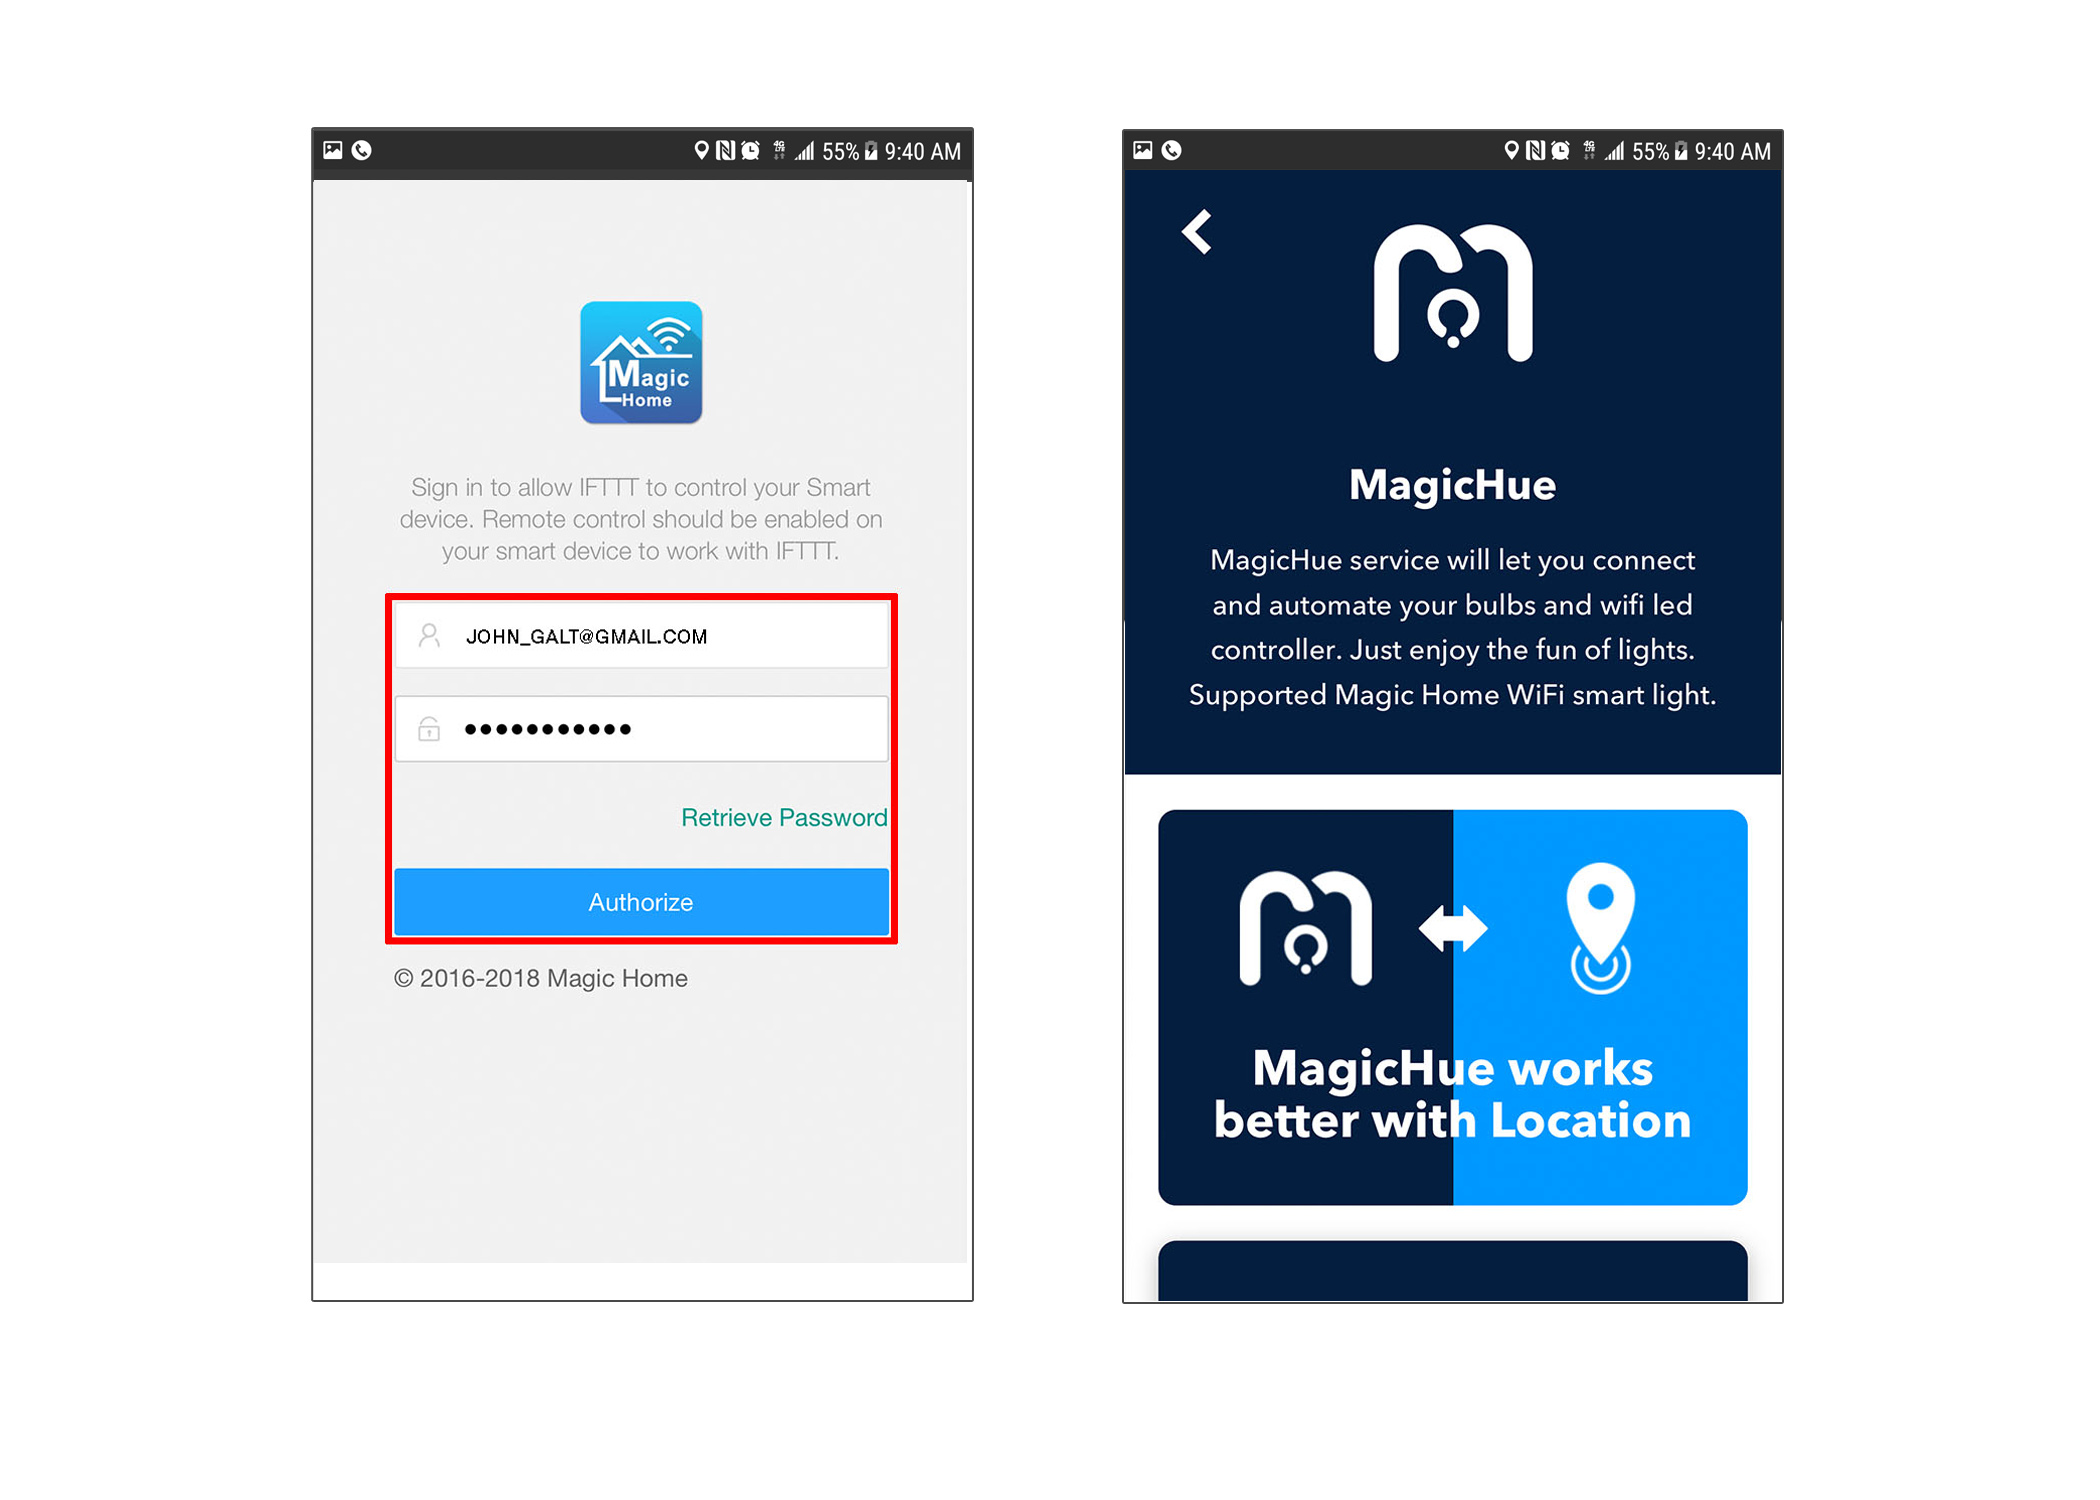
note: [scene] = EFXTM Scene Name.

Your EFXTM Device can be integrated for automation using other third-party apps. IFTTT (If This Then That) is a third-party app that allows you to automate actions or create triggers that will control/affect your EFXTM Device(s). For example, with your geographic GPS location, you can instruct your EFXTM Device to turn off when you are no longer in your home or place of business. You could also program your IFTTT to turn your EFXTM Frame to red color at sunset or to a blue color if it starts raining.


To setup your EFXTM Device with these functions, follow these instructions:

  1. Open the Google Play Store app and search "IFTTT" to download the app.
  2. Select the IFTTT app icon from your home screen to open.
  3. IFTTT Create Account-1.JPG
  4. On the home screen of the IFTTT app, you can select from Apple, Facebook, Google, or Email to create a IFTTT account. (Note: This will be a separate account from your EFXTM Cloud account; it is also suggested to use an email account to sign up)
  5. Enter your desired email and create a password to your IFTTT account.
  6. IFTTT Create Account-1.JPG IFTTT Create Account-2.JPG
  7. On the IFTTT Home Screen, select "Get More" to add widgets provided by IFTTT and its users.
  8. In the search bar, type in "magichue" and select the MagicHue icon.
  9. Select "Connect" to connect the MagicHue applet to your EFXTM Cloud account.
  10. IFTTT EFX Connect-1.JPG IFTTT EFX Connect-2.JPG

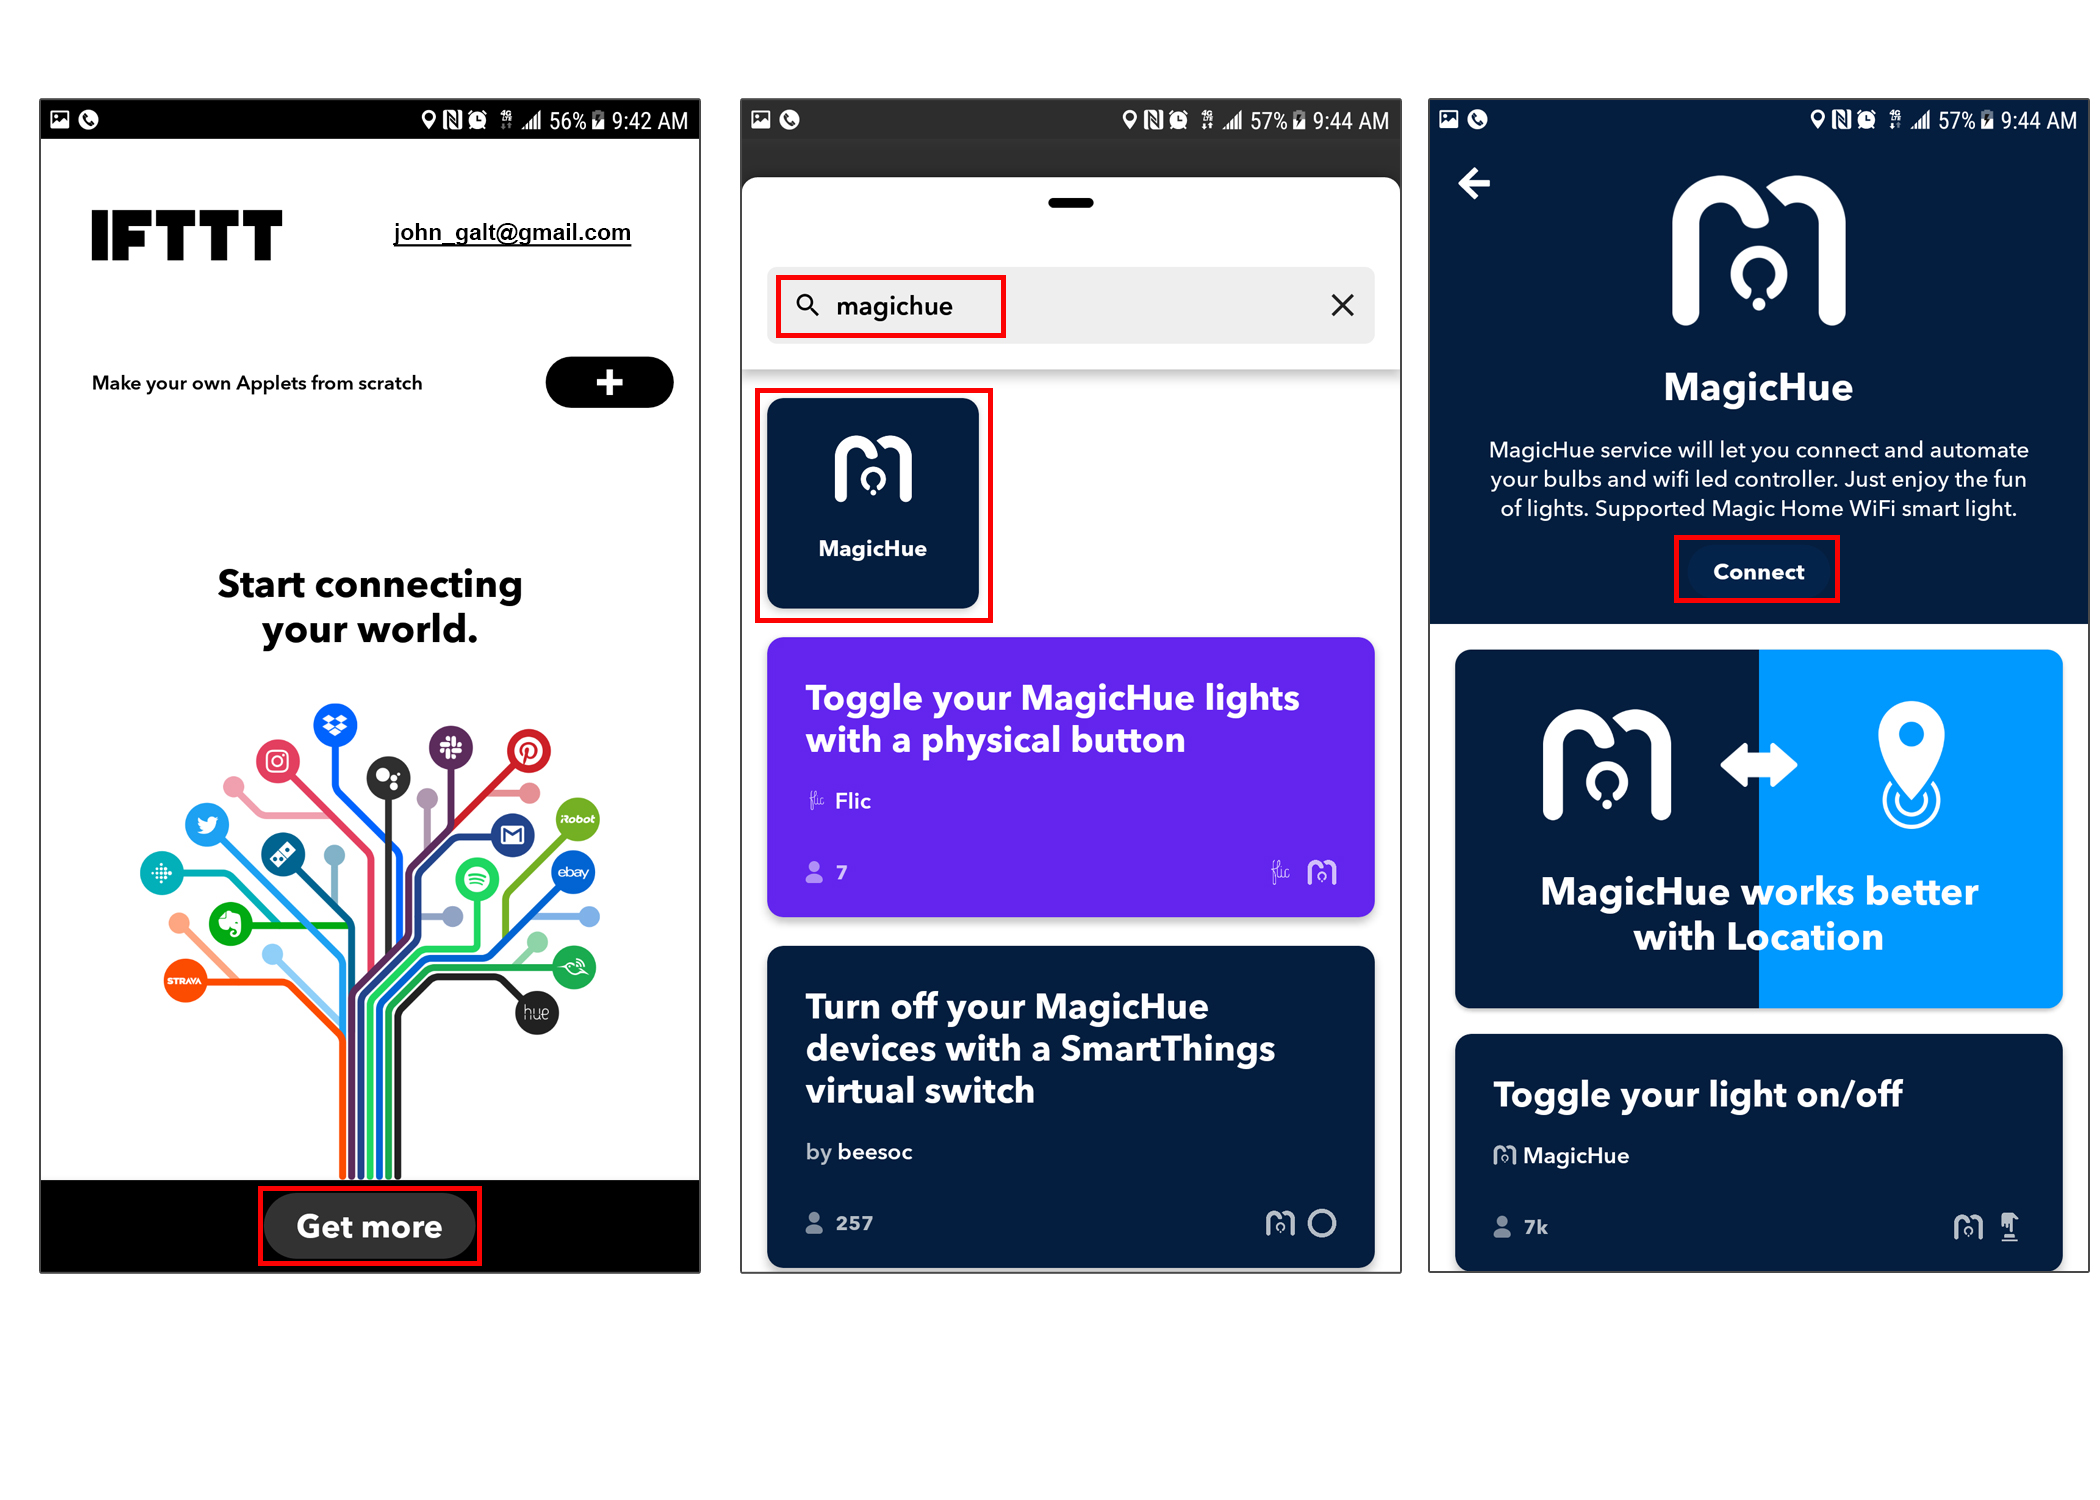
Note: Once added, you are fully setup to add automation tasks to your IFTTT app to control your EFXTM Devices.


To add an automation task, follow these instructions:

  1. Under the MagicHue tab of the IFTTT home screen, there will be a list of automations you can choose to use. (Note: Click into each automation to get more details)
  2. After selecting an automation to use, drag the slider labeled "Connect" to begin the connection process of that automation.
  3. IFTTT EFX Swipe to Connect.JPG
  4. Some automations will require additional setup, in which case you follow the prompts and are able to change certain settings of the automation. (Example: Turning On Your Lights at Sunset can be modified to a specific device, color and brightness level)
  5. Click on the "Save" button at the bottom of the screen to save the automation.
  6. IFTTT EFX Automation Settings.JPG